Scientific vocabulary can be a significant barrier to learning for many students. Success in science requires students to understand and use subject-specific Tier 3 vocabulary accurately, yet many learners encounter these terms for the first time in the classroom. Explicit vocabulary instruction helps students develop the language they need to access scientific concepts, participate in discussions, interpret questions and communicate their understanding. By making vocabulary instruction a deliberate part of our teaching, we can improve both literacy and science outcomes.
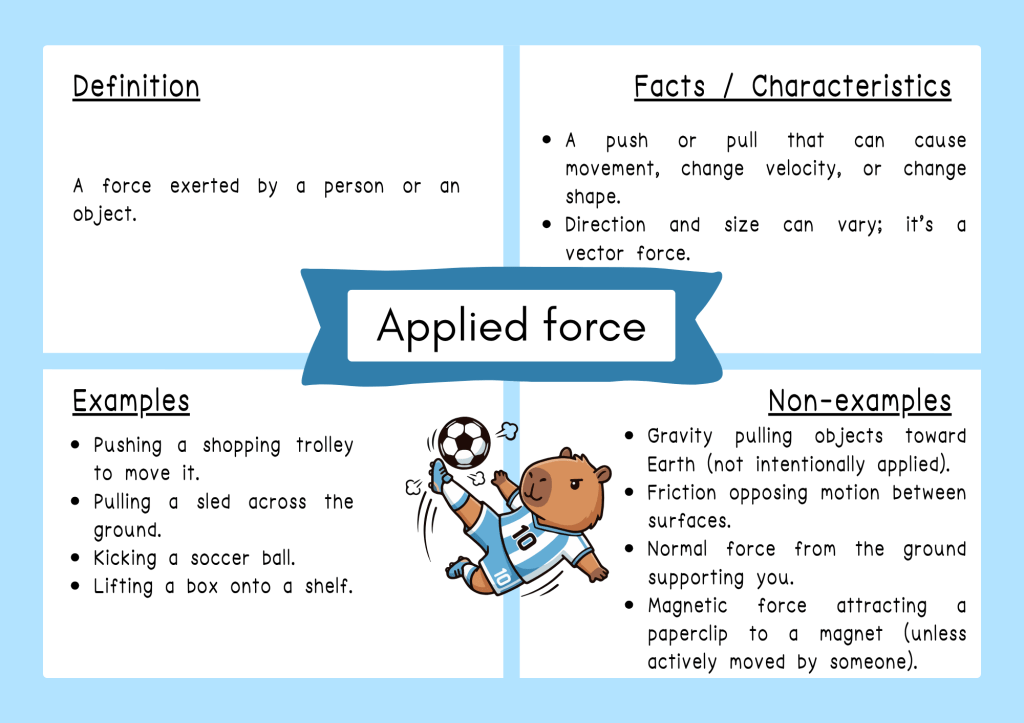
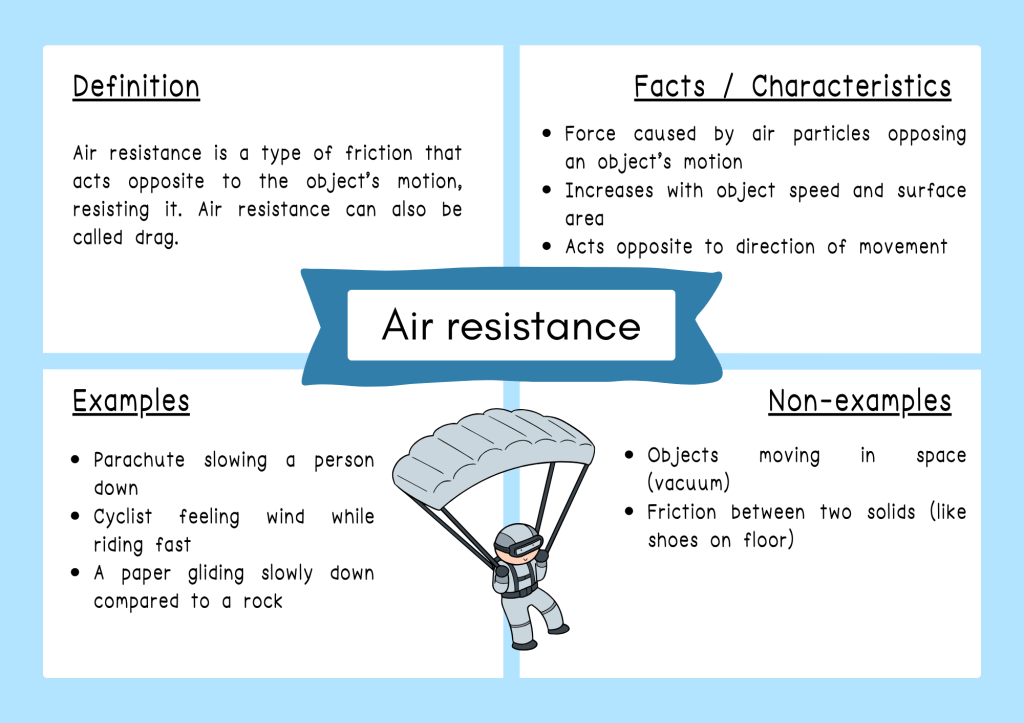
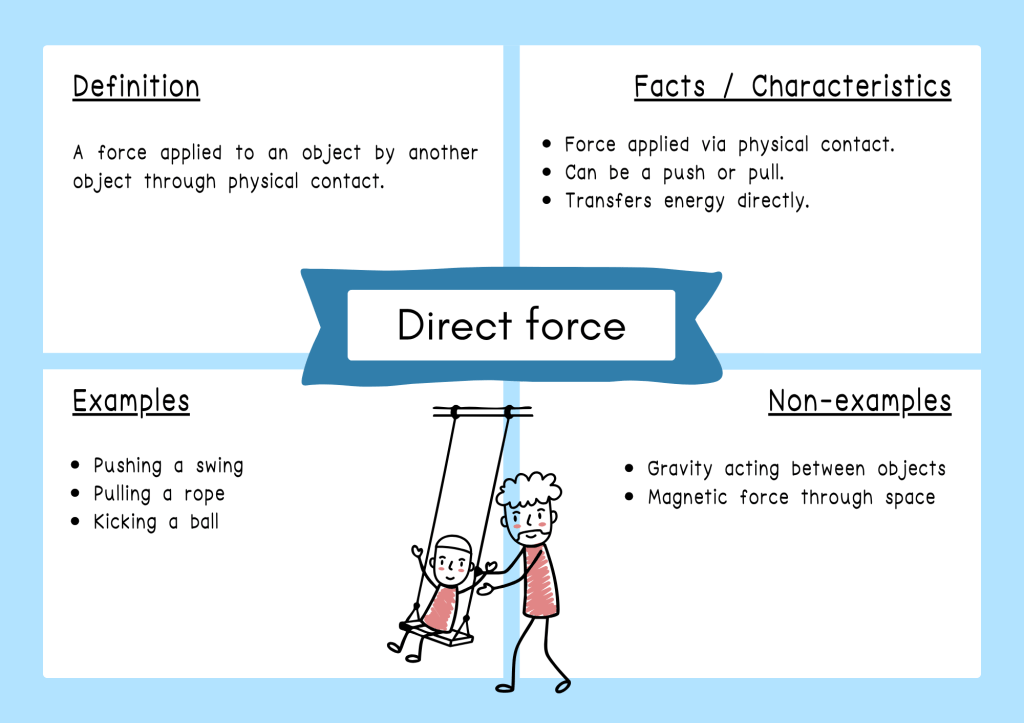
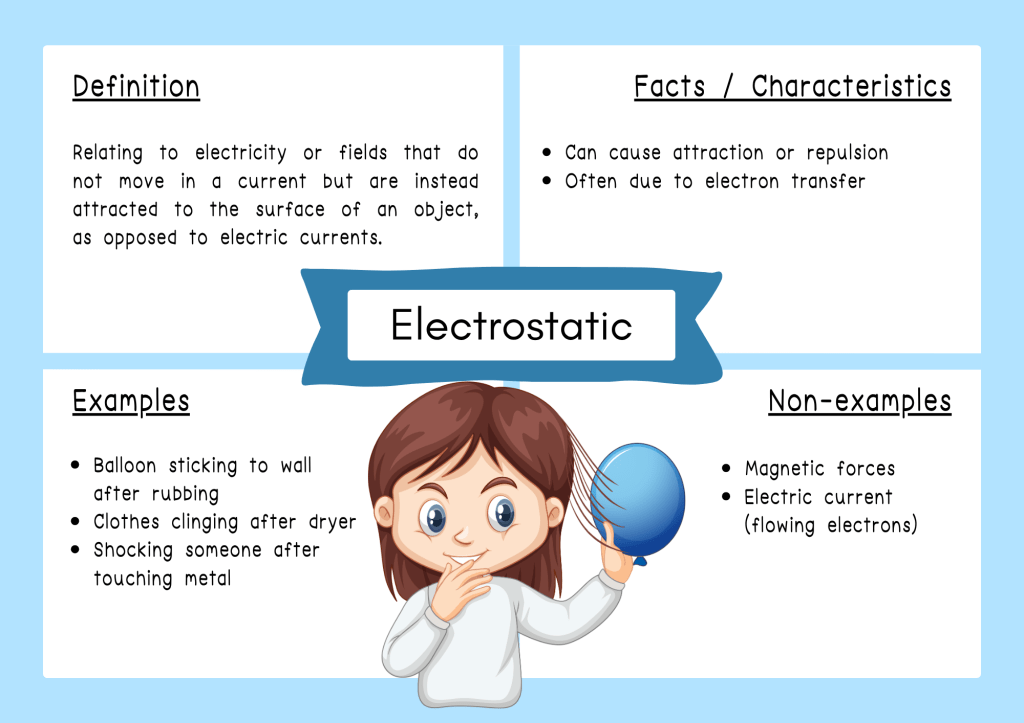
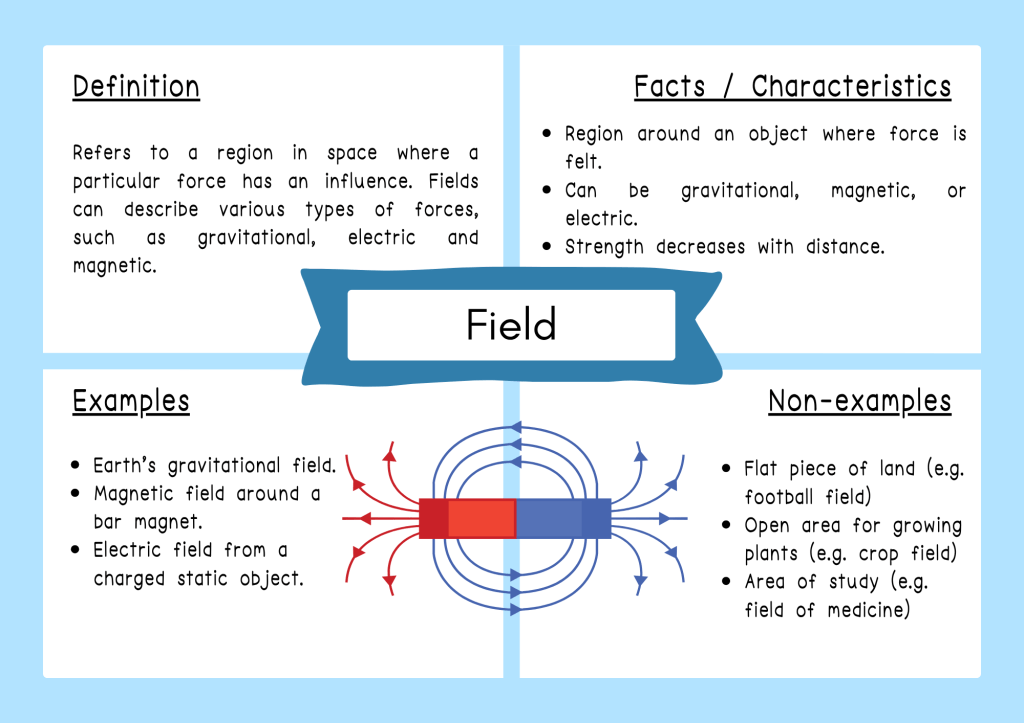
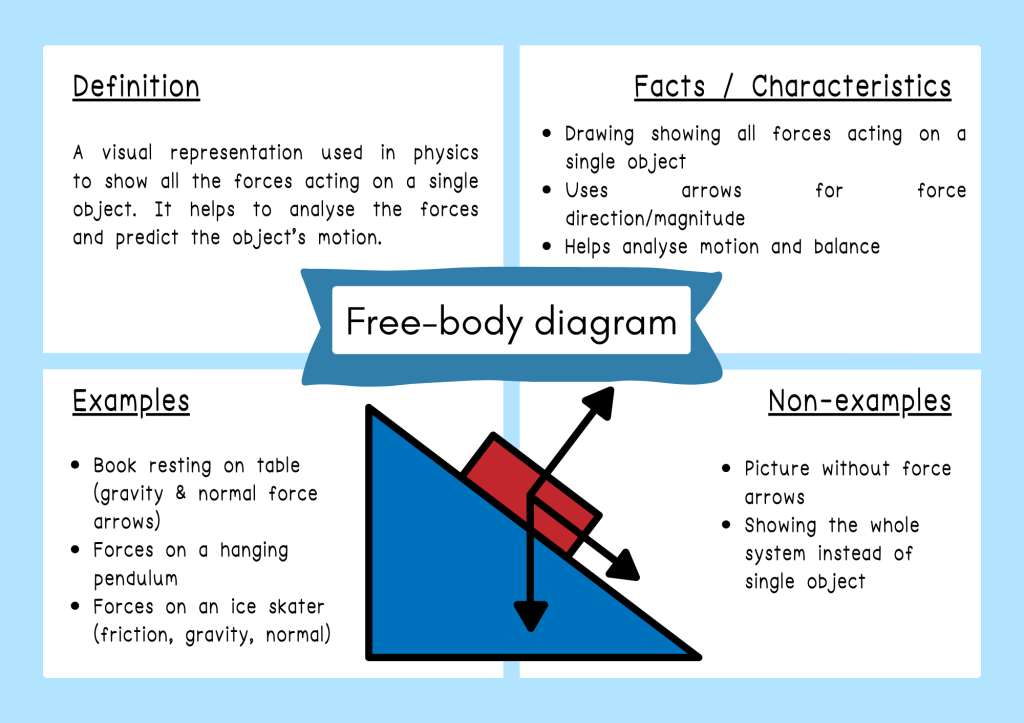
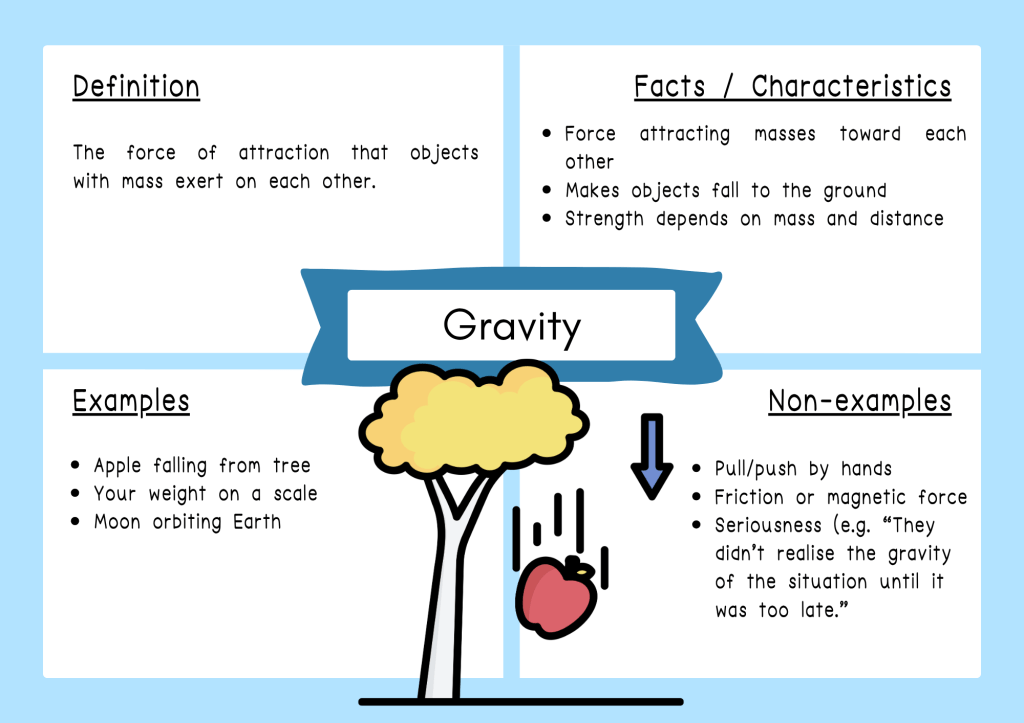
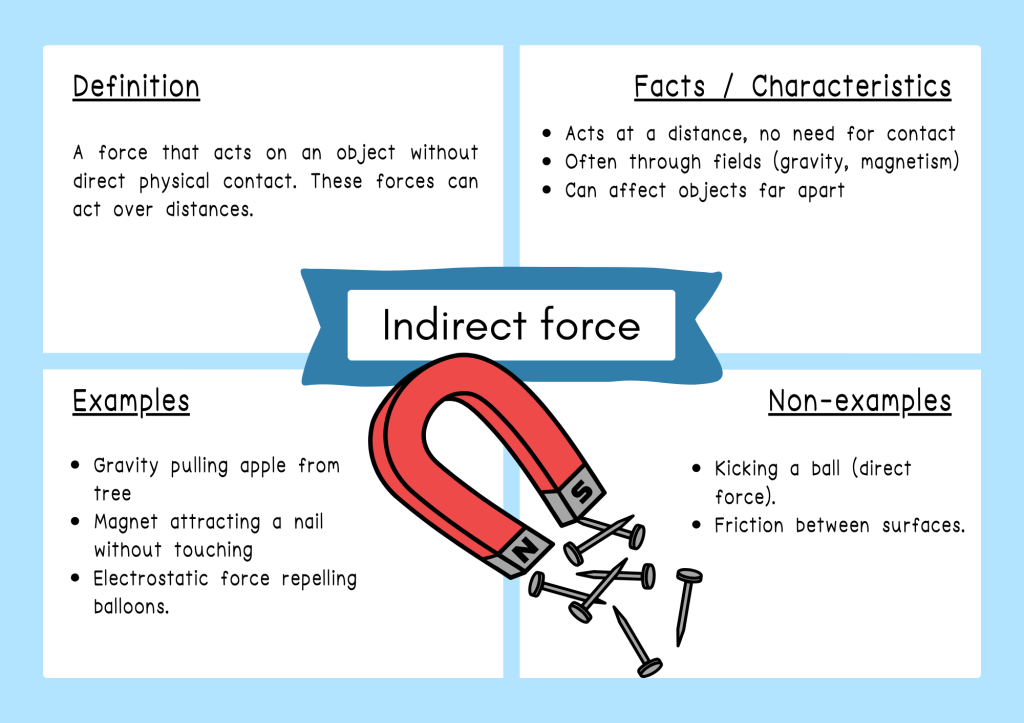
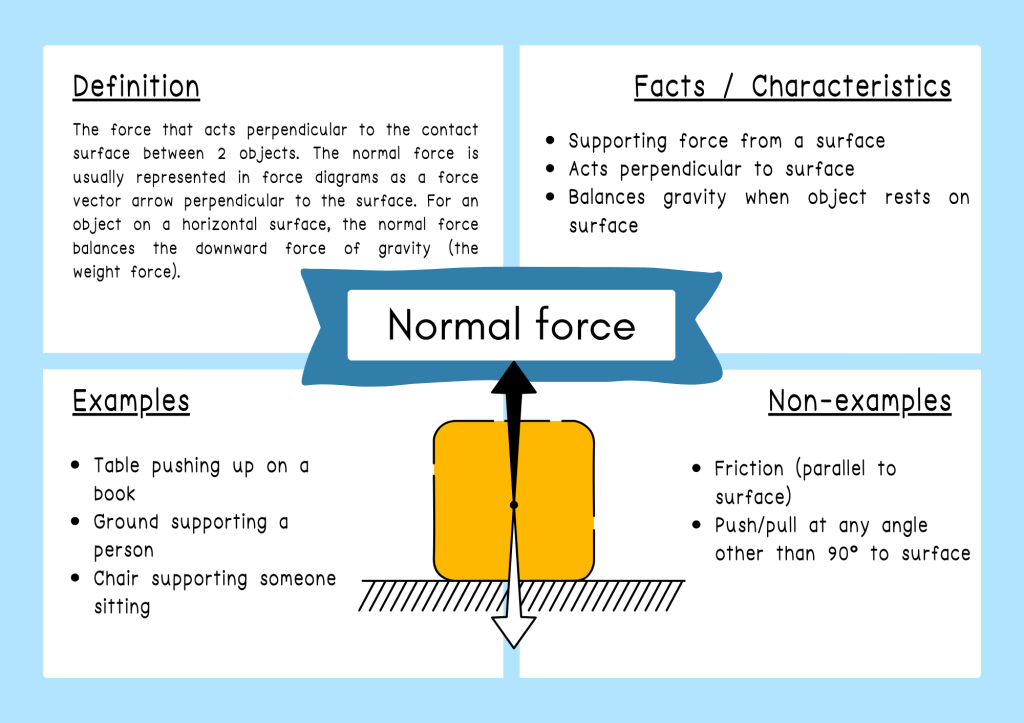
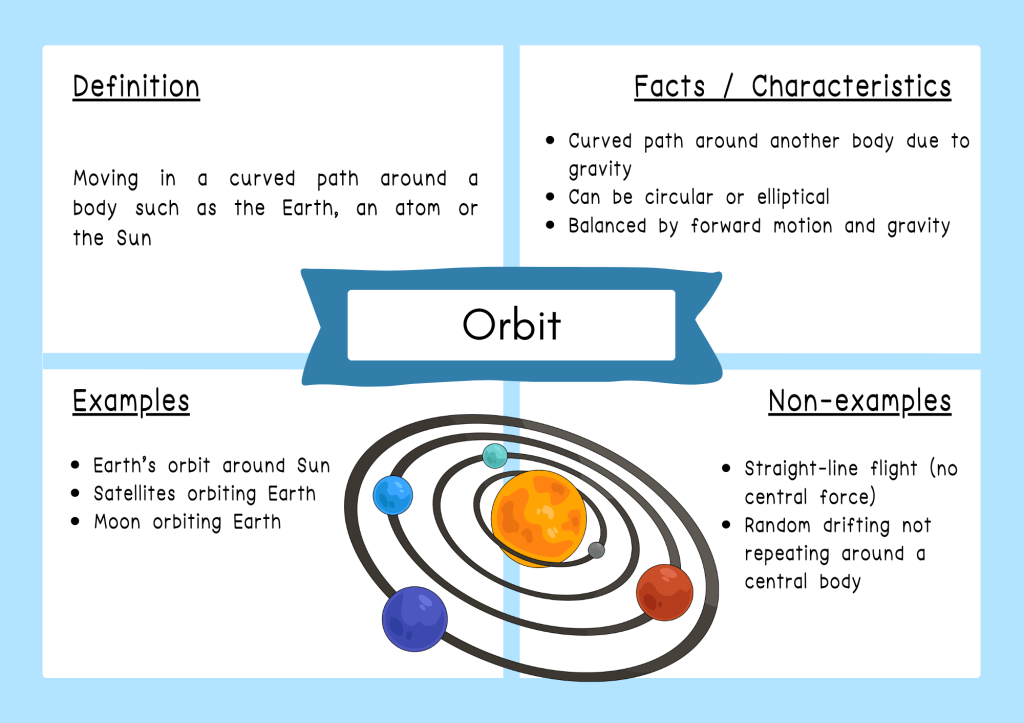
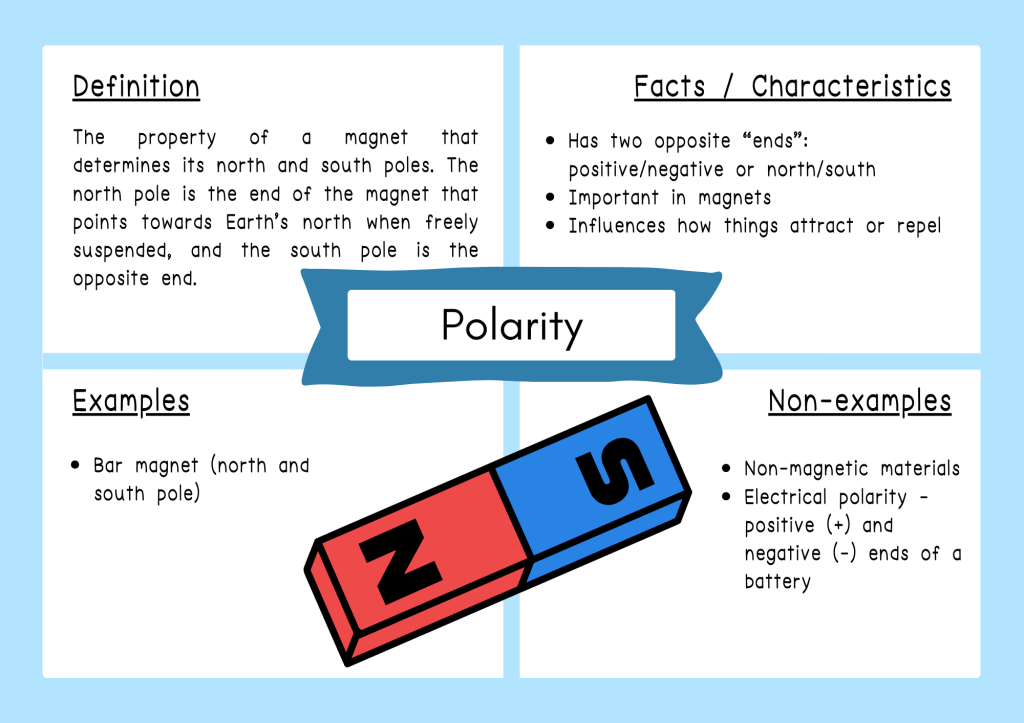
To support explicit vocabulary teaching in a Year 7 Forces unit, I have created a set of Frayer Model posters for key Tier 3 terms. The Frayer Model is a graphic organiser that helps students build a deep understanding of vocabulary by exploring four elements: the definition of a term, its characteristics, examples and non-examples. This approach encourages students to move beyond simply memorising definitions and instead develop a richer understanding of how scientific terms are used in context.
The posters can be displayed around the classroom as a visual reference throughout the unit, incorporated into explicit teaching lessons, or used as part of revision activities. They also lend themselves well to literacy-focused tasks. Students can use the posters to participate in vocabulary games, create their own Frayer Models or use the information to construct scientific explanations. Teachers might use them as a stimulus for think-pair-share discussions exit tickets, or annotation tasks during reading. The posters can also support students when unpacking scientific texts by providing a reference point for unfamiliar terminology encountered in textbooks, worksheets and assessment tasks.
If you are looking for a simple way to strengthen scientific literacy while teaching forces, feel free to download these free Year 7 Forces Frayer Model posters and use them in your classroom.
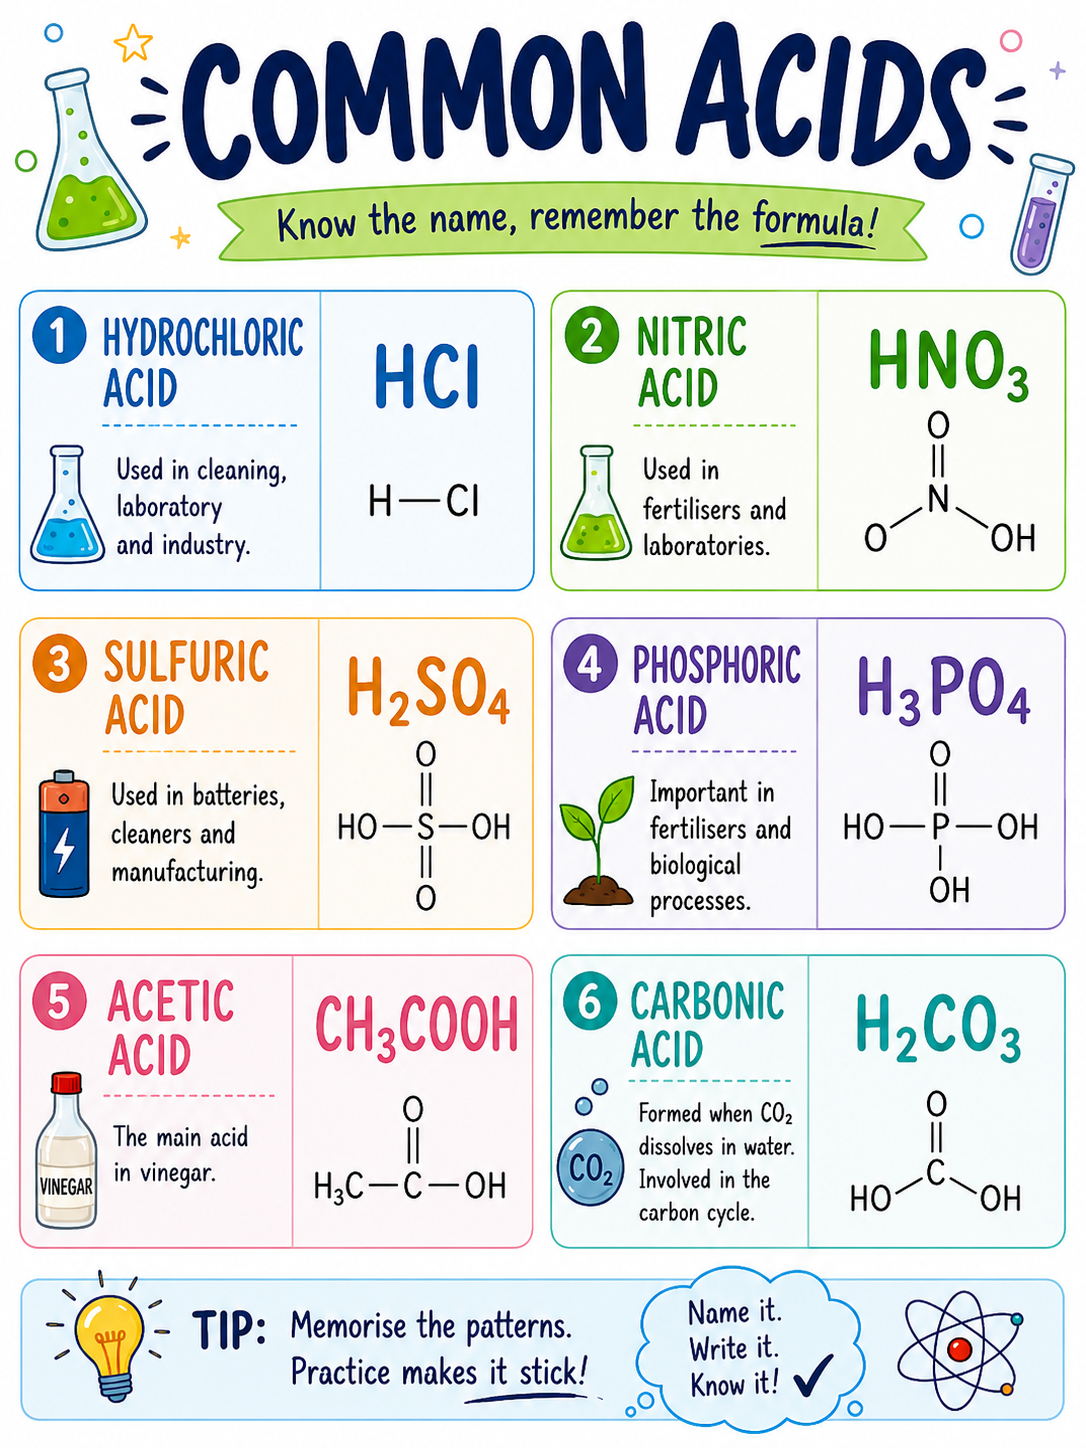
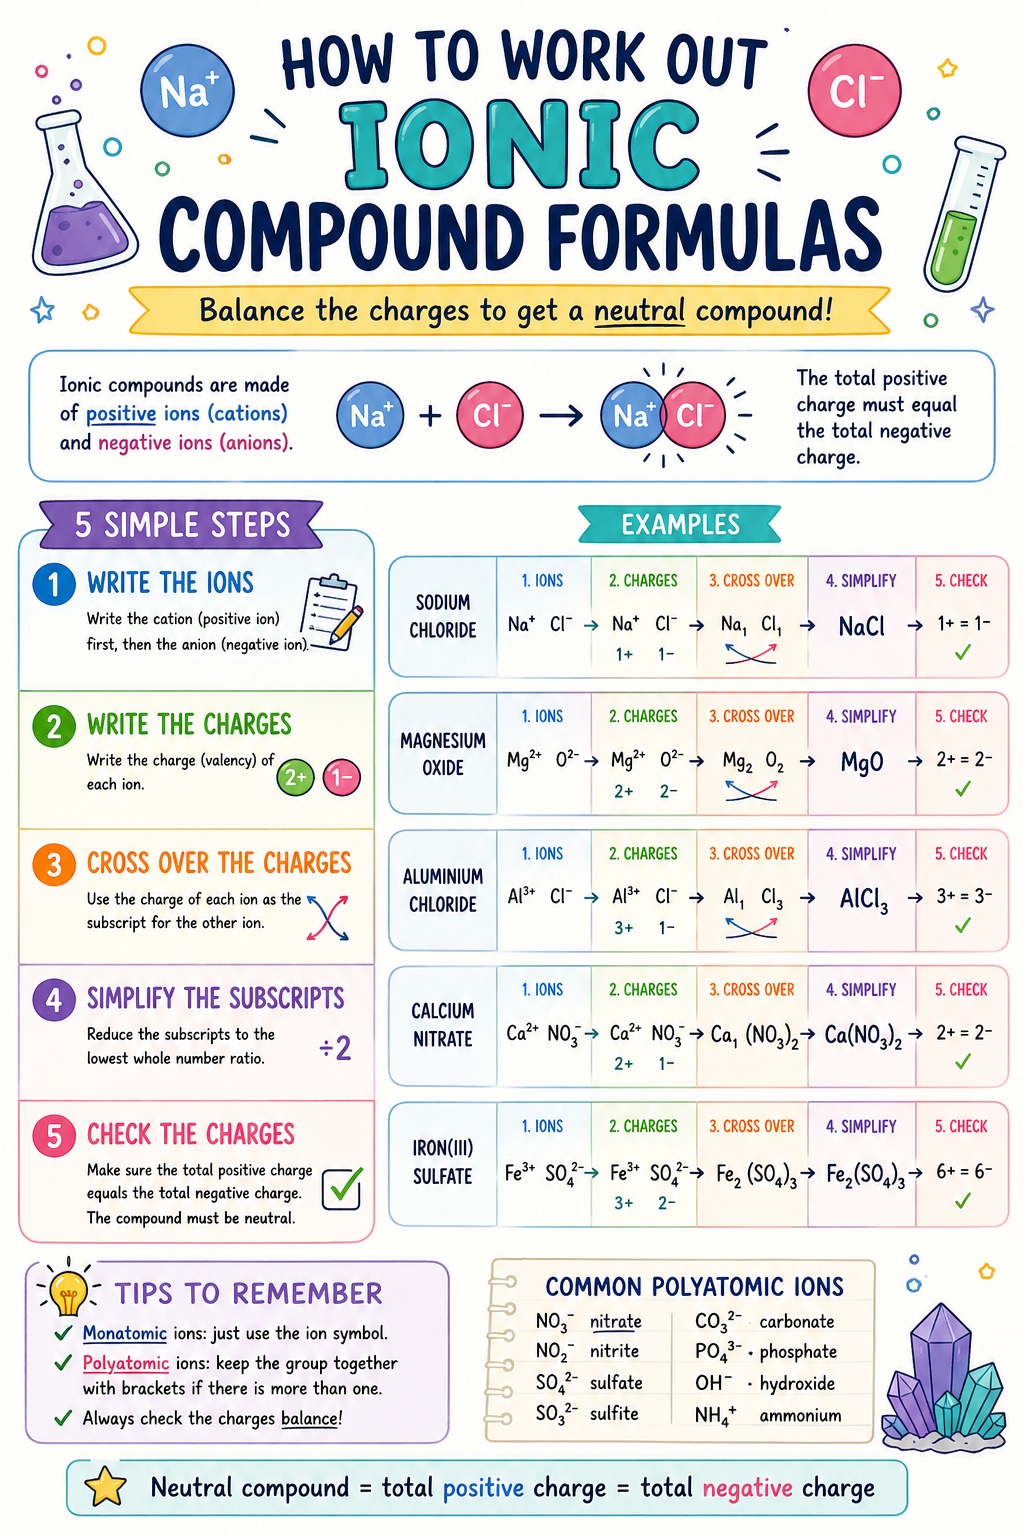
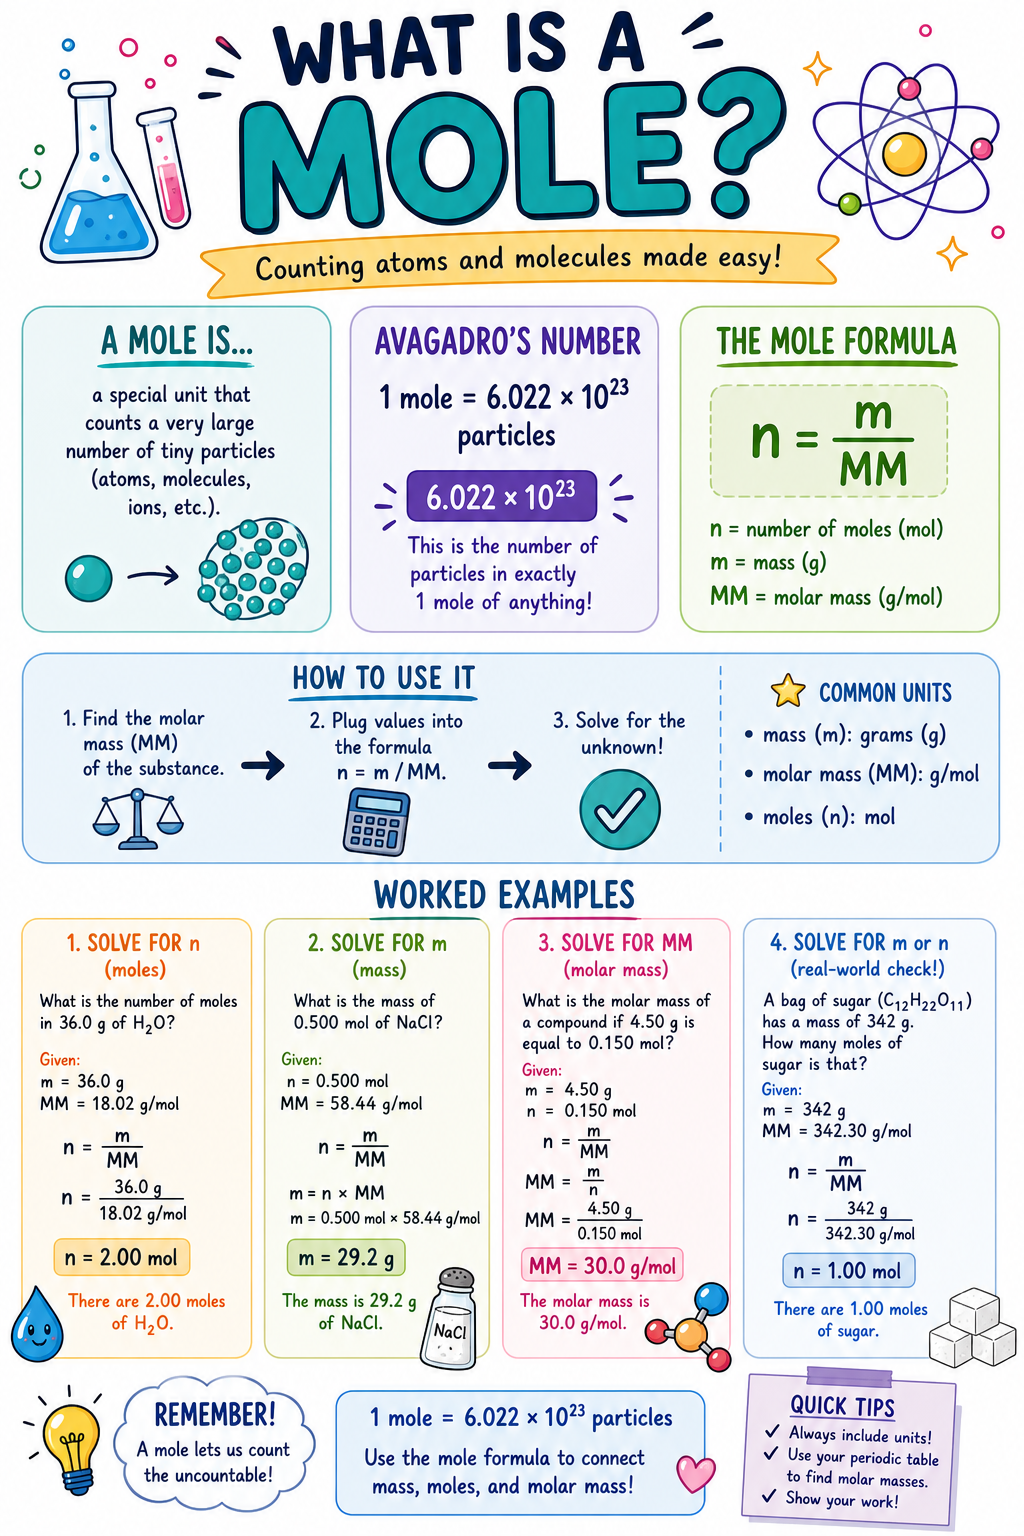
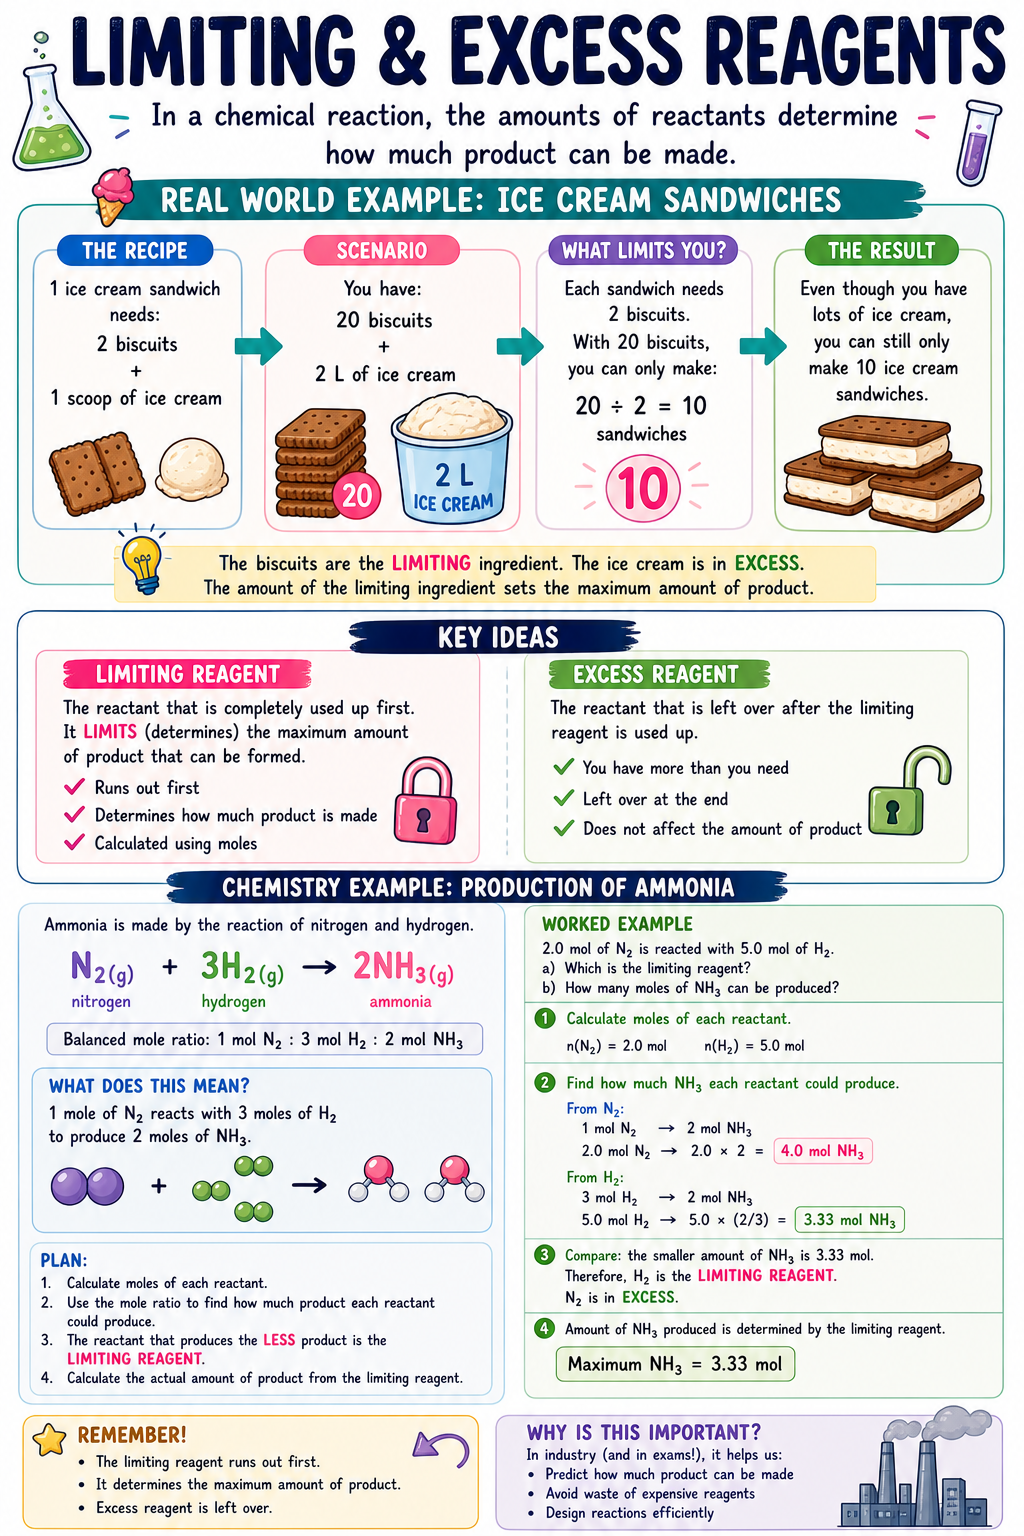
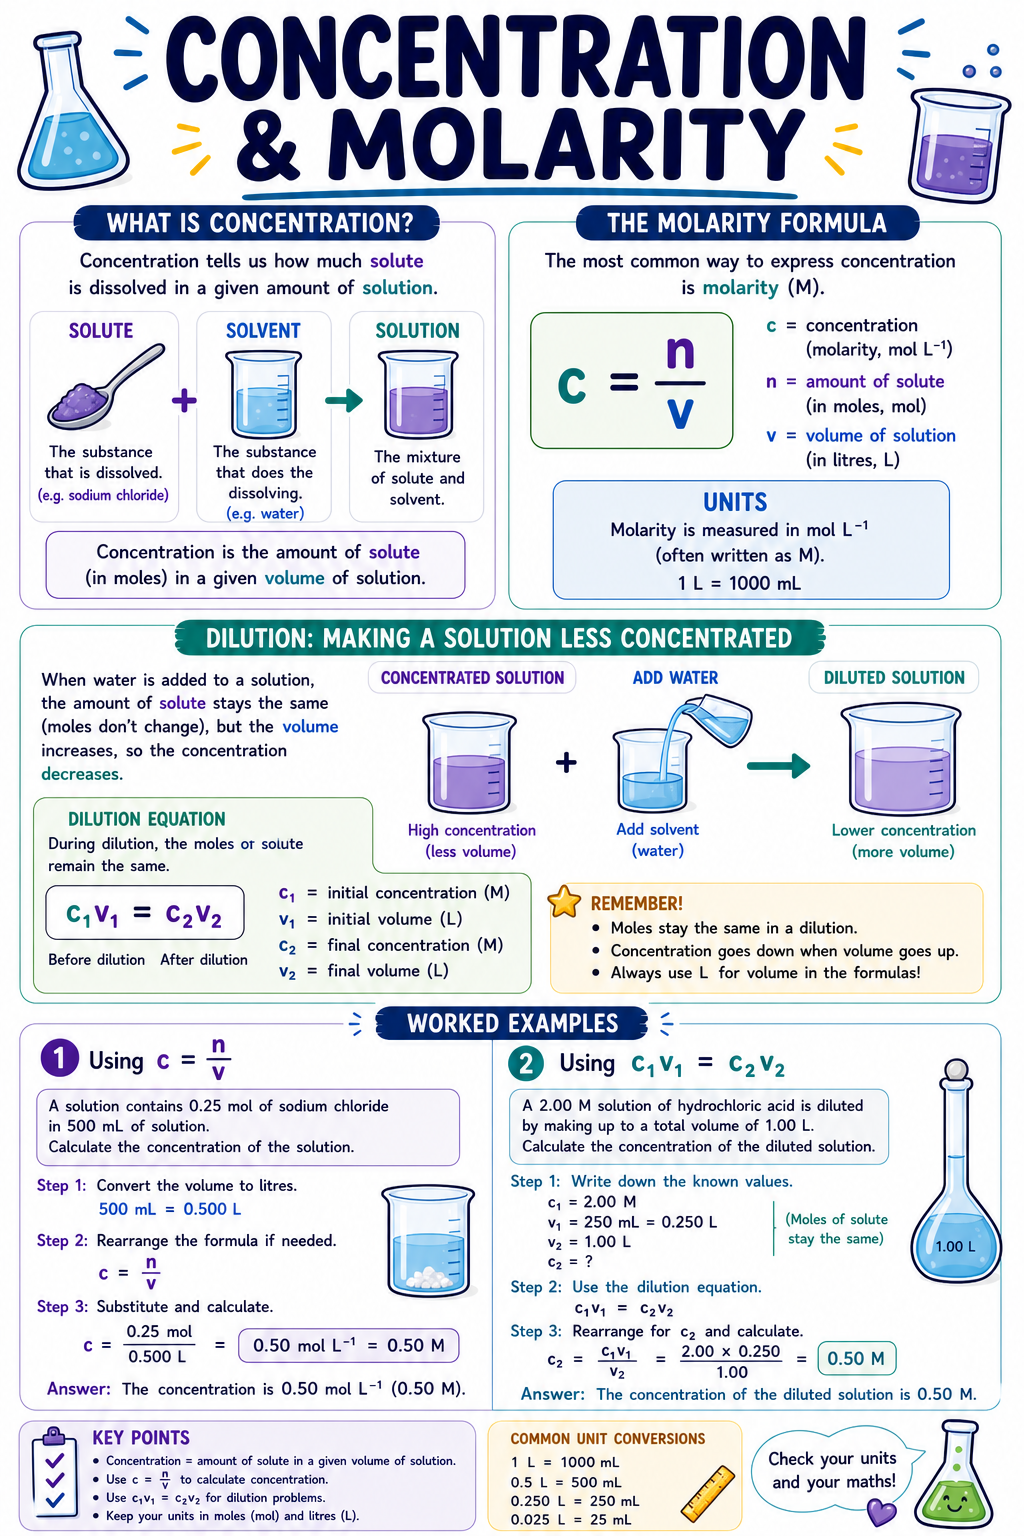
I love posters and infographics. There’ something about explaining a complex concept visually that makes it more fun, interesting and easier to understand. I would identify important concepts that students need to understand in chemistry and want to make a poster for it, but would need to use Canva to create it. Using Canva to turn an idea to a visual product takes time. A LOT of time.
Now I use Gen AI. I’ve been playing with prompts and have generated the following posters. I really like how I can tell Gen AI how I want the concept broken down (I do need to give very specific and explicit instructions on breaking down a concept in the prompt. It’s not as simple as “Make me poster on this concept.”) and it will create something for me in a matter of seconds. No more mucking around with Canva trying to find the right template to work from and finding the appropriate graphics.
So here is a small collection for Year 11 Chemistry Modules 1 and 2. Feel free to download. Print them in A3 or larger for your classroom and give them to your students as infographics for their study notes.
Let me know what you think. All feedback is welcome. On some posters, I had to tell the AI to make corrections. Some posters I’ve abandoned because the AI just kept making errors.
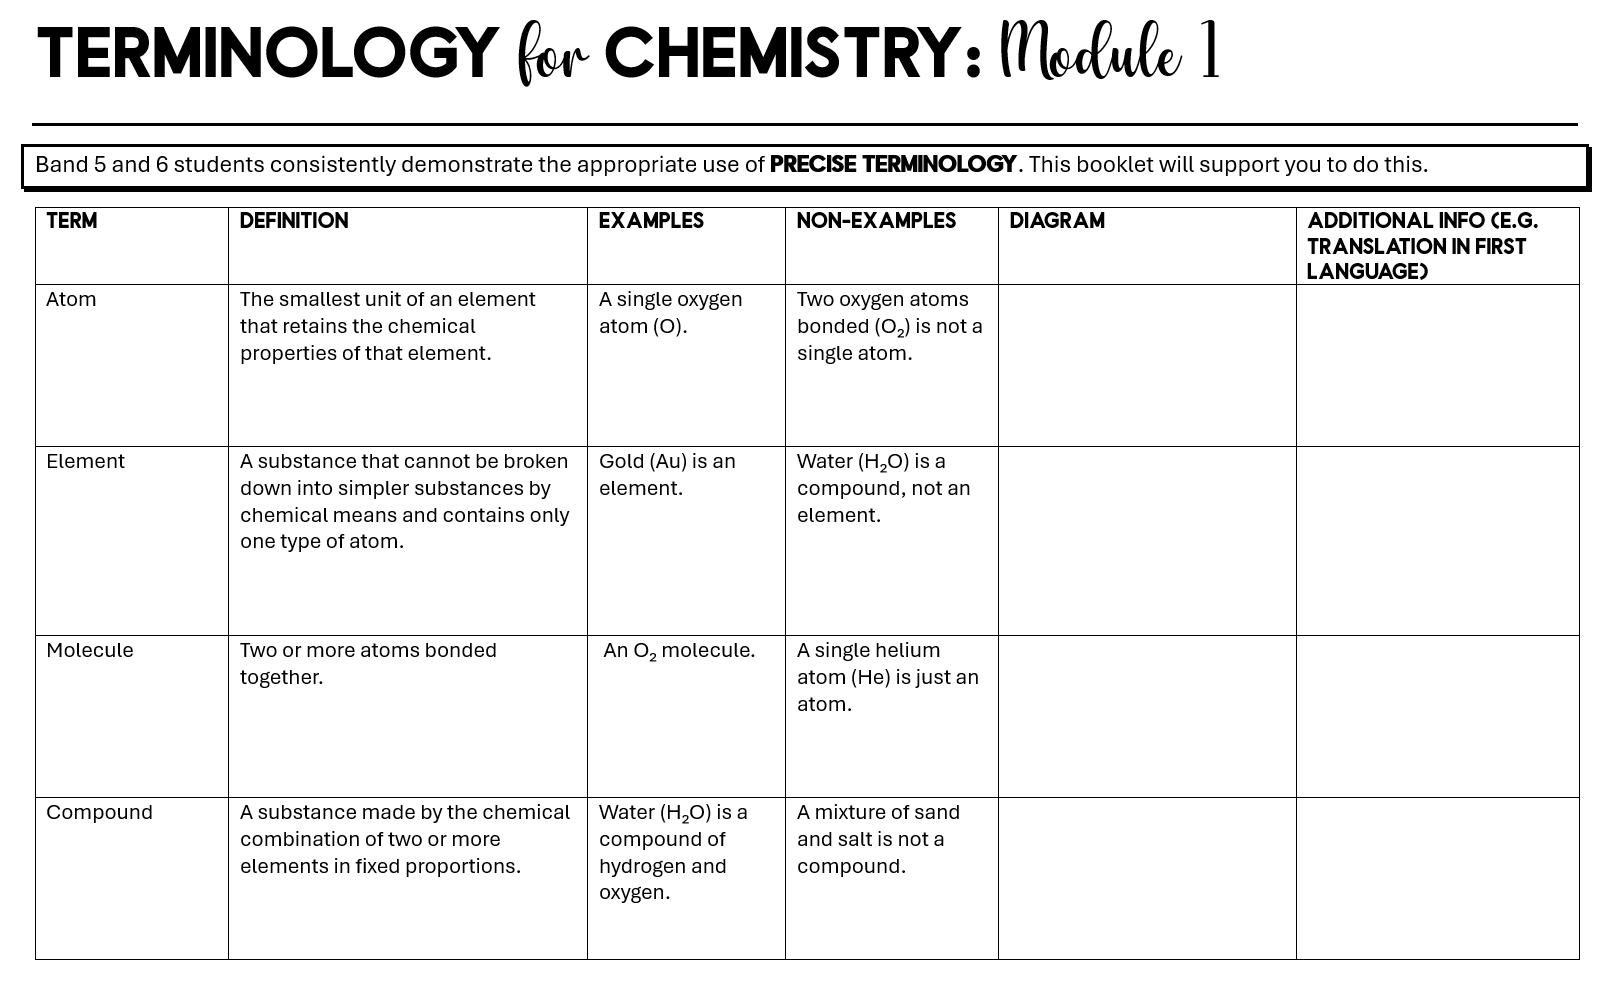
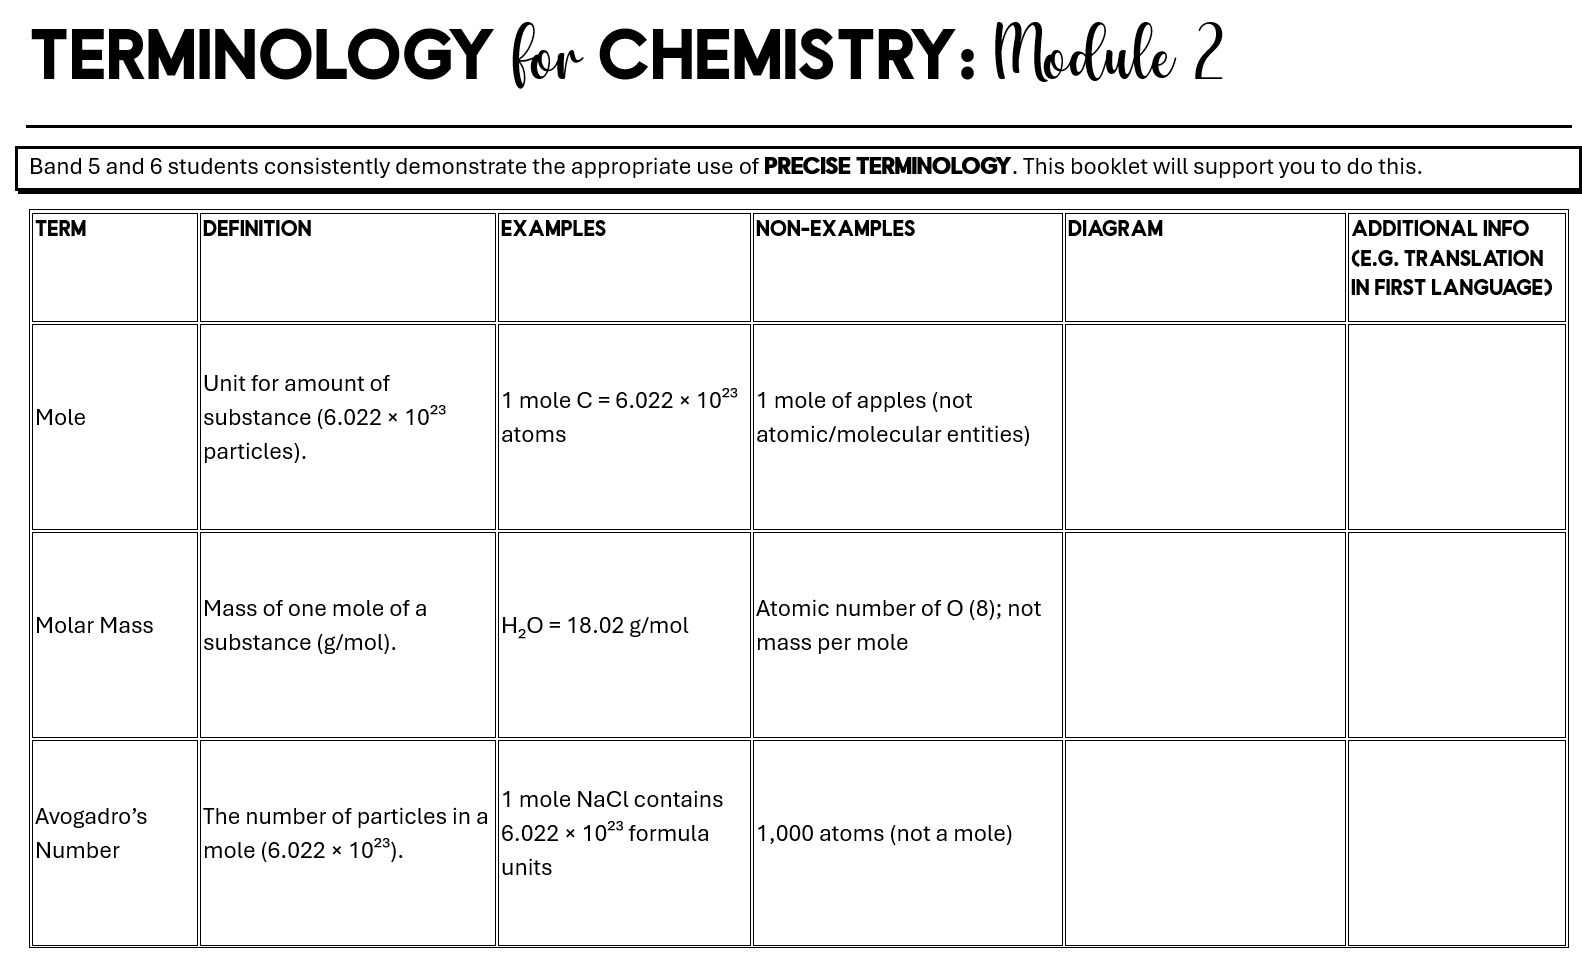
One key skill HSC Chemistry students need to have if they are aiming for a Band 5/6 is the ability to consistently use precise terminology when communicating their understanding. For students learning English as an additional language/dialect (EAL/D), this can be an additional challenge. This year I have a higher proportion of EAL/D students in my chemistry class than previous years so I am dedicating more time to explicitly teach precise terminology in each module. My school’s EAL/D specialist teacher and I developed precise terminology booklets for Module 1 and Module 2. The booklets are inspired by the Frayer Model and has a space for additional information which EAL/D students can translate into their first language if they wish. We will be dedicating team teaching lessons to explicit teach the application of precise terminology. So to share and care, below are the downloadable and editable booklets. Modules 3 and 4 will be coming soon.
After teaching for almost 15 years, here are three STEM activities I have done many times that need zero (almost) preparation and use materials readily available in nearly every classroom. These activities can work from middle primary to middle secondary but can be adapted to suit younger and older learners. These activities work really well without worksheets so no photocopying is required. They also work indoors or outdoors. You can literally walk into a class with just yourself and run these activities. And best of all, students love them!
All of them can be used to explore concepts in science mathematics and technology such as:
Science – fair testing, investigation design, data processing and representation
Mathematics – data and representation of data
Technology – design process and coding
You can incorporate literacy activities such as writing procedures and recounts.
So whether you need a quick activity for your own class or you are covering someone else’s class in short notice and need something hands-on and engaging, check out these activities and add them to your toolkit of anywhere anytime lesson activities.
Note these activities need timers. I usually ask students to use the stopwatch/timer app on their mobile phones. However, if you are teaching younger students who wouldn’t have mobile phones or you are working in a school where students are not allowed to have phones in class, you can ask students to use the stopwatch/timer app on their laptops or go online and use Google Timer. You can also display Google Timer on the interactive classroom screen for the class to use.
Paper helicopters
Materials and equipment needed – paper, scissors, paper clips, timer
Paper helicopters are also known as rotocopters. An internet search for paper helicopters or rotocopters will generate lots of results. I particularly like this page, which has instructions, explanations and templates. If you can’t print the templates, you can ask students to draw their own templates. The video below also shows how to draw the templates.
Paper helicopters are great for teaching fair testing, average calculations and presenting data in tables and graphs. For some classes, I also like to link them to adaptations in seeds, particularly sycamore seeds like the video below.
Paper planes
Materials and equipment needed – paper, timer
Almost every student knows how to fold a paper plane, but instead of folding a plane that flies the furthest, have a competition to see who can fold a paper plane that has the longest flight time. This is a good option as it doesn’t need metre rulers or tape measures; just a phone timer (see the above note if your students do not have phones). I like to have students explore the Fold ‘N’ Fly website, which has a large range of paper plane designs with written and video instructions.
You can also show the class a short clip from the movie, Paper Planes, to introduce the activity.
Exercise and heart rate
Materials and equipment – timer
This is one of my favourite activities. It gets students moving and can be linked to many concepts, particularly in science. The idea is simple. Have students measure their resting heart rate, and do some kind of exercise from 5 to 10 minutes (I usually let the students choose star jumps, jogging on the spot, running around the oval, sit-ups, push-ups or another exercise they are comfortable with) and then measure their heart rate again. Data can be collated from the whole class. Discussions can be linked to so many concepts from respiration to athletic performance. See this website for more detailed instructions and videos.
If you have a bit more time and access to digital materials, you can have students create their own heart rate monitor and evaluate its effectiveness.
I have been imploding watermelons with rubber bands with my Year 7 science classes for over two years. The kids absolutely love the experiment. We work as a class to patiently place rubber bands onto a large watermelon one at a time and revel in being suddenly splashed by pieces of watermelon. Here is a video of our experiment. See The Big Watermelon Experiment for details on how to do the experiment.
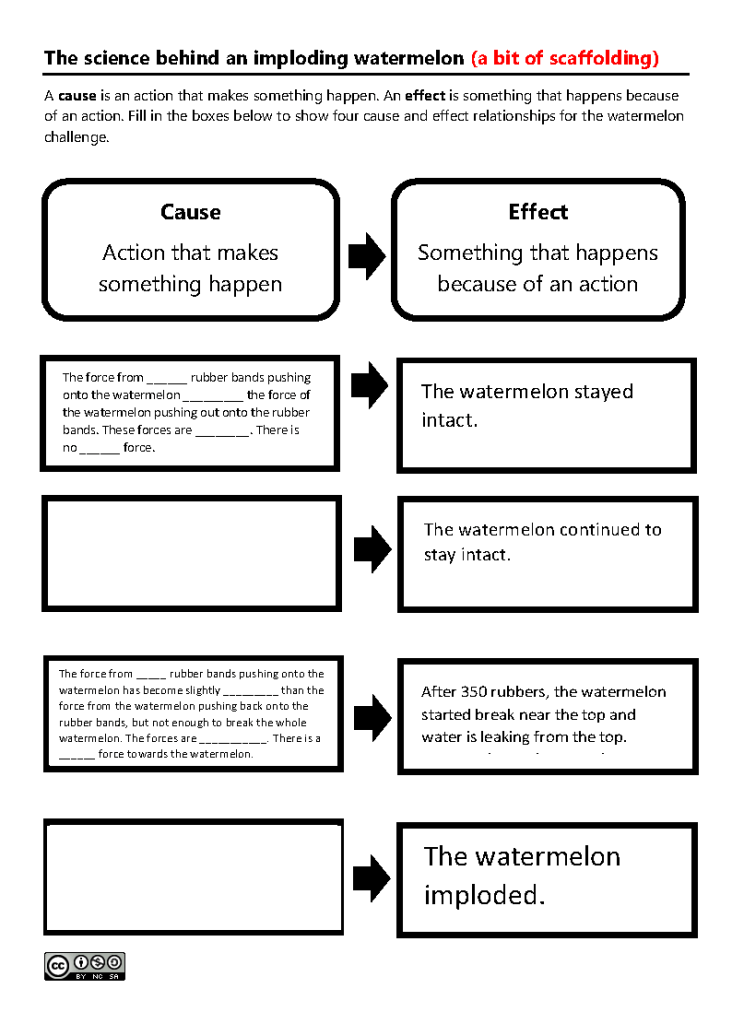
Imploding a watermelon with rubber bands is also a great way to teach how to write explanations in science. I like to use a cause-and-effect graphic organiser to teach students how to use forces to explain what happens in the watermelon implosion experiment. It’s a great opportunity to teach how to use scientific concepts to explain observations. After the graphic organiser, I like to use an explanation scaffold to support students to write an extended text that sequentially explains how rubber bands can implode a watermelon. In this activity, they use casual connectives, time connectives and rhetorical questions. It’s also a great way to embed any paragraph structures your school prefers like TEEL or PEEL.
Use the link below to download and adapt the writing scaffolds for your students.
If you have done the watermelon implosion and/or used the experiment as an opportunity to develop your students’ writing skills, please comment below to share your experience.
In high school, the curriculum often feels overcrowded and rushed. There are just too many things to cover and not enough time. However, it is important to give students the time to stop and think about what they are learning and how they are learning, which are important for becoming self-regulated learners. Students need to be supported to set goals, monitor their progress towards their goals, identify areas for improvement and evaluate the usefulness of different learning strategies.
Using learning logs to guide student reflection
Last term, I decided to prototype learning logs with my Year 7 mathematics and science class. We dedicated 50 minutes every week where we stopped “pushing through the curriculum” and wrote learning reflections. We used the learning log Google Slides template from the NSW Department of Education.
We wrote in our learning log every Friday, for ten weeks. In our dedicated learning log lessons, we would first brainstorm as a class what we have learnt in mathematics and science this week. We did this on Zoom using annotation tools as we were in remote learning due to the COVID-19 pandemic. I shared the following template on Zoom and students used the text annotation tools to do a class brainstorm. The template was modified from an existing Canva template.
After we have completed our weekly reflection brainstorm, I would ask volunteer students to unmute in Zoom and elaborate further on their thoughts. Students will then individually write in their learning logs.
Here are some samples of our reflections.
Benefits of learning logs to guide student reflection
I liked this learning log template because it provided students with a variety of reflection questions. This is opposed to asking students to write a reflection or journal entry as an extended writing activity, which many students find challenging because not only are they trying to think about their own learning, but they also have to learn the structure and language of reflective writing.
As a teacher, I also found these learning logs useful as a form of formative assessment. I can use the students’ self-assessment on what they are confused about or from their questions on the topic to guide my lesson planning for the next week.
Challenges of learning logs and student reflection
Some of the challenges we faced were some students wrote very little in their learning logs at first and I had to work quite intensively with them to write more for each reflection question. Some students also did not yet see the value of reflection and completed the entries with minimal thought and as quickly as possible. However, their attitude and work standard improved over the term.
A huge challenge was TIME. As I mentioned earlier, the curriculum is overcrowded and learning often feel rushed. At the start, I found myself questioning whether I can spare 50 minutes each week for learning logs. However, after persisting for a term, I think the time is worth it. Having dedicated time to support students to self-assess, to think about their own learning and reflect on their successes will help them grow into self-regulated learners.
Where to next
Next term, I am going to continue the learning log with my Year 7 class, but I’m going to change some of the reflection questions. I would like to move them towards reflecting more on learning strategies and the significance of what they are learning. There are some sample reflection questions from an Edutopia post that I would like to incorporate. Eventually I would like to make better links between the learning log and their goal setting processes.
If you are thinking about embedding student reflection in your lessons, I would highly recommend scheduling a dedicated time for it each week/fortnight. Giving it class time show students the activity is valued. It is not something they do at home or done as an extension activity. While it does take time away from continuing with content, it is worth slowing down and allowing students to think about their learning. The learning log template I mentioned earlier is a great way to start.
In Sydney, NSW, we are currently in our second round of lockdown due to COVID-19. This means families are being asked to keep their children at home if they can and students are being taught remotely. For my school, we have decided that most of our remote teaching and learning will be conducted online on Zoom and Google Classroom. I’ve blogged about this in our first round of lockdown last year, but many have asked for more details so this post is to share how I set up my online classes. Note that these practices work for my students as many were already established routines (Google Classroom routines in particular) before online learning.
Every lesson is posted on Google Classroom
Even before online learning, I post every lesson on Google Classroom the day before the lesson. The lesson post would have the learning intention and success criteria for the lesson, the class activities we would be doing and all videos, slides, worksheets and other resources would be attached. This is so students can preview the lesson if they wish and it allows me to be more organised in class. At the start of a lesson, I put up Google Classroom on the interactive screen and everything is there.
An example of a Google Classroom post before online learning
For online learning, I still do the same thing. However, instead of posting the lesson as a Materials post, I post it as an Assignment post with a due date as the day of the lesson. This is because an Assignment post with a due date will make it appear on a student’s Google Classroom homepage. At my school, we have a whole school process that every lesson is an assignment post with a due date and all lesson posts for the day need to be posted before 8:45 am. So when students log on in the morning, they can see a summary of all of their lessons for today. Most of our parents have also signed up to Google Classroom Guardian so making every lesson an Assignment post allows parents to receive a daily or weekly email summary of whether their child has submitted the required work.
In my online learning Google Classroom posts, I also include Zoom details if there is a live Zoom lesson so everything a student needs for that lesson is in the one Google Classroom post. Many students are already overwhelmed with suddenly transitioning to a completely new mode of learning, by themselves at home, so I try to minimise their need to click on too many different things and potentially getting lost.
An example of a Google Classroom post before online learning
Live Zoom lessons
I run live Zoom lessons for almost every lesson, but not all. My live Zoom lessons always start in the same way. Students are admitted into the meeting room at the start of the lesson where they will see a holding slide with today’s lesson outline or a quick quiz, depending on the class. The holding slide replicates our classroom whiteboard set up when we weren’t in lockdown so it offers a sense of familiarity. The slide has a YouTube countdown music timer clip so students know when the live instruction will begin. This allows three to five minutes for students to enter the room. The countdown video lets them know their audio is working. I also let them use these three to five minutes to use the Chat function to say hi to each other.
Holding slide for a Year 7 Zoom lessonHolding slide for a Year 11 Zoom lesson
Zoom routines
In the first week of online learning, I teach my classes how they should behave on Zoom. We go through expectations and consequences so everyone has a shared understanding of how we act on Zoom.
An infographic of our Zoom lesson expectations
In the first week, I incorporate activities where students have many opportunities to practise our Zoom learning routines including:
raising their Zoom hand and waiting for me to ask them to unmute before speaking
having a choice of asking questions by raising their Zoom hand or in the Chat
using the Yes and No reactions in Zoom to respond to regular questions to check their understanding to determine if we can move on (I use to ask them to type in the chat, but using the Yes and No reactions is much more efficient as you can easily see a tally of who is saying Yes and who is saying No in the participant list)
expecting to be randomly selected to respond to questions (before online learning, I used Class Dojo for a ‘no hands up’ approach to responding to questions, which we have continued on Zoom)
taking turns to use the shared screen annotation features, which is particularly good for maths and chemistry
Integrating other apps
While the annotation tools and whiteboard on Zoom are sufficient for most of the activities we do, sometimes I find it easier to connect a second screen such as from a document camera or an iPad. I find an iPad with an Apple Pencil are really good tools. I particularly like the Microsoft Whiteboard app on the iPad with the Apple Pencil to teach maths and chemistry as it feels more like writing on paper and makes my digital handwriting neater.
An example of using the Microsoft Whiteboard iPad app with Apple Pencil, shared in a live Zoom lesson
We have also used Quizlet Live on Zoom to practise our vocabulary. I think playing synchronous games like Quizlet Live allows the class to maintain their relationships and enables them to have experiences they use to before lockdown. Running games like Quizlet Live or Kahoot via Zoom works better if students have a second device. So they will view the Zoom lesson on their laptop and play Quizlet Live on their phone or tablet.
Screenshot of a Quizlet Live game played on Zoom
Formative assessment
In face to face learning, a lot of my formative assessment and feedback processes happened with student interactions. This included checking their work books in class, speaking to them and being able to gather an overall sense of how they are going. Most of these practices require all of us to be in the same room and these have been the most challenging to pivot to online learning.
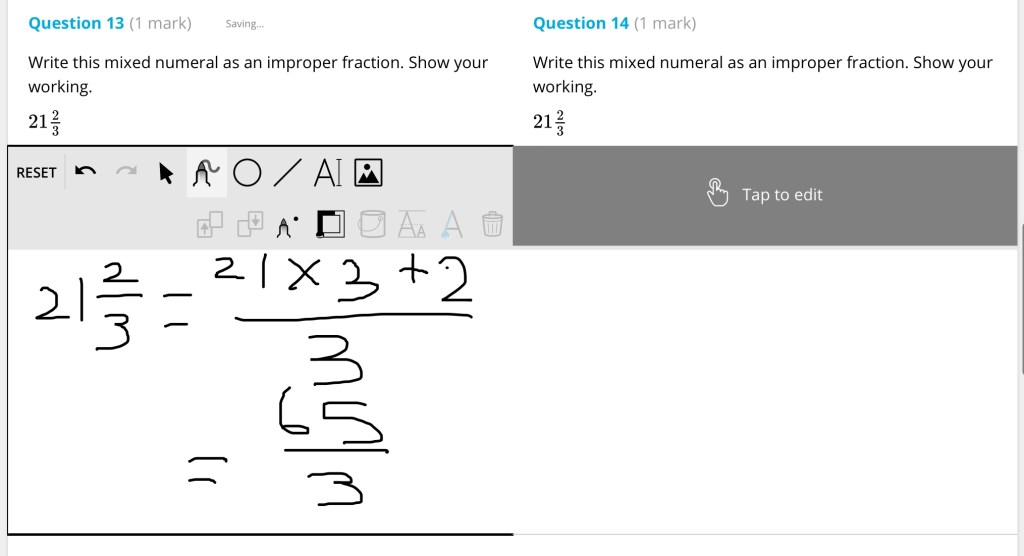
I don’t ask my students to take photos of their exercise books and upload it onto Google Classroom. I use to but found this practice to be unproductive and too time consuming for effective, timely feedback to occur. It also didn’t allow me to make adjustments to future lessons quickly enough. This is particularly important in maths as mastery of concepts are often required before moving on. So instead of asking students or post blurry photos of their work, I set quizzes every 2-3 lessons. For maths, I use Stile. While this platform is officially for science, I create maths quizzes in Stile because students can use their mouse or touch screens to easily write their working out and mathematical processes such as fractions that are difficult to type.
Screenshot of a maths quiz in StileScreenshot of a maths quiz in Stile showing working out with a mouse or touch screen
Overall, I try to make online learning include as many live Zoom lessons as possible where they involve explicit teaching with lots of worked examples. Google Classroom routines are set up so it offers familiarity to students and allows them to access everything they need in one place, reducing cognitive load as much as possible. However some practices in face to face teaching have to be adjusted for online learning.
I have a STEM class this year again. Yippee! The last time I had a STEM class was in 2019 and their first project was the cardboard games challenge, which I have previously blogged about. This year, my class is different (every class is different) and according to their pre-tests, needed more support in working effectively in teams and more guidance in designing fair investigations and communicating their findings. So we decided to dive into some mini challenges to launch into STEM, before settling into longer-term projects. The series of mini challenges are low prep, low cost, quick to do and are designed for students to consolidate the skills they need for more complex projects. The processes, scaffolds and success criteria are repeated with each mini challenge and are designed so there is a gradual release of responsibility.
This blog post contains an outline of each mini challenge and the resources I used. I used them with my Year 8 class, but they can be adapted to younger or older students. This post also contains a brief reflection on what worked well and what can be done differently.
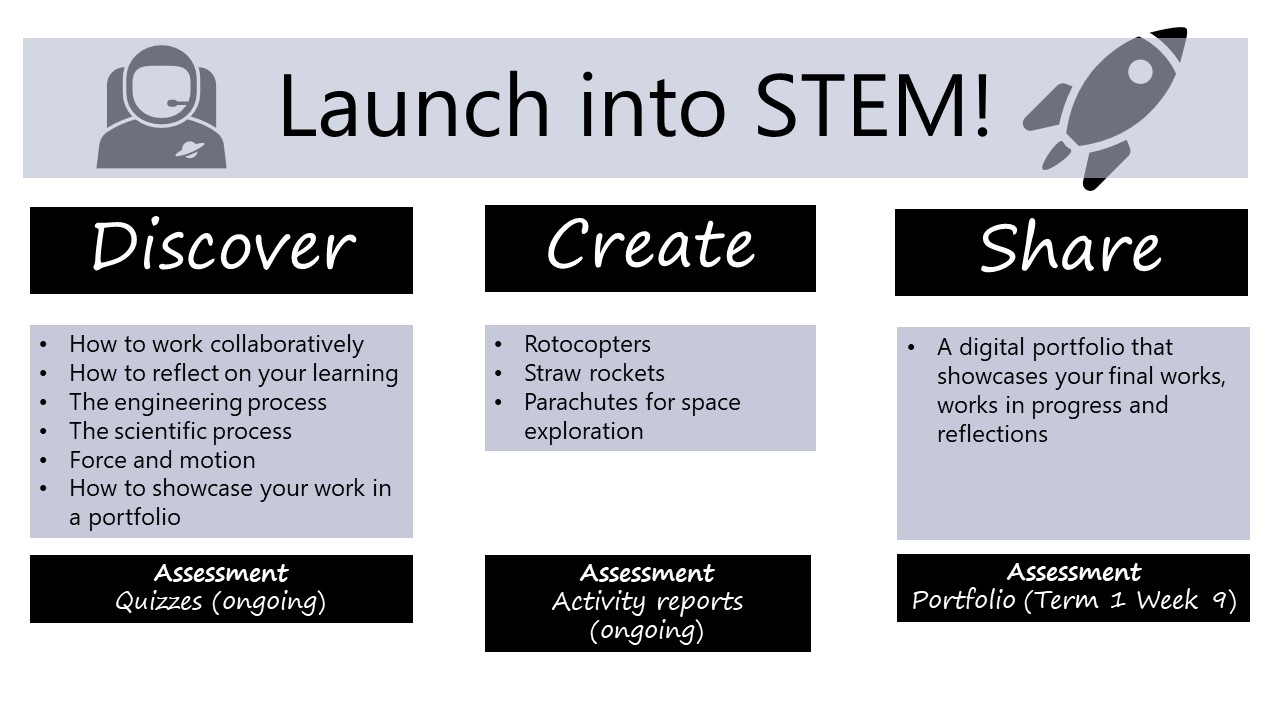
Launch into STEM
Our project outline is shown in the graphic below.
Mini challenge one – rotocopters
The first mini challenge was rotocopters. This is a very easy challenge so students can focus on developing their skills to identify independent, dependent and controlled variables, selecting and using appropriate equipment to make measurements, using basic statistics to analyse results and writing an investigation report. When students have done this challenge once, they can start changing the design of the rotocopters to have it fall slower, spin faster, etc. To support students to brainstorm on ideas and negotiate on an agreed idea, we used a PMI chart.
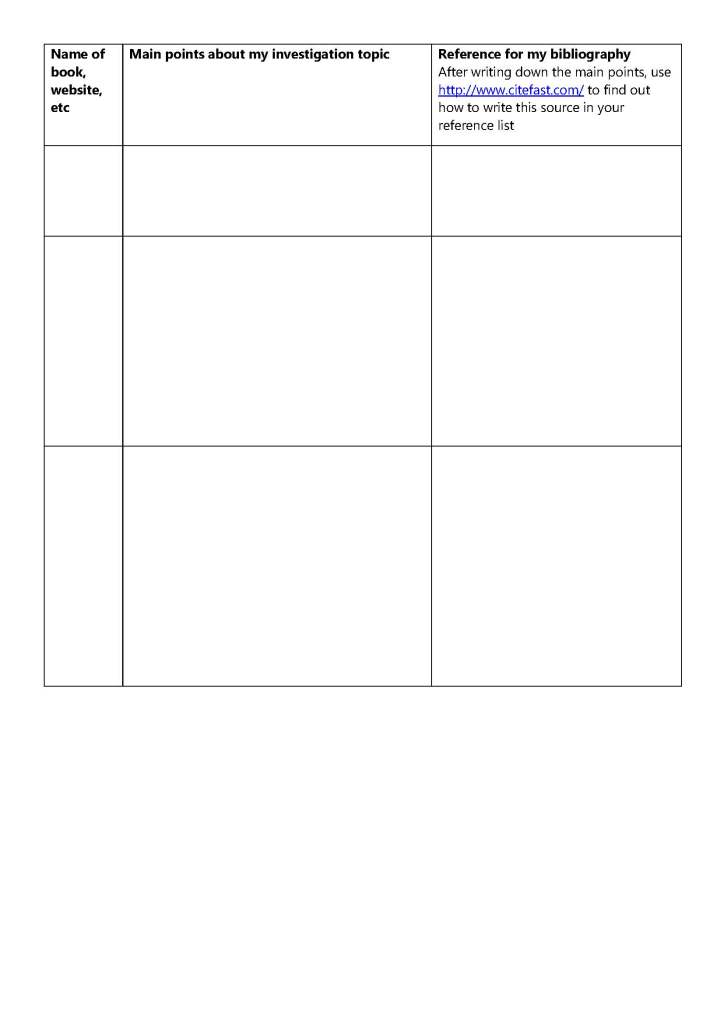
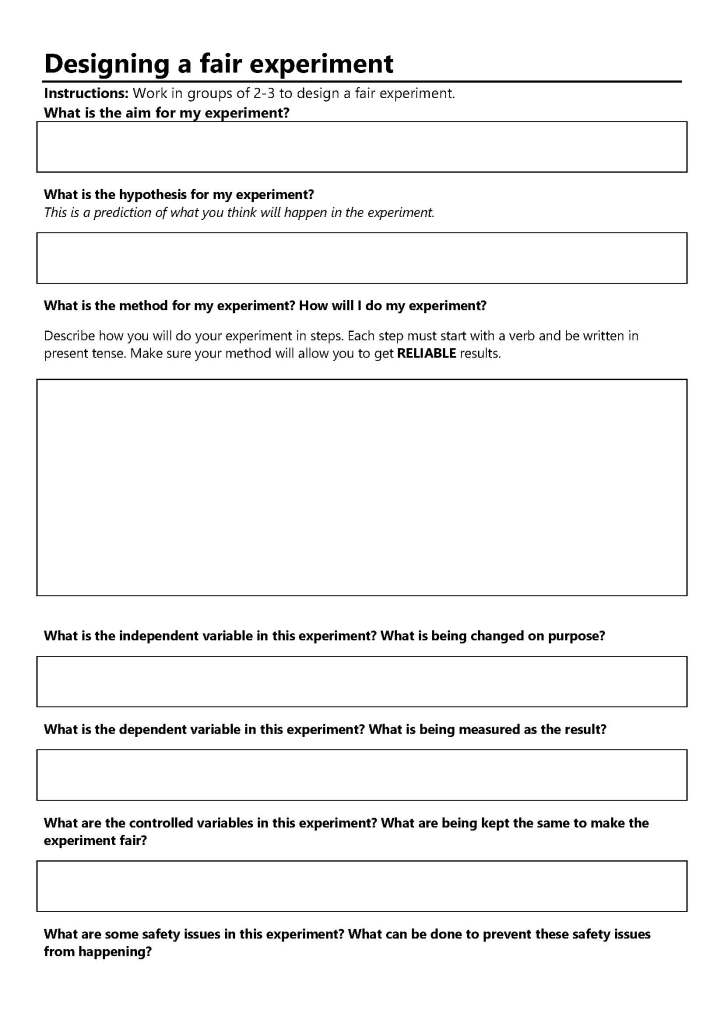
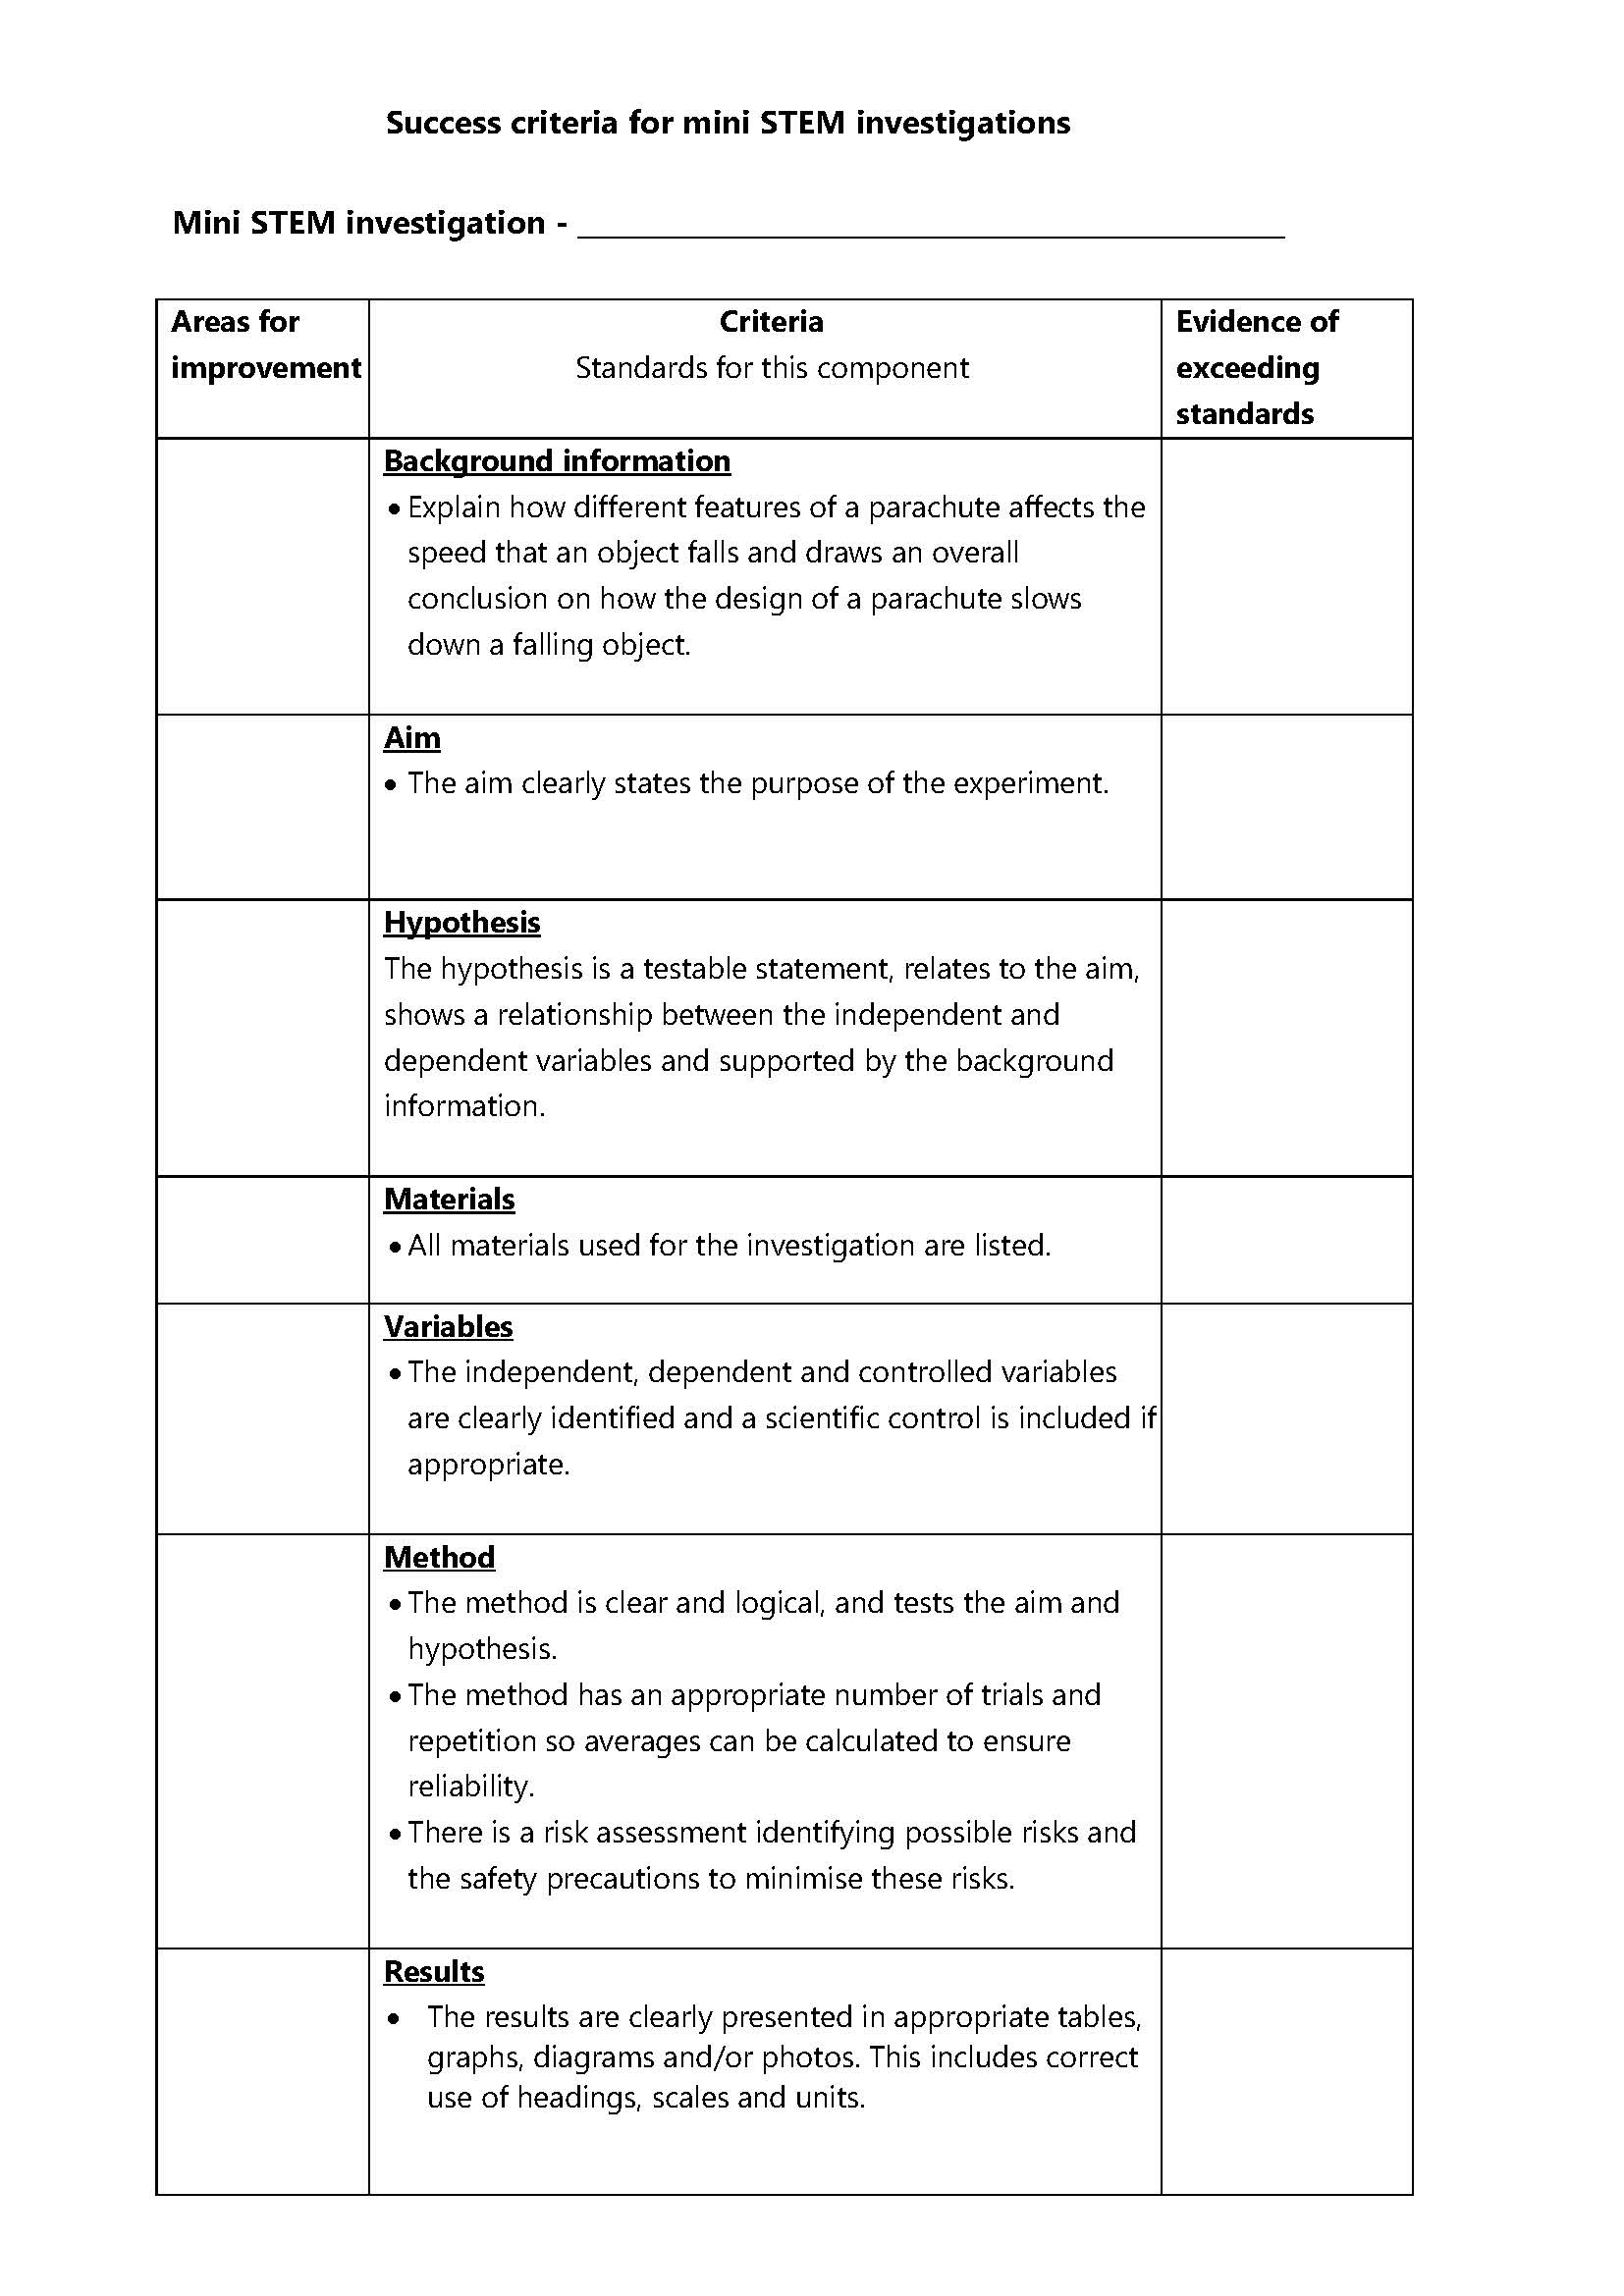
I used the following scaffold and success criteria to help students design a fair investigation and to write an investigation report.
Our second mini challenge was straw rockets from NASA’s Jet Propulsion Laboratory. The NASA website has everything you and your students need, from written and video instructions on making the rockets to explanations on how rocket propulsion works. While this challenge seems easy, the extension opportunities are endless. We used the same scaffolds from the rotocopter challenge so students can get another go at improving their work. They can implement the feedback they got for the rotocopter challenge. For the air rockets, I introduced the following reflection questions for students to complete at the end of the challenge.
How much did you know about air rockets before this experiment?
What problems did you have with this experiment? This may include working in a team.What did you learn about yourself in this experiment? This may include working in a team.
Did you do your work the way other people did theirs? Explain.
What is one thing you would like to improve on if you did the experiment again?
If you were the teacher, what comments would you give to your work?
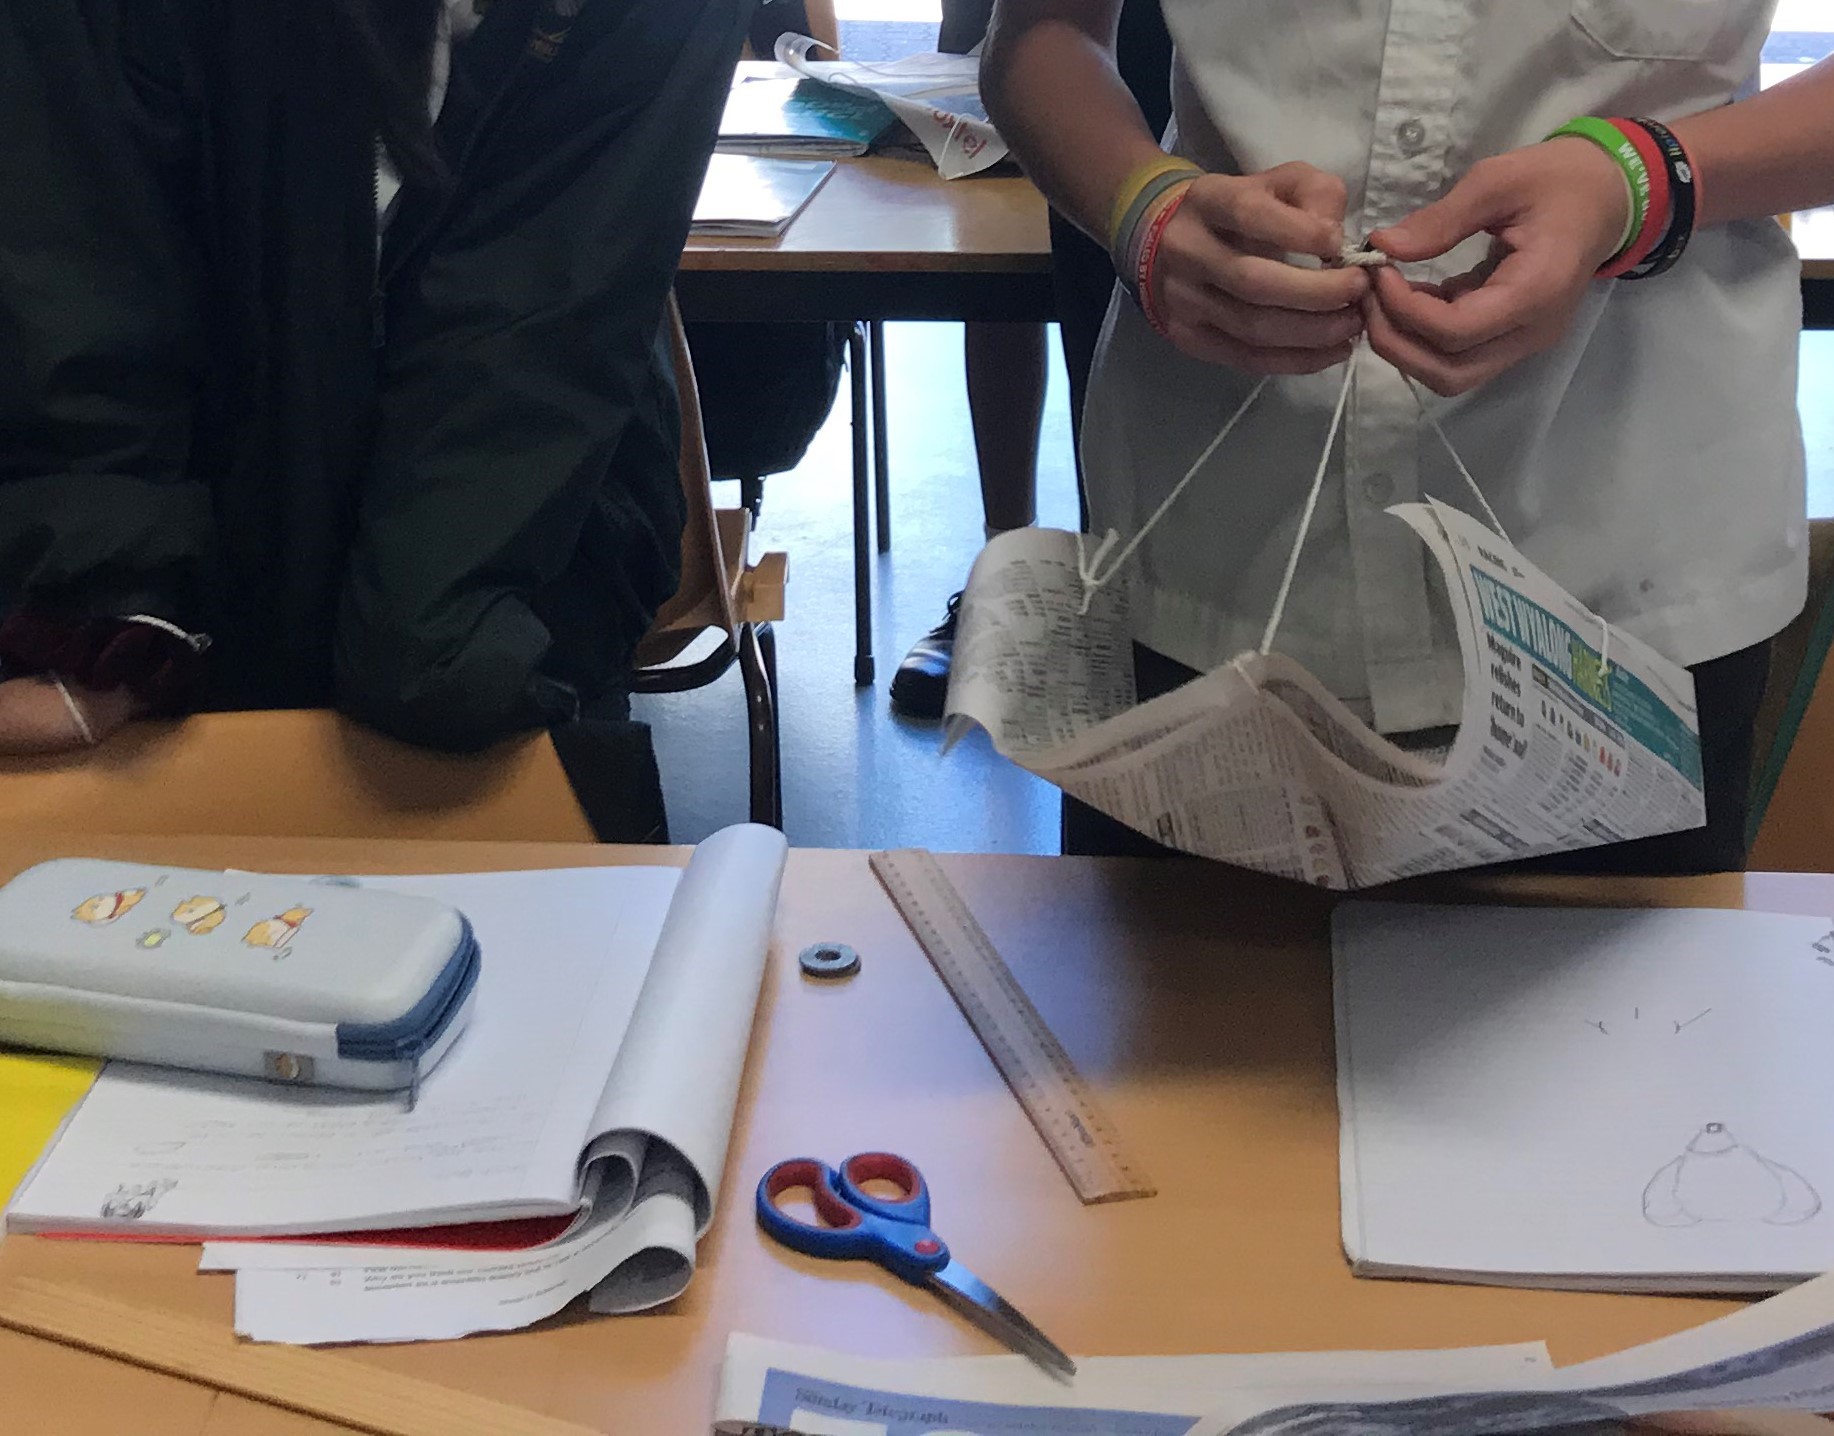
Mini challenge three – parachute challenge
Everything we did for the rotocopters and air rockets led to students being successful at this final challenge – to design a parachute for space exploration. Again, NASA has great resources for this. Check out their Eggstronaut Parachute Challenge.
We used the same processes, scaffolds and success criteria as the previous mini challenges. Students have done these processes twice and have received feedback twice. The parachute challenge is the time for them to become more independent learners. Instead of me pacing the students and releasing scaffolds as they are needed, students were given a project booklet and were allowed to pace themselves within a provided timeline.
When all three mini challenges were completed, each student had multiple samples of work from each challenge that showcase similar skills in designing fair investigations, communicating the results of investigations, and reflections on working in a team. Students can use these work samples to explain how they have grown over the term and how they implemented feedback to improve their work with each mini challenge.
So, what did the students think?
The class did an evaluation of the project. Here are some of their responses to what they liked most about the project.
I enjoy that we are given freedom in our projects to work creatively and not just writing in books.
I really love how our teacher is really understanding when it comes to our work because she does not pressure us like other teachers.
[I like] The rocket experiment, the parachute experiment and filling out the report.
What to do differently next time
Even though the project was designed so it accumulated to a portfolio in the end, many students ran out of time to document their learning progress. I also did not explicitly teach how to create a digital portfolio and articulate learning growth as well as I wanted to. Again the term got away from us.
Explanation texts is another aspect I would like to have taught more explicitly. Each mini challenge required students to explain the forces behind the rotocopter, air rocket and parachute and use forces to explain how their design changes worked. If I had my time again, I would have provided more scaffolding for students to express cause-and-effect relationships and how to move their writing from spoken-like to written-like.
In NSW, Australia, NSW public schools moved to a ‘learning from home’ model on 24 May 2020, due to increased restrictions to combat COVID-19. Parents were asked to keep their children at home if they could learn from home Overnight, we moved from face to face teaching to online remote teaching and learning. Like many other teachers, I started to experiment with using online meetings. This is what I have found to be useful.
1. Play around with different tools
I tested Adobe Connect, Microsoft Teams and Zoom for online live lessons with my classes. Overall, I prefer to use Zoom with my students for the following reasons:
Many of them already use it with family and friends.
Many of their parents use it so they know how to help if required.
It has breakout rooms that is easy to set up and use (more on this later).
It generates a meeting link that you can use over and over. I have this link as the top post on Google Classroom so it is easy to find for students. See here for instructions on how to create a link for recurring meetings.
For staff teams, I prefer Microsoft Teams for online meetings as it offers a more efficient experience. Microsoft Teams is the easiest to run an online meeting when you have everyone you need in your Team. You literally just click a button and voila! I like how Microsoft Teams allows for staff teams to be broken into smaller teams through Channels (Eg. Our Year 7 Middle School team has a main Microsoft Team and then the STEM teachers and Humanities teachers have their own Channels. If you run a science faculty for example, you can have all of your teachers in the main Channel and then break off smaller teams of teachers into their own Channels like a separate Channel for each Year 11/12 subject.) In those channels, teachers can easily run their own online meetings.
You can also collectively take notes while you have an online meeting in Microsoft Teams. We ran an executive meeting on Teams and notes were taken live during the meeting. Everyone can see the minutes being entered.
You can also schedule online meetings in Microsoft Teams, but it’s trickier than Zoom if you work in a NSW public school. The video below shows how to do it. It’s important to let colleagues know who is starting the live meeting. Otherwise you may have enthusiastic teachers going into Teams early and then starting the meeting and end up two different meetings happening simultaneously.
After a few weeks of testing, it’s important to discuss a whole school approach to online meetings and come to a consensus on which online meeting tool to use with students. This is particularly important in high school where a student can have up to 8 different teachers and it will be challenging for them to use a different online meeting tool for each teacher.
2. Keep online live lessons short
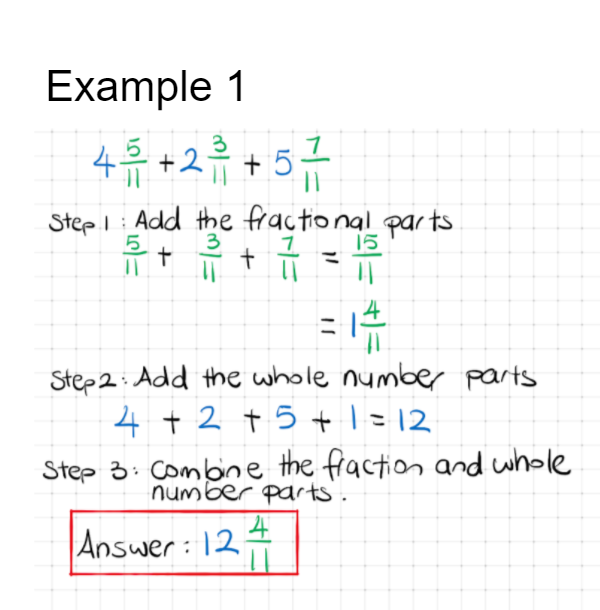
I like to keep online live lessons at around 20 to 30 minutes. Our school periods are 50 minutes and that is way too long in an online lesson environment. Think about the purpose of the online live lesson. If it’s to explicitly explain a concept (eg. how to add fractions with different denominators), then it is better to record a video rather than a live meeting. I like to use live meetings for welfare check-in’s, collaborative discussions and feedback; basically things that cannot be done effectively with a recorded video on online posts.
3. Use breakout rooms
I like to use breakout rooms in Zoom for students to have small group discussions (about 3 to 4 students). Breakout rooms are where you can send students into their own online meeting spaces and you as the teacher can ‘drop in’ and monitor each one. It’s the online version of separating students into smaller groups in a classroom and the teacher walking around. Students have more opportunities to actively participate in an online discussion and some are more willing to when they are in smaller groups. You can randomly assign students to breakout rooms or choose your own student groups.
Breakout rooms can also be done in Microsoft Teams.
4. Give students something to do while they are waiting
In a regular face to face classroom, I start every class with a quick quiz. This is for several reasons:
Retrieval practice – The questions I set requires them to remember content they have learnt in previous lessons, which helps them to consolidate the information into their long term memory.
Classroom management – As soon as students walk in, they have something to do. They have to unpack their equipment and they have to engage with the course work straight away. It allows me to manage students coming into the classroom at different times. Some may be coming from the classroom next door and others are walking from the other end of the school. The quick quiz mean I have a five minute window of ensuring everyone is on task and attentive. It’s a good crowd control strategy. I can also mark the roll.
An online live lesson is very similar to a face to face class. Some students will log on before you do. Others will log on a few seconds after you. And others will log in minutes later. I like to use the Polls feature in Zoom for retrieval practice. I usually do 3 to 5 multiple choice questions for them to do in Polls while I allow students into the meeting from the lobby.
I also like to use the Whiteboard feature to tell them they need to be answering the questions in Polls, list the meeting’s agenda, learning goals, etc.
5. Set and practise routines
An online live class needs to have learning routines and they need to be explicitly taught, just like in a face to face classroom. I like to start my online live classes the same way every time – the quick quiz in Polls and use the Whiteboard to communicate what we are doing in this online class (and tick them off as we go). Students know they have to use the hands up features to ask a question and they know when and why to use the chat. Some teachers like to disable the chat, but I like it. Yes, my students have used it to talk about irrelevant things, but 99% of the time they use the chat to help each other and alert me to technical issues (like the YouTube clip I’m trying to share is glitchy).
Overall, my students really value live online classes. I think they value the connection with each other and with their teachers. As we move into Term 2 where they may be a continuation with remote teaching or some sort, I would like my students to lead the online live lessons more. Have them share their screens and show their work or use breakout rooms where there is a student leader to facilitate the discussions.
Last year I started prototyping with teaching and learning strategies based on cognitive science. I was particularly interested in how to design and structure learning to support students to consolidate knowledge and skills into long term memory. Some of the things I did were:
Prototyping promising practices with retrieval practice, goal setting and metacognition with the science and HSIE faculties at my school
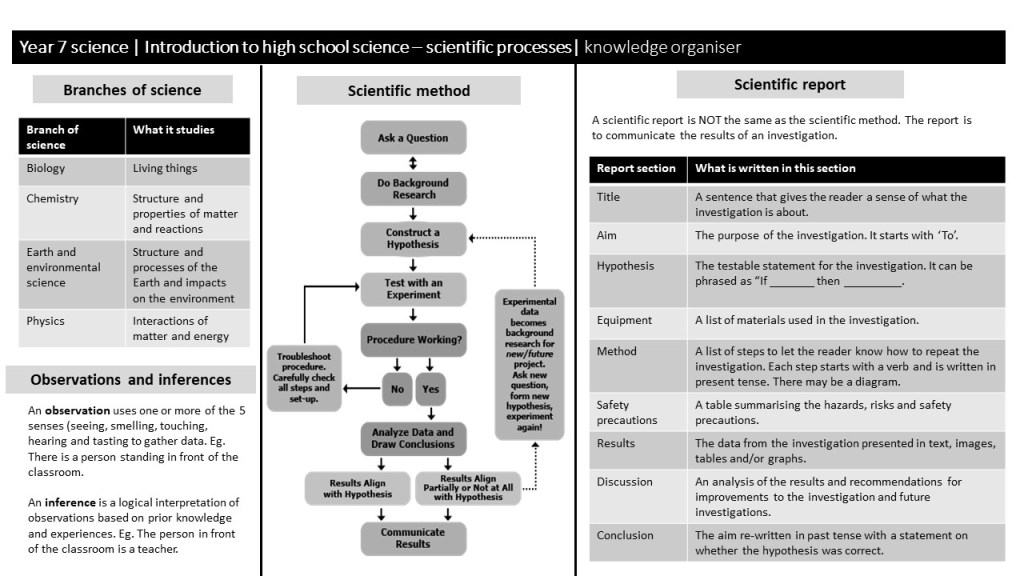
This year I want to prototype knowledge organisers. A knowledge organiser is an A4 template that succinctly shows the reader (student/parent/teacher) what is essential to know for a particular topic. Knowledge organsers are not new. I’ve seen them on UK EduTwitter for a number of years but I think they are not that widely used in Australia. For a really good post on knowledge organisers, see Joe Kirby’s blog on how knowledge organisers are used at Michaela Community School.
For me I’m trialling knowledge organisers with my Year 7 maths/science class. I’ve made these knowledge organsiers so far for the introduction to high school science topic.
This is how I’m going to use them:
Students to use the look cover check correct process to learn one section of the knowledge organiser at a time. Students choose one section of a knowledge organiser to focus on, read the information, cover that section, write what they remember, check their retrieved version with the knowledge organiser and then correct it with a different coloured pen. This will first be done in class and then moved to homework tasks. Students will receive a copy of the knowledge organisers in their homework folders so that their parents/carers know what they are learning at a glance and can use them to quiz their children.
Use the knowledge organiser to develop low-stakes quizzes. Students can also use the knowledge organiser to quiz each other.
Once students have practised using knowledge organisers in a range of ways and have these routines automated, retrieval practice using knowledge organisers can become the class work students do when the regular teacher is absent.
I make the knowledge organisers in PowerPoint. Click on this link to download the PowerPoint files and make a copy if you’d like to edit the knowledge organisers to suit your needs and the needs of your students.