Three zero-prep, tried and tested STEM activities for almost any class

After teaching for almost 15 years, here are three STEM activities I have done many times that need zero (almost) preparation and use materials readily available in nearly every classroom. These activities can work from middle primary to middle secondary but can be adapted to suit younger and older learners. These activities work really well without worksheets so no photocopying is required. They also work indoors or outdoors. You can literally walk into a class with just yourself and run these activities. And best of all, students love them!

All of them can be used to explore concepts in science mathematics and technology such as:

  • Science – fair testing, investigation design, data processing and representation
  • Mathematics – data and representation of data
  • Technology – design process and coding

You can incorporate literacy activities such as writing procedures and recounts.

So whether you need a quick activity for your own class or you are covering someone else’s class in short notice and need something hands-on and engaging, check out these activities and add them to your toolkit of anywhere anytime lesson activities.

Note these activities need timers. I usually ask students to use the stopwatch/timer app on their mobile phones. However, if you are teaching younger students who wouldn’t have mobile phones or you are working in a school where students are not allowed to have phones in class, you can ask students to use the stopwatch/timer app on their laptops or go online and use Google Timer. You can also display Google Timer on the interactive classroom screen for the class to use.

Paper helicopters

Materials and equipment needed – paper, scissors, paper clips, timer

Paper helicopters are also known as rotocopters. An internet search for paper helicopters or rotocopters will generate lots of results. I particularly like this page, which has instructions, explanations and templates. If you can’t print the templates, you can ask students to draw their own templates. The video below also shows how to draw the templates.

Paper helicopters are great for teaching fair testing, average calculations and presenting data in tables and graphs. For some classes, I also like to link them to adaptations in seeds, particularly sycamore seeds like the video below.

Paper planes

Materials and equipment needed – paper, timer

Almost every student knows how to fold a paper plane, but instead of folding a plane that flies the furthest, have a competition to see who can fold a paper plane that has the longest flight time. This is a good option as it doesn’t need metre rulers or tape measures; just a phone timer (see the above note if your students do not have phones). I like to have students explore the Fold ‘N’ Fly website, which has a large range of paper plane designs with written and video instructions.

You can also show the class a short clip from the movie, Paper Planes, to introduce the activity.

Exercise and heart rate

Materials and equipment – timer

This is one of my favourite activities. It gets students moving and can be linked to many concepts, particularly in science. The idea is simple. Have students measure their resting heart rate, and do some kind of exercise from 5 to 10 minutes (I usually let the students choose star jumps, jogging on the spot, running around the oval, sit-ups, push-ups or another exercise they are comfortable with) and then measure their heart rate again. Data can be collated from the whole class. Discussions can be linked to so many concepts from respiration to athletic performance. See this website for more detailed instructions and videos.

If you have a bit more time and access to digital materials, you can have students create their own heart rate monitor and evaluate its effectiveness.

Using OneNote to be more organised as a teacher

Being organised is essential in teaching. Every teacher has a teacher planner where you do your lesson plans, track student progress, monitor the progress of your goals, record professional learning notes, record meeting notes and much more.

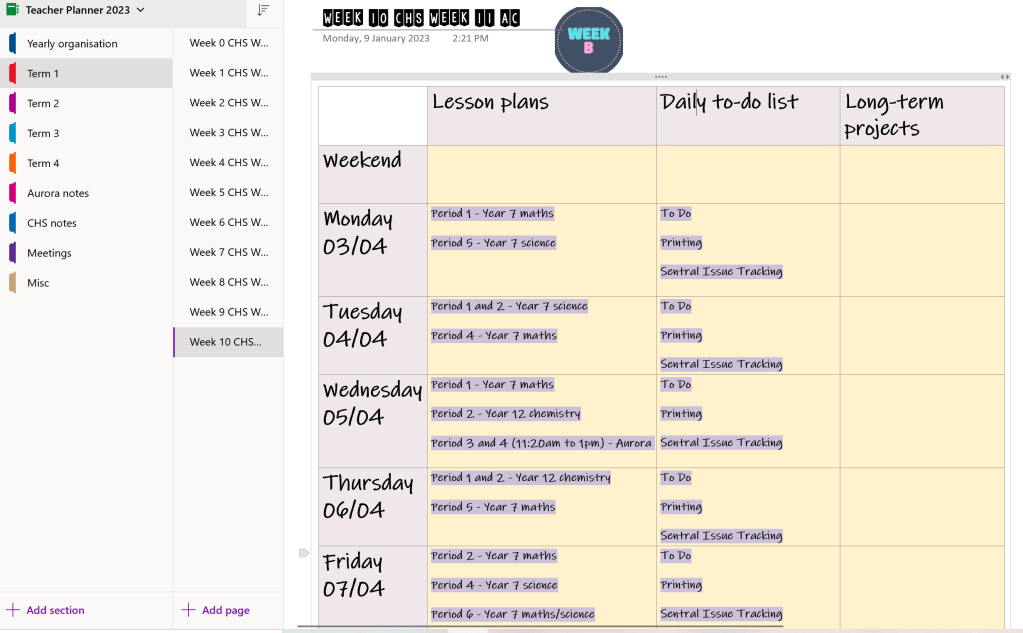
I have never found a commercial teacher planner to suit my needs and over the last 5 years, I have created and refined my own teacher planner in OneNote. Here’s the structure of my OneNote digital planner.

Sections structure

I have a very straight forward section structure. For me this is the right amount of sections to stay organised and not be overwhelmed by too many sections. I have a section for:

  • Yearly organisation
  • Term 1
  • Term 2
  • Term 3
  • Notes for School 1
  • Notes for School 2
  • Meetings
  • Misc
Screenshot of OneNote digital planner section structure showing the sections listed above.

Yearly organisation section

This section has two pages – a cover page and a yearly calendar from NSW Education.

Term 1, 2, 3 and 4 sections

These sections have the same pages. Each section has a page for each school week. Each page has a table format for lesson plans for each day and period, a column for a daily to-do list and a column for tracking the progress long-term projects. For the daily to-do list, I use the To-Do tags in OneNote to check off a task when I finish it. Whatever I don’t get done, I cut and paste it to the next day or week.

I like having my lesson plans, to-do list and long-term projects presented on one page so I am not flicking back and forth between different pages, which I found I did not like with hardcopy planners.

School notes section

These sections hold notes for the two different schools I work at this year. For my main school, I have pages to track homework and classwork completion. I have created a custom tag to check off student work.

Meetings section

This section has been set up so the same meetings notes template is created each time a new page is added.

Why I prefer OneNote for my teacher planner

I have tried various hardcopy planners and digital apps for lesson planning, but have found OneNote to be the best. My main reasons are being able to:

  • Sync my planner across my Surface Pro, iPhone and iPad. This means I always have access to my planner in most situations.
  • Use digital ink with the Surface Pen and Apple Pencil, which is extremely useful for annotations.
  • Email pages in my OneNote to colleagues or students if I need to. This is particularly useful for meeting notes.

What kind of teacher planner do you use? I’d love to learn from teachers how they use a planner to stay organised.

Less school, more learning – Why we should have a 4-day school week

Despite being well into the 21st century, schooling is still stuck in the 1900s, demanding consistency and conformity. Learning is driven by bells and timetables. School systems want learners to do the same thing, at the same time, in the same way.

If we’re to shift these issues in a child’s school career by 2040, we must transform the schooling system to adapt to the needs of learners and teachers.

  • Do Australian children have to spend so many hours at school?
  • Do teachers have to spend so many hours face-to-face teaching?
  • Does school have to be five days a week?
  • Can students have an opt-in day, so they only have to attend school for four days a week?

Check out my case for change for a four-day school week as part of Education 2040: the near future of schools series.

Teach writing by imploding a watermelon 🍉

I have been imploding watermelons with rubber bands with my Year 7 science classes for over two years. The kids absolutely love the experiment. We work as a class to patiently place rubber bands onto a large watermelon one at a time and revel in being suddenly splashed by pieces of watermelon. Here is a video of our experiment. See The Big Watermelon Experiment for details on how to do the experiment.

Imploding a watermelon with rubber bands is also a great way to teach how to write explanations in science. I like to use a cause-and-effect graphic organiser to teach students how to use forces to explain what happens in the watermelon implosion experiment. It’s a great opportunity to teach how to use scientific concepts to explain observations. After the graphic organiser, I like to use an explanation scaffold to support students to write an extended text that sequentially explains how rubber bands can implode a watermelon. In this activity, they use casual connectives, time connectives and rhetorical questions. It’s also a great way to embed any paragraph structures your school prefers like TEEL or PEEL.

Use the link below to download and adapt the writing scaffolds for your students.

If you have done the watermelon implosion and/or used the experiment as an opportunity to develop your students’ writing skills, please comment below to share your experience.

Get in, learn, get out – How to create classroom routines in 3 easy steps

Effective classroom management is one of the key challenges in teaching. It can make or break a lesson. It can even determine whether a teacher chooses to stay in the profession. There are lots of books and resources on classroom management. All of them emphasise the importance of routines. However, many early career teachers I speak to often say it is difficult to know how to create routines that work for you as a teacher and your students. Where do you start? How many routines do you need? How detailed should they be? For this, I found the book, ‘Effective Classroom Management: A Teacher’s Guide’. The first chapter outlines the “four rules of classroom management”, which are:

  • Get them in
  • Get them out
  • Get on with it
  • Get on with them

Essentially, a teacher needs to have routines in place to get students into the classroom, get students out of the classroom, have students learn during the lesson and establish and maintain positive relationships. I’ve condensed these further to:

  • Get in
  • Learn
  • Get out

I frame my routines around these three core events. They happen in every lesson, every subject and every learning space. Hence, they act as a great framework to establish classroom routines. Below are examples of my year 7 quick guides to classroom expectations, which then inform my more detailed routines. The quick guides are more appropriate to display in the classroom as posters as they act as a summary to the routines.

I then break up the dot points in the quick guide into more detailed routines, which are explicitly taught through our school’s positive behaviour for learning processes. I like to go through the expectations and routines at the start of each term, even if I’ve had no classroom management issues with the class. My current Year 7 class is beautiful but I still like to re-establish our shared understanding of how our class works before issues arise.

See here for the Canva template I used to create the quick guide. You can make a copy and modify the text, title and Bitmoji to suit you and your students’ needs.

See here for a more detailed blog post on routines, expectations and classroom management, based on the book ‘Running the room‘.

3 ways to stay organised with Google Classroom

This year I teach Year 7 maths, year 7 science and Year 12 chemistry in a large high school. Working in a large high school means that no one has their own classrooms. Homerooms are non-existent. My school has a fortnightly timetable cycle with each 50-minute lessons. I am in at least 10 different classrooms in a fortnight. This means every 50 minutes, I am setting up and packing up in a different classroom, utilising different audiovisual equipment and working with a different seating layout. Learning time can be easily wasted if I don’t have a system and a consistent routine for me and my students as we move from room to room. So here are three ways I use Google Classroom to make it easier for me and my students to stay organised and maximise learning time.

Every lesson and every detail are on Google Classroom
I post every lesson with every worksheet, slide deck, website, video and anything else I use for a lesson is on Google Classroom. This includes the lesson’s learning intention and success criteria for my Year 7 classes, and the syllabus content points for my Year 12 chemistry class. This means I can walk into any classroom, connect my laptop to the display screen and my entire lesson and everything I need is ready to go. I don’t need to waste time looking for files in File Explorer or my Google Drive. Everything is already in the lesson post on Google Classroom. This maximises learning time as it allows a more seamless lesson flow. It also minimises classroom management issues and cuts down on transition points.

At my school, every student has their own device, so I encourage my students to have the same resources opened on their device as I am going through them on the classroom display screen. This is very helpful for students who may have difficulty seeing the screen clearly for a variety of reasons. Students can also work at their own pace if we are making notes from slides that I’m using so the students who work faster can move on and the students who need more time can take more time.

Having every lesson posted on Google Classroom, lesson by lesson, also makes registrations so much easier.

A lesson post on Google Classroom for my Year 7 class
A lesson post on Google Classroom for my Year 12 class

Lesson starter activity is on Google Classroom

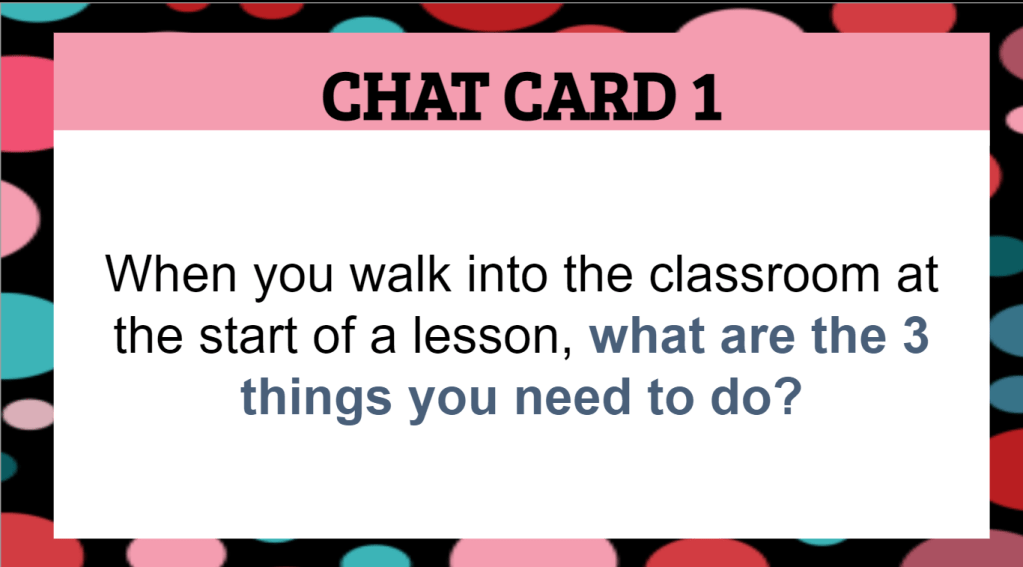
I start every lesson with Quick Quiz, which is a bell ringer activity that the class completes in silence as soon as they enter the classroom. The Quick Quiz is a series of questions based on previous content the class has learnt. I use the Quick Quiz for retrieval practice and as a classroom management strategy. The students know as soon as they walk into the classroom, they do the Quick Quiz. This gives me time to mark the roll, check uniform and set up for the lesson. Each lesson’s Quick Quiz is on Google Slides which is placed on the top of their Google Classroom Classwork. I use to handwrite the Quick Quiz on the whiteboard, but found having the Quick Quiz prepared before the lesson results in a smoother start to the lesson.

An example Quick Quiz question for my Year 12 chemistry class

Lessons are posted on Google Classroom the day before

I post every lesson on Google Classroom in the afternoon the day before the lesson. This allows students to have a preview of the lesson before they walk into the lesson. I encourage my students to log onto Google Classroom in the evening or in the morning before school, so they know the type of learning to expect for the day ahead.  I find that when students know what to expect ahead of time, they are more settled and there are fewer classroom management issues. Some of my Year 12 students like to read the slides the night before if they have time so they can better understand the content when I explain it in class.

These three strategies are not unique to Google Classroom and can be adapted to other digital tools like Microsoft Teams. The key is using technology to facilitate routines that allow you to maximise learning time and feel less frantic when you set up a lesson.

Revamping learning logs (with downloadable and adaptable template)

Last year I trialled digital learning logs with my Year 7 maths and science class, which you can read about here. Overall, I found it beneficial as my students were given regularly dedicated time to reflect on their learning, with a focus on what work they are proud of, the challenges they faced, how they overcame these challenges and what they can do differently next time. While students appreciated the time to stop and think about their learning, time was also a barrier to this initiative. Sometimes it felt like there was no time to do this and if we used lesson time to reflect, then we will fall behind. This challenge became very obvious in the last term of the year when students had a large number of assessments and end-of-year activities that we missed some of our dedicated time for learning logs.

So I’ve created the third iteration of the learning log, which only has six weekly reflection activities and a goal setting/tracking page that is equivalent to two weekly reflection activities. So there is a total of eight weekly activities, which provides a buffer for other things that come up during the term like assessments, excursions, incursions and other disruptions. I’ve changed some of the reflection activities to embed more extended writing which may be more suitable for older students. I’ve also incorporated an ACE score in some of the activities, which is a student self-assessment on their attitude, commitment and effort. This was inspired by Trangie Central School.

You can download your own copy of the learning log template to adapt and use with your students.

How I stopped my emails from killing my productivity

buried in emails by yng yng from the Noun Project

Like many teachers, I get LOTS of emails each day. In the past few years, I’ve noticed that my email practices were negatively impacting my productivity. Email notifications would break my workflow. If I was marking student work and I saw email notifications, I felt the need to read and sometimes reply to these emails immediately when it was not necessary. Even if I didn’t read the email, seeing and hearing the notification is a distraction. I was also tempted to check emails more often than I should. Time is a precious resource for teachers and I can’t have emails taking up more time than they should. Here is a summary of what has worked for me that may be useful for other teachers.
Turning off desktop notifications

I use the Outlook desktop app and notifications are turned on by default. I found the notification sound and the little pop up at the bottom corner of the screen was distracting me, particularly when I needed sustained focus. So I turned off desktop notifications. This way I can still have my emails opened, but I won’t know I have new emails until I am ready to look at my emails. Here are instructions to turn message alert pop-ups on or off.

Having a To-Do folder


The To-Do is a sub-folder within my inbox folder with emails that required me to do something, I use to have them floating in my main inbox folder, which sometimes caused me unnecessary stress as they constantly reminded me of everything I needed to do. Instead, I now immediately move these emails into the To-Do folder. I allocate time in my calendar to follow up on these emails.

Setting up rules to filter email notifications

I choose to receive Google Classroom emails notifications so I can keep track of questions and comments from my students. However, I don’t need these emails to constantly show up in my main inbox. I’ve set up a rule so that all Google Classroom notifications go straight into a special folder. Like the To-Do folder, I allocate time during the day to look at them. Here are instructions to set up rules in Outlook.

Unsubscribing from unwanted emails

Over my career, I have accumulated a number of subscriptions that I no longer need or find useful. I spent a couple of weeks subscribing from these each time an email arrived. My inbox is so much better now. See here for instructions on different ways to unsubscribe from unwanted emails.

Moving the email app to the last screen of my phone

I know many people choose not to have their work emails on their personal phones. I don’t mind it. I find it convenient but I turned off push email notifications on my phone years ago. I have also moved the email app to the last screen page of my phone so I’m not tempted to tap on it unless I actually need to look at my emails.

Not sending or responding to emails outside of core work hours

I deliberately do not send or respond to emails outside of core work hours. For me, emails are sent and responded to between 8 am and 5 pm on school days. If I wanted to draft emails outside this time, I set them on delay send so they are sent at 8 am the next work. Here are instructions on how to do this in Outlook. I personally believe it is important for leaders to set an example and not intrude on others’ personal time.

Giving time for students to think – using learning logs to guide student reflection

In high school, the curriculum often feels overcrowded and rushed. There are just too many things to cover and not enough time. However, it is important to give students the time to stop and think about what they are learning and how they are learning, which are important for becoming self-regulated learners. Students need to be supported to set goals, monitor their progress towards their goals, identify areas for improvement and evaluate the usefulness of different learning strategies.

Using learning logs to guide student reflection

Last term, I decided to prototype learning logs with my Year 7 mathematics and science class. We dedicated 50 minutes every week where we stopped “pushing through the curriculum” and wrote learning reflections. We used the learning log Google Slides template from the NSW Department of Education.

We wrote in our learning log every Friday, for ten weeks. In our dedicated learning log lessons, we would first brainstorm as a class what we have learnt in mathematics and science this week. We did this on Zoom using annotation tools as we were in remote learning due to the COVID-19 pandemic. I shared the following template on Zoom and students used the text annotation tools to do a class brainstorm. The template was modified from an existing Canva template.

After we have completed our weekly reflection brainstorm, I would ask volunteer students to unmute in Zoom and elaborate further on their thoughts. Students will then individually write in their learning logs.

Here are some samples of our reflections.

Benefits of learning logs to guide student reflection

I liked this learning log template because it provided students with a variety of reflection questions. This is opposed to asking students to write a reflection or journal entry as an extended writing activity, which many students find challenging because not only are they trying to think about their own learning, but they also have to learn the structure and language of reflective writing.

As a teacher, I also found these learning logs useful as a form of formative assessment. I can use the students’ self-assessment on what they are confused about or from their questions on the topic to guide my lesson planning for the next week.

Challenges of learning logs and student reflection

Some of the challenges we faced were some students wrote very little in their learning logs at first and I had to work quite intensively with them to write more for each reflection question. Some students also did not yet see the value of reflection and completed the entries with minimal thought and as quickly as possible. However, their attitude and work standard improved over the term.

A huge challenge was TIME. As I mentioned earlier, the curriculum is overcrowded and learning often feel rushed. At the start, I found myself questioning whether I can spare 50 minutes each week for learning logs. However, after persisting for a term, I think the time is worth it. Having dedicated time to support students to self-assess, to think about their own learning and reflect on their successes will help them grow into self-regulated learners.

Where to next

Next term, I am going to continue the learning log with my Year 7 class, but I’m going to change some of the reflection questions. I would like to move them towards reflecting more on learning strategies and the significance of what they are learning. There are some sample reflection questions from an Edutopia post that I would like to incorporate. Eventually I would like to make better links between the learning log and their goal setting processes.

If you are thinking about embedding student reflection in your lessons, I would highly recommend scheduling a dedicated time for it each week/fortnight. Giving it class time show students the activity is valued. It is not something they do at home or done as an extension activity. While it does take time away from continuing with content, it is worth slowing down and allowing students to think about their learning. The learning log template I mentioned earlier is a great way to start.

How I run online learning during COVID-19 lockdown

In Sydney, NSW, we are currently in our second round of lockdown due to COVID-19. This means families are being asked to keep their children at home if they can and students are being taught remotely. For my school, we have decided that most of our remote teaching and learning will be conducted online on Zoom and Google Classroom. I’ve blogged about this in our first round of lockdown last year, but many have asked for more details so this post is to share how I set up my online classes. Note that these practices work for my students as many were already established routines (Google Classroom routines in particular) before online learning.

Every lesson is posted on Google Classroom

Even before online learning, I post every lesson on Google Classroom the day before the lesson. The lesson post would have the learning intention and success criteria for the lesson, the class activities we would be doing and all videos, slides, worksheets and other resources would be attached. This is so students can preview the lesson if they wish and it allows me to be more organised in class. At the start of a lesson, I put up Google Classroom on the interactive screen and everything is there.

An example of a Google Classroom post before online learning

For online learning, I still do the same thing. However, instead of posting the lesson as a Materials post, I post it as an Assignment post with a due date as the day of the lesson. This is because an Assignment post with a due date will make it appear on a student’s Google Classroom homepage. At my school, we have a whole school process that every lesson is an assignment post with a due date and all lesson posts for the day need to be posted before 8:45 am. So when students log on in the morning, they can see a summary of all of their lessons for today. Most of our parents have also signed up to Google Classroom Guardian so making every lesson an Assignment post allows parents to receive a daily or weekly email summary of whether their child has submitted the required work.


In my online learning Google Classroom posts, I also include Zoom details if there is a live Zoom lesson so everything a student needs for that lesson is in the one Google Classroom post. Many students are already overwhelmed with suddenly transitioning to a completely new mode of learning, by themselves at home, so I try to minimise their need to click on too many different things and potentially getting lost.

An example of a Google Classroom post before online learning

Live Zoom lessons

I run live Zoom lessons for almost every lesson, but not all. My live Zoom lessons always start in the same way. Students are admitted into the meeting room at the start of the lesson where they will see a holding slide with today’s lesson outline or a quick quiz, depending on the class. The holding slide replicates our classroom whiteboard set up when we weren’t in lockdown so it offers a sense of familiarity. The slide has a YouTube countdown music timer clip so students know when the live instruction will begin. This allows three to five minutes for students to enter the room. The countdown video lets them know their audio is working. I also let them use these three to five minutes to use the Chat function to say hi to each other.

Holding slide for a Year 7 Zoom lesson
Holding slide for a Year 11 Zoom lesson

Zoom routines

In the first week of online learning, I teach my classes how they should behave on Zoom. We go through expectations and consequences so everyone has a shared understanding of how we act on Zoom.

An infographic of our Zoom lesson expectations

In the first week, I incorporate activities where students have many opportunities to practise our Zoom learning routines including:

  • raising their Zoom hand and waiting for me to ask them to unmute before speaking
  • having a choice of asking questions by raising their Zoom hand or in the Chat
  • using the Yes and No reactions in Zoom to respond to regular questions to check their understanding to determine if we can move on (I use to ask them to type in the chat, but using the Yes and No reactions is much more efficient as you can easily see a tally of who is saying Yes and who is saying No in the participant list)
  • expecting to be randomly selected to respond to questions (before online learning, I used Class Dojo for a ‘no hands up’ approach to responding to questions, which we have continued on Zoom)
  • taking turns to use the shared screen annotation features, which is particularly good for maths and chemistry

Integrating other apps

While the annotation tools and whiteboard on Zoom are sufficient for most of the activities we do, sometimes I find it easier to connect a second screen such as from a document camera or an iPad. I find an iPad with an Apple Pencil are really good tools. I particularly like the Microsoft Whiteboard app on the iPad with the Apple Pencil to teach maths and chemistry as it feels more like writing on paper and makes my digital handwriting neater.

An example of using the Microsoft Whiteboard iPad app with Apple Pencil, shared in a live Zoom lesson

We have also used Quizlet Live on Zoom to practise our vocabulary. I think playing synchronous games like Quizlet Live allows the class to maintain their relationships and enables them to have experiences they use to before lockdown. Running games like Quizlet Live or Kahoot via Zoom works better if students have a second device. So they will view the Zoom lesson on their laptop and play Quizlet Live on their phone or tablet.

Screenshot of a Quizlet Live game played on Zoom

Formative assessment

In face to face learning, a lot of my formative assessment and feedback processes happened with student interactions. This included checking their work books in class, speaking to them and being able to gather an overall sense of how they are going. Most of these practices require all of us to be in the same room and these have been the most challenging to pivot to online learning.

I don’t ask my students to take photos of their exercise books and upload it onto Google Classroom. I use to but found this practice to be unproductive and too time consuming for effective, timely feedback to occur. It also didn’t allow me to make adjustments to future lessons quickly enough. This is particularly important in maths as mastery of concepts are often required before moving on. So instead of asking students or post blurry photos of their work, I set quizzes every 2-3 lessons. For maths, I use Stile. While this platform is officially for science, I create maths quizzes in Stile because students can use their mouse or touch screens to easily write their working out and mathematical processes such as fractions that are difficult to type.

Screenshot of a maths quiz in Stile
Screenshot of a maths quiz in Stile showing working out with a mouse or touch screen

Overall, I try to make online learning include as many live Zoom lessons as possible where they involve explicit teaching with lots of worked examples. Google Classroom routines are set up so it offers familiarity to students and allows them to access everything they need in one place, reducing cognitive load as much as possible. However some practices in face to face teaching have to be adjusted for online learning.