Tech tips from teachers for teachers

Are you a pre-service teacher about to do your practicum? Or are you a graduate teacher about to enter the profession? Wondering how to effectively use technology as a teacher and with your students, in a way that enhances your wellbeing?

I recently presented at a pre-service teachers conference at University of Technology, Sydney on using technology effectively in the classroom. Here are the highlights of the session. These tips are targeted at pre-service teachers about to go on their practicums and graduate teachers about to enter the classroom.

Google or Microsoft? (or Canvas or everything?)

Many schools will use mainly Google or Microsoft. For Google, this may mean all classes use Google Classroom and the apps that come with Google Workspace for Education such as Google Docs and Google Slides. For Microsoft, this may mean all classes use Microsoft Teams and OneNote Class Notebook. Other schools will use Canvas. Some schools will use a mixture of everything. Before you start teaching at your new school, ask which platforms the students you will be teaching will mostly use so you can become familiar with them. Ask to be added to other teachers’ Google Classrooms and Microsoft Teams (same year level if possible and same subject) so you can see what they’re doing with their classes. My school uses Google Classroom with students and I always add beginning teachers to my Google Classrooms when they ask. That way, they can reuse my posts on their Google Classrooms as a way to support them to develop their craft. For more details on how I use Google Classroom, see this post.

Get WiFi access BEFORE your practicum

This tip is mainly for pre-service teachers doing practicums in a NSW public school. When you first contact your supervising teacher or in your pre-practicum, ask them how to get a NSW Department of Education account for pre-service teachers so you can log into the WiFi. You are not suppose to ask others to log on for you and you don’t want to be using your mobile phone hotspot for your whole practicum. GET THIS ORGANISED BEFORE YOU START YOUR PRAC!

Digital wellbeing

Many teachers (including me) have work apps like Outlook, Google Classroom, Microsoft Teams and Sentral on our personal phones and tablets where everything is synced across. This can be very convenient (For example, I usually have my laptop connected to the interactive panel to display the lesson starter activity and I mark the roll on my phone.).However, this also means your work can slowly creep into your personal life and you find yourself responding to every ‘ping’ from your work apps on your personal devices. Everyone has a different way of working and you have to find out what works for you while respecting your colleagues’ personal time and the school systems policies. Here are some considerations:

  • Learn how to schedule send emails (and Teams chat messages) so if you want to write a message in the evening after work hours because it is fresh in your mind, you can have the message land in your colleagues’ emails or Teams chat during work hours. This means you can work the way you want and respect others’ personal time. If you are a pre-service teacher, ask your supervising teacher how they work outside of school hours so everyone has a shared understanding of contact outside school hours.
  • Set expectations for your students. This is particularly relevant for high school. Teenagers often do school work in the evenings, at night (sometimes in the early hours of the morning) and on weekends. I tell my students they can post on Google Classroom at any time, but I will look at their posts and respond on Monday to Friday between 8am and 5pm. I have separate expectations in the school holiday period, depending on the circumstances. If you are a pre-service teacher, ask your supervising teacher what their expectations are for the classes you are taking.
  • If you choose to have work apps on your personal phone, know the privacy implications for the relevant school system. Move these work apps to the last screen of your phone so they’re not immediately visible and available for you to tap when you unlock your phone. Explore features like Focus mode, Personal mode and Do Not Disturb mode to see if and how they work for you.

Tips from teachers for teachers

And finally here are the tips from teachers, deputy principals and principals (who I highly respect and are known for their educational technology expertise and innovations) specifically for pre-service teachers and beginning teachers. 🙂 A big thank you to every one of them for sharing their advice.

Parent teacher conferences on Zoom

Our school’s usual parent teacher conferences happen in the hall. It’s like speed dating where each teacher has a small desk in the school hall and parents move from one teacher to another. However, COVID19 means we can’t run our parent teacher conferences in our usual way. So we decided to use Zoom. Overall it was a success. We had 78 teachers hold hundreds and hundreds of conferences.

How we did it

Our school uses the NSW Education Zoom so only people with a Zoom account can enter a meeting room. Each meeting room has a password and a waiting room. The teacher is the host of their own meeting room and they have to let the parents in from the waiting room. We used the following steps to set up the conferences.

  1. We used Edval for parents to book times. Usually we allocate 5 minute blocks per teacher. This time we allocated 10 minutes so there was enough buffer time to make sure all conferences ran on schedule.
  2. We created a meeting room for each teacher. In the future, we will use each teacher’s personal Zoom meeting room.
  3. We created a parent guide to explain how to create a Zoom account and how to join meetings. The parent guide listed all teachers’ meeting room IDs and passwords. We decided to send out meeting room IDs rather than links as it was less overwhelming and easier for parents using tablets for Zoom.
  4. We created a teacher guide with step by step instructions. We emphasised teachers need to effectively manage the waiting room and stick to their conference schedule.
  5. We encouraged students to be part of the conference and help their parents with Zoom.

Zoom enabled teachers to share their screens so they can show student samples of work to parents. This would not be possible over the phone.

COVID19 can make us feel isolated. A Zoom parent teacher conference, where you can see each other’s faces, is very valuable in fostering the school-home relationships in these uncertain times.

Using Ozobots in the science classroom

I’ve been interested in using Ozobots in my science lessons ever since I saw this tweet of Ozobots being used to model different types of eclipses.

I really liked how the Ozobots were being used to create a moving model of eclipses, which is quite difficult to do without coded robots that automatically move (I have never found children holding basketballs and moving around another child holding a torch work well).

This term our school got hold of some Ozobots through the STEMShare initiative and I was able to test out how Ozobots can be used to enhance students’ understanding of the nitrogen cycle. Matter cycles through ecosystems, particularly the nitrogen cycle, can be quite difficult to conceptualise. Common activities include showing students diagrams of the nitrogen cycle, videos and getting students to physically model the cycle by pretending to be nitrogen particles themselves. However, just like eclipses, Ozobots provide an opportunity for students to create an annotated moving model to better visualise the processes.

So last Friday, my Year 9s used Ozobots to create a narrated video explanation of the nitrogen cycle with the Ozobot acting as a nitrogen particle. Here’s one of the videos.

The videos were created in an 80 minute lesson. What I really liked about using the  Ozobots was that it gave students the opportunity to work in teams and talk to each other about the nitrogen cycle. They worked in teams of 2 to 3 students draw the map, negotiate the narration and film the video. The activity gave them an opportunity to test and clarify their understanding of the nitrogen cycle with each other. The activity allowed students to determine if they really understand the nitrogen cycle. Prior to this, we had already done many other activities of the nitrogen cycle (worksheets, question and answer sessions, quizzes) and many students were confident they understood the nitrogen cycle. However, when it came to creating the narrated video with the Ozobots, many found that they didn’t know the nitrogen cycle as well as they thought they did.

Next time, I would also ask students to create a map so that the Ozobot wouldn’t be travelling in a nice unidirectional cycle but back-and-forth through different components of the ecosystem.

3 things I’ve learnt from supporting teachers


This year one of my roles is to support teachers in using technology to further enhance teaching and learning for their students. I feel very privileged to have such a position because it is one of the best professional learning experiences I have; I learn so much from the teachers I support.

So here’s a summary of what I have learnt:

1. It’s not about me; it’s about them and their students

Those who know me knows that I like to try new things, especially with technology. I like to take risks with designing learning new experiences. I often go into the classroom with “this can go really well or it will blow up in my face” (Don’t worry. The usual result is option A). This doesn’t mean that other teachers have the same attitude and that’s OK. Some teachers like small steps and others like giant leaps. I have learnt that the best way to support a teacher to shift their practice is to find out what they and their students’ needs are. It’s not about how I would teach the class.

2. I do. We do. You Do.

The “I do. We do. You Do” strategy is one that many teachers use to teach students reading comprehension and writing. It’s otherwise known as “Deconstruction. Group Construction. Independent Construction”. When teachers teach students how to write or read for understanding, they would first model the process, then students do the process as a group then students do the process independently. Basically the aim is to make the teacher redundant. This is what I’ve been doing with the teachers and classes I’ve been supporting. My aim is to make my role redundant. For example, in Year 8 French, students and their teacher have been using Google Apps to enable a more efficient feedback model. My role was to teach students how to use Google Apps, teach the teacher how to use comments, editing modes and revision history to give students feedback and show students how to act on this feedback in Google Apps. Towards the last few weeks of the term, I wasn’t needed in the room. The kids knew what to do. The teacher knew what to do. In fact, the student starting using Google Apps for feedback with her other classes, without me helping her at all. The kids are now using Google Apps in their other subjects without their teachers directing them to and are showing their teachers how to use the technology. So I have made my role redundant.

3. From little things big things grow

In the beginning, I was supporting the classes with “little things” like resetting students’ computer and internet access passwords, helping them connect their devices to the school wifi, showing students how to access Google Apps, things that I considered “little” as they were basic technical steps. However, I’ve realised these “little things” are absolutely essential for many teachers and students. It enabled the teachers and students to get over hurdles that switch off a lot of them from trying new ways of teaching and learning with technology.

So I have one more term in this role of supporting teachers. I have loved every minute of it so far. While teachers have thanked me for teaching them, it is them who are teaching me new things.

OfficeMix in a BYOD classroom

Last term I had the privilege of team teaching with a colleague who is teaching a Year 7 class this year for English, Maths, Science, Geography and History (at my school Year 7s are taught these subjects by the same teacher as a middle years strategy). This class, like many classes, consisted of students of varying ability levels and were learning English as an additional language. We wanted to utilise technology in a way that enabled more differentiation. personalised learning and more opportunities for teachers to help students one-to-one.

So we decided to use OfficeMix to flip the classroom. We didn’t flip the classroom in the traditional sense of getting students to watch video tutorials at home and then do activities in class. Instead, we did a brief introduction of the lesson (eg. brainstorm, linking the lesson’s content to previous learning, pre-loading metalanguage) then students watched an OfficeMix presentation on their own devices with a follow-up activities (eg. quiz or a worksheet). Students were told they can watch the OfficeMix presentation as many times as they need to in order to complete the follow-up activities successfully. This meant some students only watched the OfficeMix presentations once or twice while other students watched it many times. When students found the follow-up activities challenging, they were able to watch the OfficeMix presentation to work out how to do it. This allowed me and the teacher I was team teaching with to offer intensive one-to-one support to the students who needed it most.

Here’s an example of one of the OfficeMix presentations we used for this class:

https://mix.office.com/embed/ny5p5aabe06m

Using video tutorials is not new but what I like about OfficeMix is that it utlises PowerPoint. PowerPoint is a software that many teachers are familiar with so it is an easy step-up for for them to use the OfficeMix add-on. Many teachers already have many existing content presented in PowerPoint so they can easily turn them into video tutorials with minimum workload. What I personally found the most useful is that OfficeMix presentations works on all devices. The class I was teaching in had students bringing Surface Pro’s, Windows laptops, Macbooks, iPads, iPhones and Android phones. OfficeMix worked on all of them.

My next step is to have students making their own OfficeMix presentations to show their learning.

A story in 2 minutes – a multimedia activity for all subjects

My principal shared this video with me today. It’s called Our Story in 2 Minutes. The video summarises the Earth’s history from the Big Bang till now in two minutes.

This inspired me to come up with some similar story-in-2-minutes activities where students can create a video using images only to represent the development of an event. It doesn’t even have to be two minutes. It can be one minute, three minutes, however long you and your students like. A video of images can be made to sequence the events in the evolution of life on Earth, the development of our current understanding of the universe, development of the cell theory, development of our understanding of genetics … the list goes on and on and it can be used in subjects other than science.

What I like about this activity is that it’s simple and yet allows students to create and engage in deep learning that extends from a subject area and even be part of a cross-KLA activity. It’s simple for both students and teachers as it involves searching and selecting images that represents certain ideas and events and then inserting the images into a video-editing program such as Windows Movie Maker or even PowerPoint. Technology tools that don’t require a high level of technical expertise from either teachers or students and are available to most students. The activity is also simple in the sense that it does not have to take long, which can be a good activity to suggest to teachers who are concerned about being pressed for time.

To create stories in 2 minutes also allow students the opportunity to learn about digital citizenship. Can students use any images pulled from the web? Do they have to search for creative commons images? How do they acknowledge the source of images? This activity is not only about the content of a subject area.

Finally creating stories in 2 minutes can be adapted into project-based learning or provide an opportunity to create a product that can be shared with a public audience beyond the classroom. Creating a story in 2 minutes require students to first understand the content, select and justify appropriate images that best represent the content and sequence them in a logical order. It allows students to apply higher order thinking skills.

I teach in Sydney, Australia so my school year is starting in about a week’s time. I will be definitely using the story-in-2-minutes concept this year.

What will you use it for?


Small changes can make a huge difference

Over the past few years I have been constantly changing the way I teach due to introduction of 1:1 laptop initiatives in some classes and a continually-developing understanding of how students learn. In a lot of cases it has involved turning things upside down and completely rewriting units of work. This is tiring. Worth it but tiring. But I found out recently that small, minor changes can make a huge difference too. The Student Research Project (SRP) has been around since I was in high school. It’s an oldie but a goodie. The SRP involves students planning, doing and reporting on an experiment of their choice. It is a compulsory activity for all Year 7-10 students in NSW, Australia. Each student must do at least one SRP once in Year 7 and 8, and another one in Year 9 and 10. By doing the SRP, students learn how to design a fair experiment, a must-have skill for all scientists! See here for more info on the SRP.

It was the Year 8’s turn to do the SRP in September this year. The traditional way of doing the SRP is for students to choose an experiment, plan it, do it and then submit a written report. This year my faculty decided to revamp it and not just rehash the status quo. However this didn’t involve major changes that would stress everyone out. It involved a few tweaks that would have the most impact. Like always we gave students the choice of whatever experiment they wanted. My class were doing experiments ranging from water absorption of different types of soils to whether particular types of video games would improve people’s reaction times to using Gary’s Mod to run a simulated experiment. However instead of forcing students to do a written report, we decided to let students choose how to present their SRP findings in whatever medium they wanted. Some students still chose to submit a written report (but by sharing it as a Google document to make the feedback process more efficient) while other students chose to create Prezis or videos. Students had to justify why their chosen medium would be the most effective in communicating their findings to others. At the conclusion of the SRP, students shared their findings with their class over a two-day conference, just like real scientists.

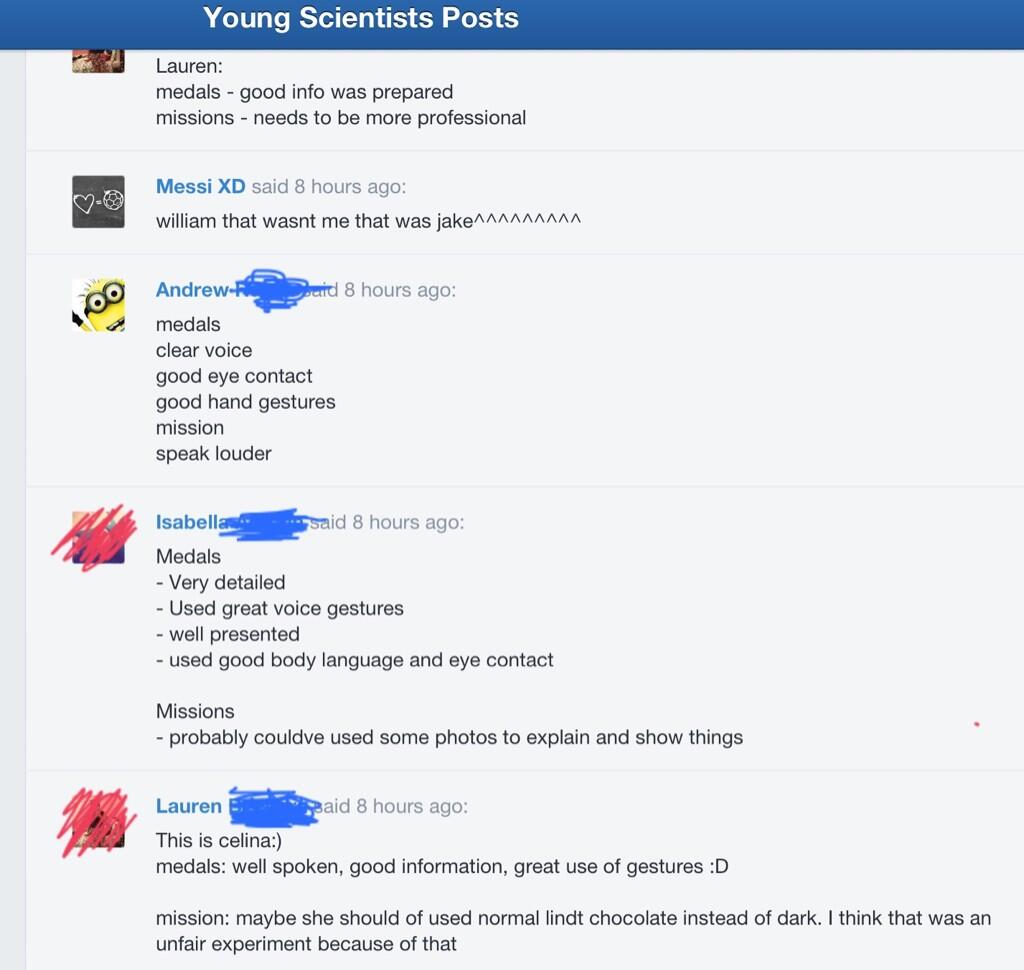
In the presentations I would usually get students to give each other feedback (one medal and one mission) by writing it down on a piece of paper, which I will take home and collate and then give back to students. This was a really inefficient way of doing it. Students had to wait at least 24 hours to get peer feedback and it took me time to type of the students’ feedback. This time I decided to create a backchannel on Edmodo that students used to give feedback to each presenter. Students did this by using laptops. A designated student had the role of creating a post for each presenter and then the whole class will reply to that post with a medal and mission for the presenter. Doing it this way meant that the presenter got the feedback as soon as they finished presenting; they didn’t have to wait till the next day after I’ve collated the class’ feedback. Students really liked the immediacy of the feedback they got from the Edmodo backchannel. There was also one student who made a video for his SRP, but he was ill over the two days of the presentations. His video was still shown and he was able to receive feedback on it at home from his peers via the Edmodo backchannel.

A sample of the Edmodo backchannel

So just with a little of tweaking, the good ol’ SRP has been thrusted into the 21st century. I didn’t have to completely re-write it or turn it upside down. Just by adding Google docs, more student choice and Edmodo, the SRP was made a million times better for students as a learning process. From the end-of-term evaluations, many students from across all Year 8 classes identified the SRP to be their favourite activity this term because it gave them choice, it let them use technology and they learnt by doing.

Next time I’d like to have students sharing their findings with a global audience, or at least with an audience beyond their class. But one small step at a time 🙂

“I didn’t feel like I was teaching” – journey in leading others in PBL

But I didn’t feel like I was teaching

One of the teachers on my faculty (let’s call her Ann for this post) said this to me during our scheduled discussion on her professional goals. At the start of the year, Ann said her professional goal for 2013 was to implement project based learning (PBL) in her Year 9 class.

After looking at the BIE website for a while and attending one of Ashley Cantanzariti’s PBL workshop, Ann created crowd-sourced a driving question for this term’s unit for her Year 9 class with a cross-school group of teachers (this happened in our school’s School Development Day which involved our community of schools). We came up with the driving question of “Will an earthquake or tsunami happen in Sydney?”. The only teacher-centred lesson that Ann gave was the introduction lesson to let the students know the expectations and organisation of their new project. The class sorted themselves into groups and brainstormed what they needed to find out for this project. Ann used Edmodo for students to collaborate and upload their progress of work so she could give them feedback. After several weeks, the groups of students presented their findings to the driving question by choosing whatever medium they thought was appropriate. Some groups chose GoAnimate while other groups made a diorama.

When we were discussing whether Ann thought PBL was very effective for her students to learn science, one of the most memorable things she said was

They found out what an epicenter was, the focus and all other features of earthquakes by themselves. I didn’t have to even tell them.”

This ties in with the first quote on this blog post. Ann expressed that she didn’t feel like she was “teaching” because the students were driving so much of the learning. She recognised that most of the “work” was done prior to the project in designing the driving question and the workflows of how students will submit drafts of work, receive feedback and revise their work, but it was so different to what she was used to she felt like she was not teaching. Her concept of teaching was changing from content deliverer to learning designer and facilitator.

I often feel this way as well. When my students are happily working in their groups, finding answers to their own questions, negotiating with others on what sort of product to make and reflecting on their goals, I often feel like I’m not their teacher or even needed in the classroom. I know that for effective learning to happen students are working harder than teachers (or just as hard) and an effective teacher makes themselves redundant overtime. However, both and I are still somewhat influenced by the traditional notion of teaching – that teaching is a teacher telling students what they need to know. This often challenged concept still has a lot of pull on what both teachers and students perceive learning to be.

Overall this is a step forward for our faculty in terms of changing pedagogies. Instead of only me doing PBL, we now have another teacher implementing PBL and talking to others about how good it is for students.

BYOD – the first steps

So my school has decided to journey down the BYOD path. This is for several reasons, including students already bringing in their own devices (not just their own smartphones but quite a few students bring in their own laptops and tablets) and asking for them to be connected to the school WiFi and wanting to continue technology-rich learning post DER (DER stands for Digital Education Revolution, an Australian government initiative that gave Year 9 students their own laptops. The funding for this has ended.)

Several teachers have asked for a blog post on our BYOD journey so far so here it is …

Before we jumped on the BYOD bandwagon, we wanted to know what students thought of this. This involved chatting to students to explain what BYOD is and whether they would bring the devices they already at home to school. We put the feelers out to see what students, parents and teachers think. The students we spoke to in these informal discussions were very supportive of the idea of BYOD and wanted to be involved in the school’s exploration of possibly implementing BYOD.

At the same time, we also looked at the literature review into BYOD and did some further research, which included using the insights from Mal Lee’s Bring Your Own Technology. Once we had a good grasp of the educational research and grounding for BYOD, looked into other school’s journey into BYOD, looked at what we already knew about our school community, we decided to propose a BYOD model where students bring in whichever laptops or tablets they wanted as long as the devices connected to the school WiFi and had certain basic software and apps installed. We also seeked feedback from people with a bit more expertise than we did at BYOD (hat tip to Pip Cleaves and Stephen Turner in particular).

So at this stage, the senior executive team was happy, the students we spoke to were happy and the teachers we seeked out for the BYOD trial was happy with the model. At this stage, our Community Liaison Officer and P&C gave their support to the model and was able to help us explain our BYOD proposal to parents. This launched us into mass data collection stage. We had a fair idea of what devices our students already owned and the challenges that will face our students’ families if BYOD is implemented, but wanted to be 100% sure and to hear as many voices and ideas as possible.

We surveyed Year 7 and 8 students and their parents. From the student survey data, we chose a group of students that held a diverse range of views towards BYOD for student focus groups, which is also acting as a student advisory group for BYOD. The focus groups enabled students to explain their concerns towards BYOD in detail and as a group come up with solutions to address their concerns.

From all the data collection and consultation with the school community, there was overwhelming support for BYOD and the reasons cited include:

-students already being familiar with their own devices
-having access to their own devices in class caves time as they longer need to move from their regular classrooms to a computer room
-bringing their own devices to school will make learning more fluid between school and home
-technology being a part of students everyday lives

The main concerns that were raised were:
-how equity issues will be addressed
-safety and storage of devices
-digital citizenship

The main lessons we’ve learnt from our BYOD journey so far is to involve the school community as much as possible. This sounds obvious but from our experience it is the students and parents who have come up with the best solutions to address challenges of BYOD.

Our next step is to work with teachers and students on the next challenges, which includes leading a classroom with multi-platform devices and learning design that will best utilise students’ devices.

Hold it right there. We learn about black holes in Year 10, not in Year 8

This term my Year 8 class has been running Science News. Science News is where each student in the class takes turns in presenting a science news item that they have found interesting. They have to showcase  the science news item in a two minute presentation. The purpose of Science News is to expose students to the latest discoveries in science. I wanted them to know that science is everywhere.

However, Science News has also taught me new things and not just scientific things. One Science News item challenged how I was designing my learning for my students and how our education system designs learning for our students. Daniel talked about new discoveries on black holes. You can read Daniel’s speech to the class here. Right after Daniel finished his speech, half of the class’ hands shot up with questions.

“What exactly are black holes?”

“What happens when you go into a black hole?”

“I heard that time slows down when go inside a black hole. Is that true?”

“If we can’t see a black hole. How do we know it is there?”

“What is a light year?”

I was really happy that my students were so enthusiastic about learning more on black holes. So what did I do? I spent about 5 minutes skimming through the basics of gravity, dark matter and the speed of light and then I said, “OK. We actually learn about this stuff in Year 10. We need to stop now and continue learning about the ozone layer.”

While ozone in the Earth’s atmosphere is very important and Year 8s were also interested in ozone, I felt really guilty in almost extinguishing my students’ curiosity in black holes because the syllabus said that they should learn it in Year 10 and right now they should be learning about the ozone layer. I’m sure many teachers have faced this kind of situation before but it really got me thinking on how the current education system does so much to restrict the learning of our students.

Why do we have to learn about black holes in Year 10?

To be more accurate, students in NSW learn about black holes in Year 9 or 10 (It’s this thing we call Stage 5, which is Year 9 and 10). I understand that the need to learn age-appropriate concepts. For example, many early primary school-aged students may not have the cognitive ability to tackle abstract concepts (you know, because of all the Piaget stuff). However, I don’t see why if my Year 8s want to learn about black holes (and I know they will be able to), they can’t learn about it because the syllabus says they learn it in Stage 5. When you learn swimming, your age doesn’t determine what kind of things you learn, it’s how fast you are progressing and what you are ready to learn.

Why can’t we learn about black holes and the ozone layer?

Why couldn’t I have let my students go online on their phones and look up videos and websites that helped answer their questions about black holes and share it with the class, and then continue with the ozone layer? I wanted to, but I only have 3 hours with them a week and I only see them an hour at a time. Last year I had the same class for 14 hours a week in an integrated curriculum and I would’ve let them explore black holes and then continue with ozone layer because I had the flexibility to do so. However, now I am back to a more traditional and rigid timetable where learning starts and stops with the school bell. Previously I have blogged about the challenges of implementing project based learning in such a traditional school structure. The more I try to implement project based learning or anything that builds on students’ curiosity and passion or anything that personlises their learning, the more I want to knock down the existing school structure. A few days ago, I was in a workshop with Greg Whitby on teaching and learning in a Web2.0 world. He said the timetable is the one thing that is stopping effective learning and teaching. I couldn’t agree with that point more.

Greg also talked about agile learning spaces. I have to admit when I first heard of agile learning spaces a few years ago, I just liked the look of them. The bright colours and funky furniture looked particularly attractive when you are used to 1950s furniture in classrooms. But since I’ve started PBL, I get it a bit more. So going back to the black hole scenario … In an agile learning space style of learning, Daniel would’ve presented his science news to the whole cohort of Year 8 or a mixture of students from different year groups in one large space. The ones who were interested in learning more about black holes can go with one teacher and the others can go with the other teachers to continue to learn about the ozone layer. Teaching and learning is no longer restricted to one teacher teaching 30 students. Depending on the need, you can be teaching one student or 10 students or 80 students. The space enables you to do so. There are no walls that says you have to teach 30 students at a time. There are also no bells to tell you that you need to spend 60 minutes on learning something; you take as long as you need to. The video below gives you an idea of what learning is like in an agile learning environment.

And now I don’t how to end this post. I sort of feel disillusioned. I want to knock down the walls of my classroom but realistically that can’t happen. Not just yet anyway. So when the school week starts again, it will be back to the status quo. *Sigh*