Cardboard games STEM challenge – what worked well and what I’d do differently next time

This year I have a Year 8 STEM elective class. It is a new course that my school is running where we build on existing syllabus outcomes in Stage 4 science, mathematics and technology mandatory. Students learn (and master) the core content in their traditional timetabled science, mathematics and technology mandatory classes and then apply it in their STEM elective. The STEM elective takes a project based learning approach with an emphasis on the design process.

In Term 1, we did the cardboard games challenge. The image below shows the project outline.

Image of project outline  - How can we create a cardboard games room for Concord High School?

We used Caine’s Arcade as our hook activity.

I chose the cardboard games project because I wanted to emphasise to my students that STEM isn’t about fancy gadgets or coding. STEM is about solving problems within parameters, with ongoing prototyping. Making games out of cardboard is also a very low-cost project, which means students can create lots of prototypes and go through many feedback cycles. This was really important in our first STEM project.

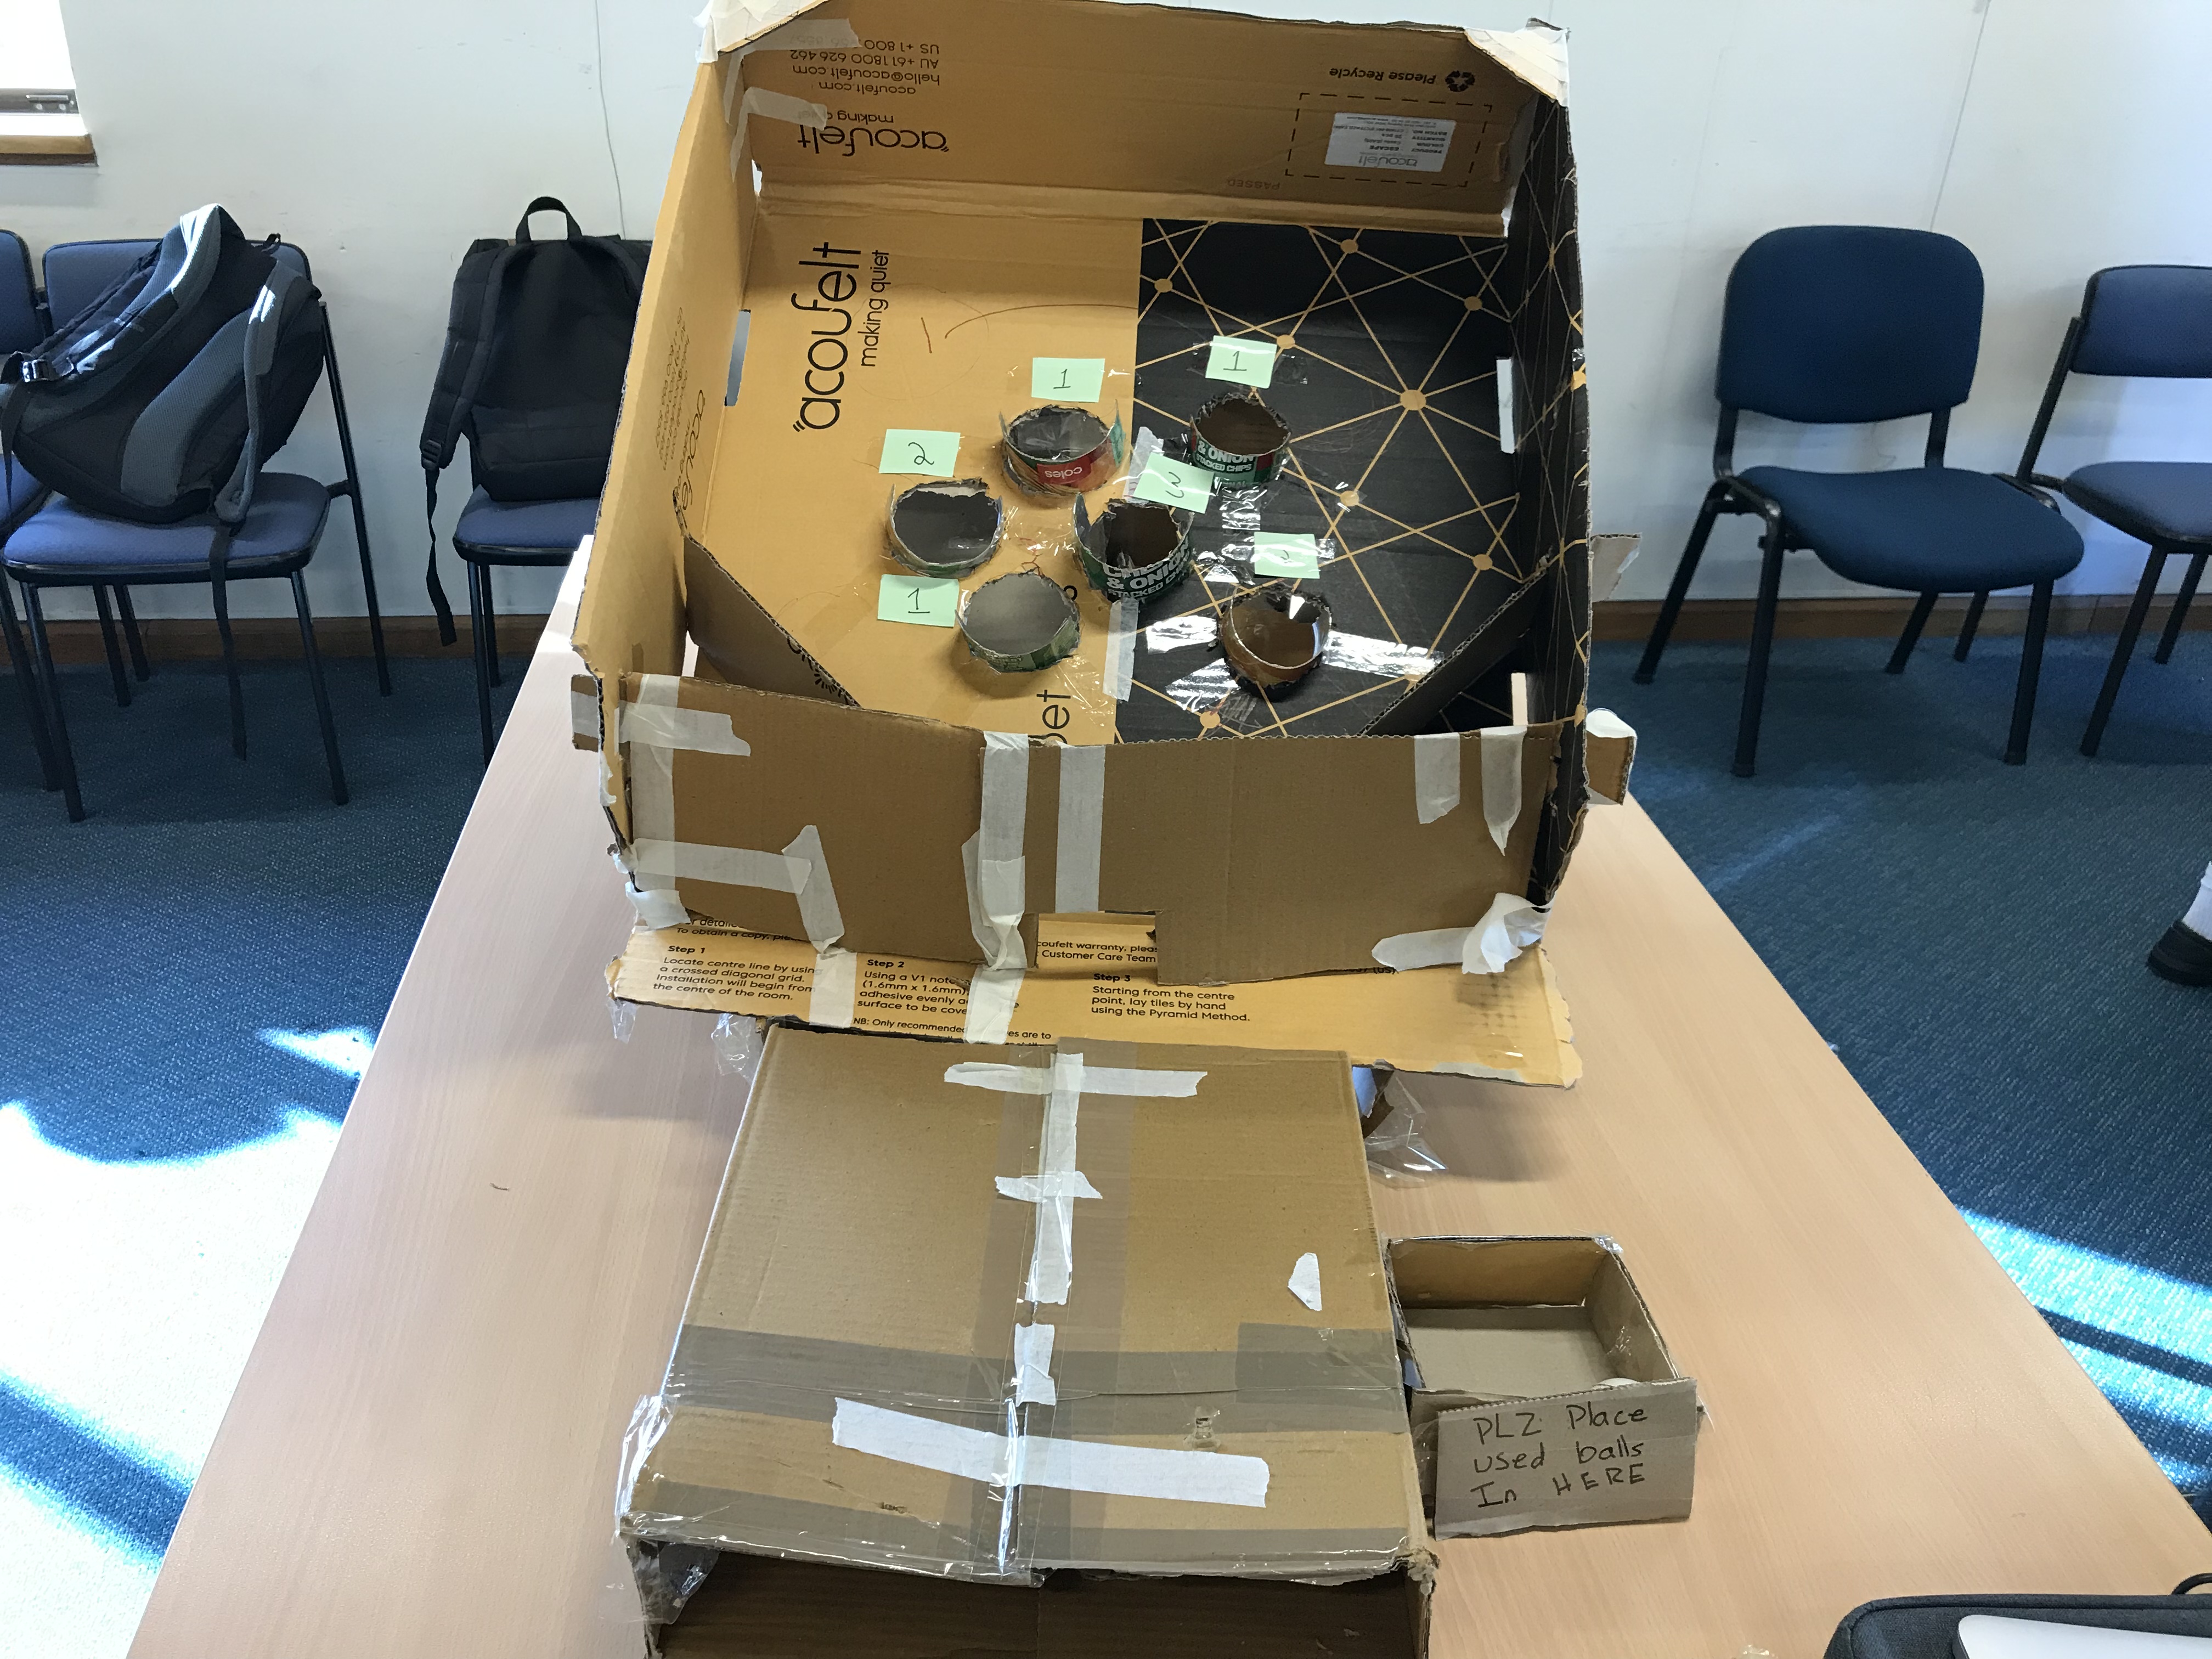
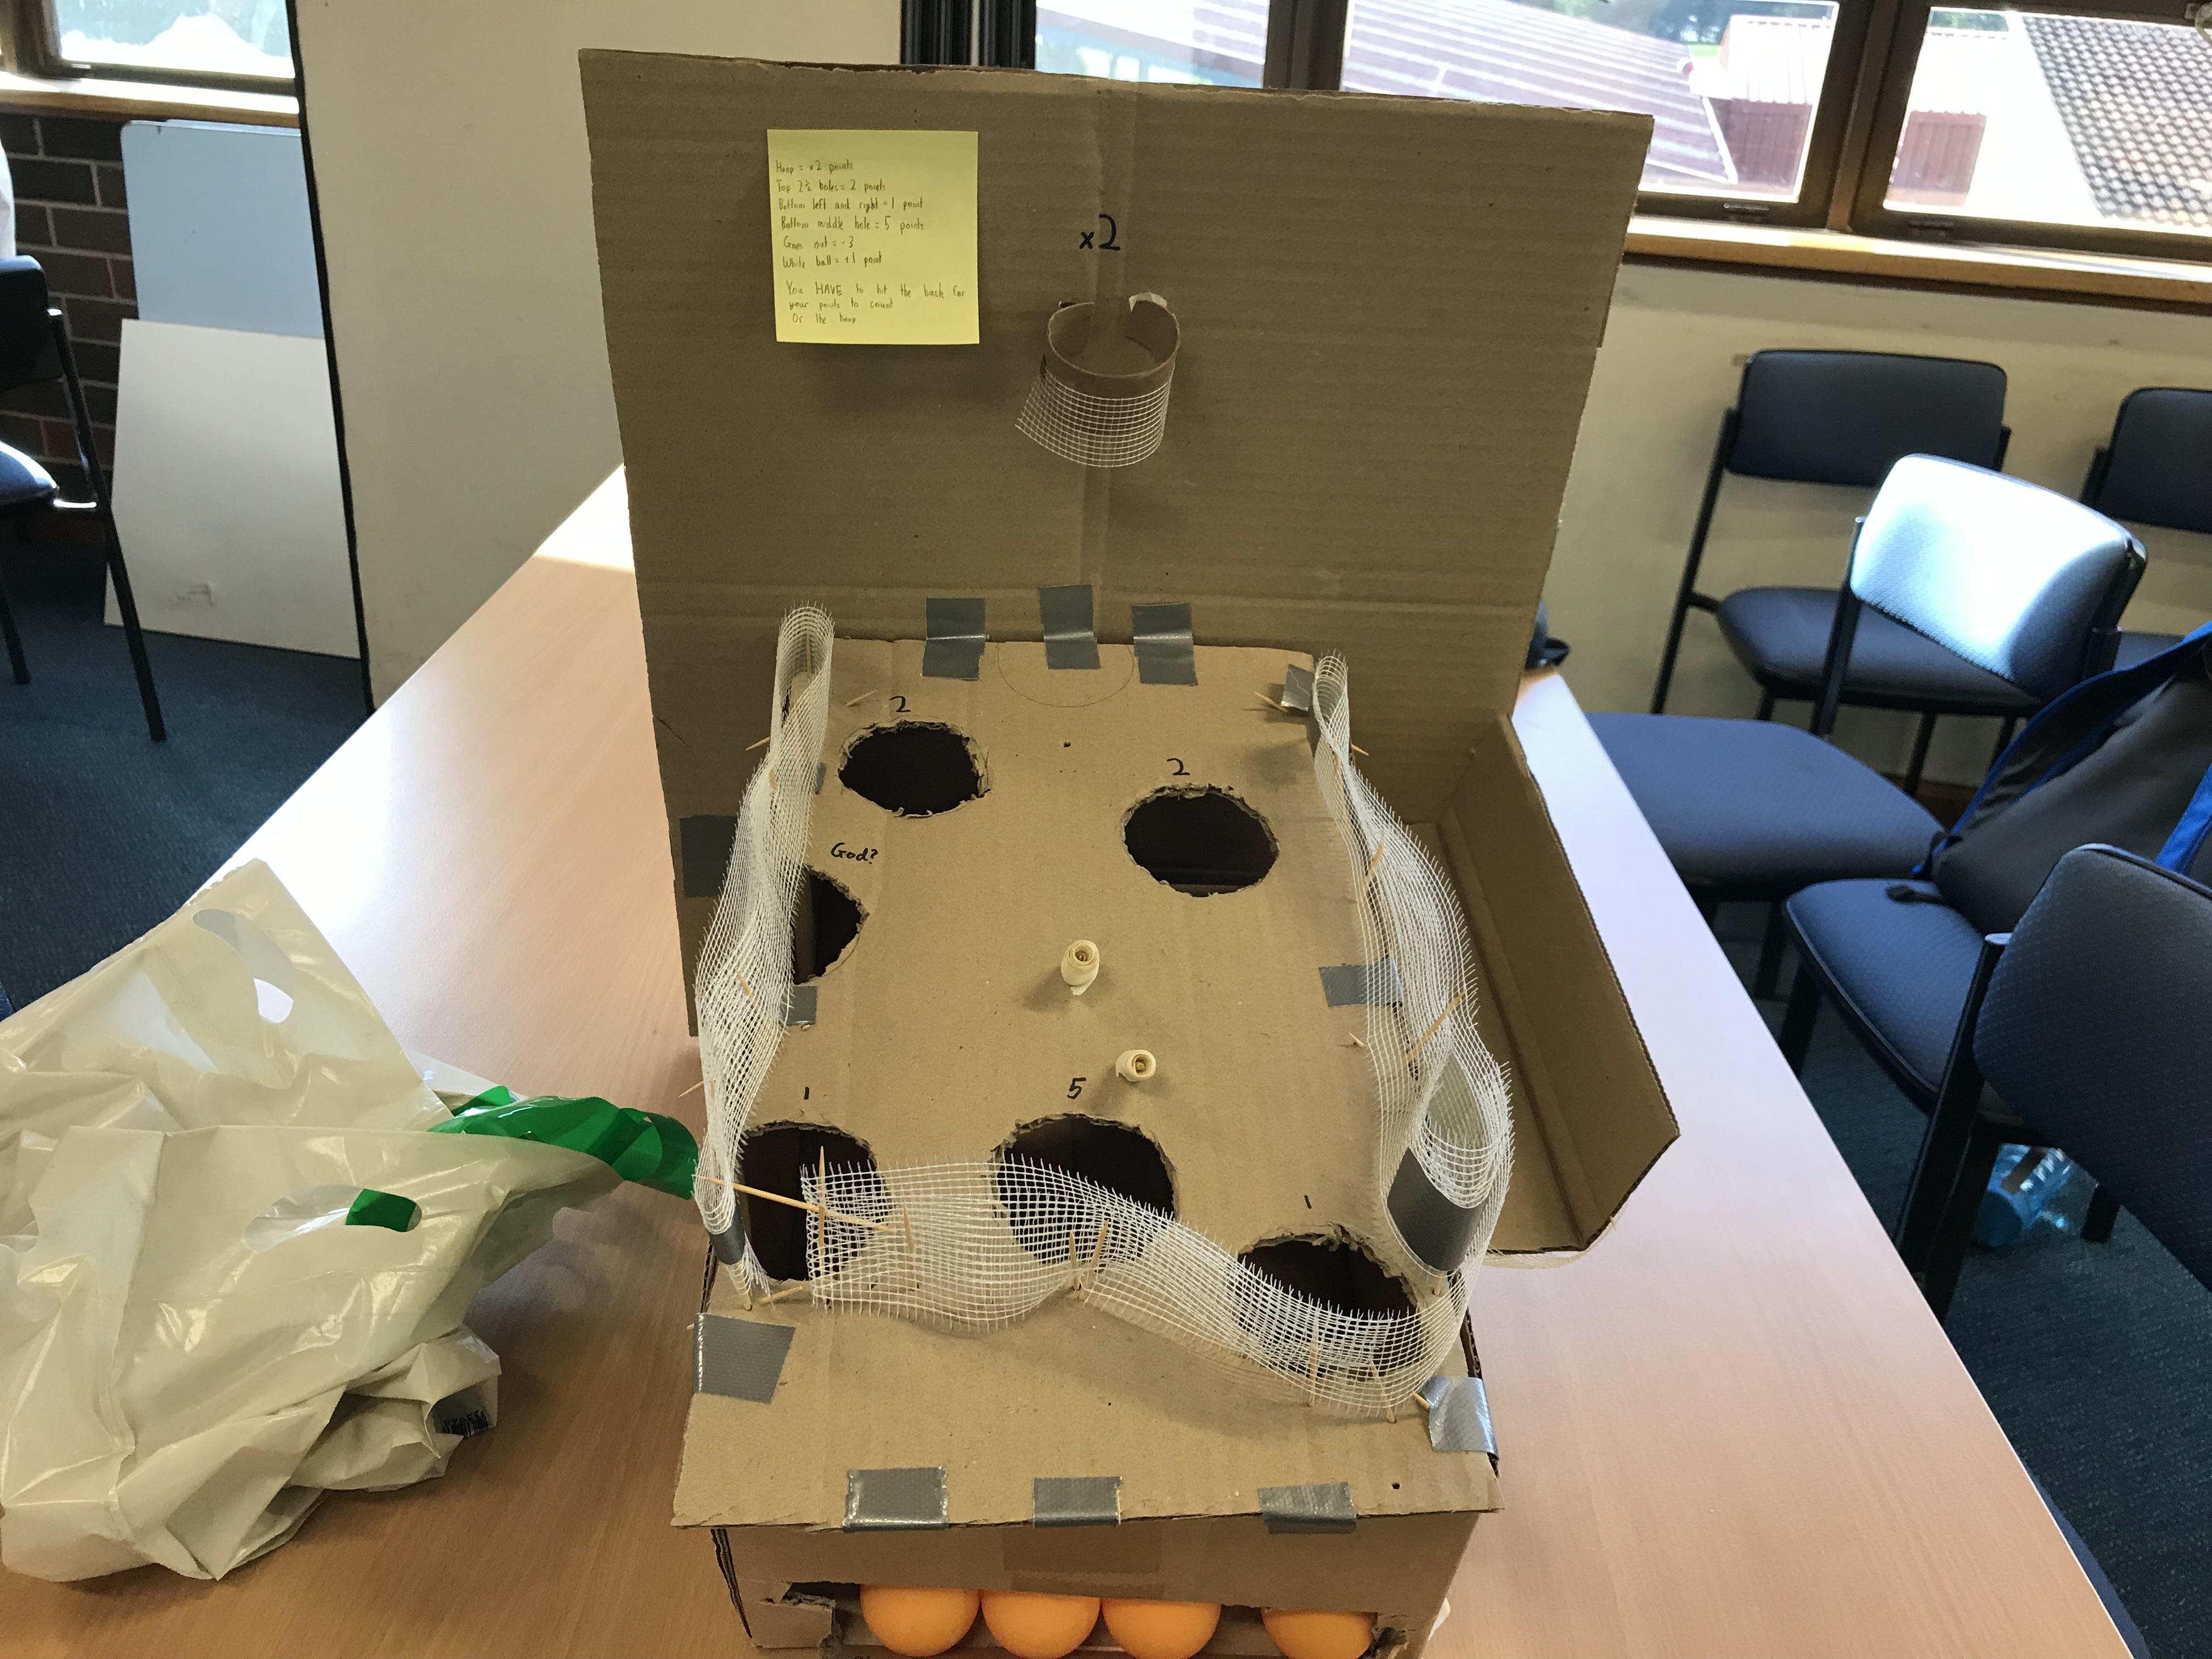
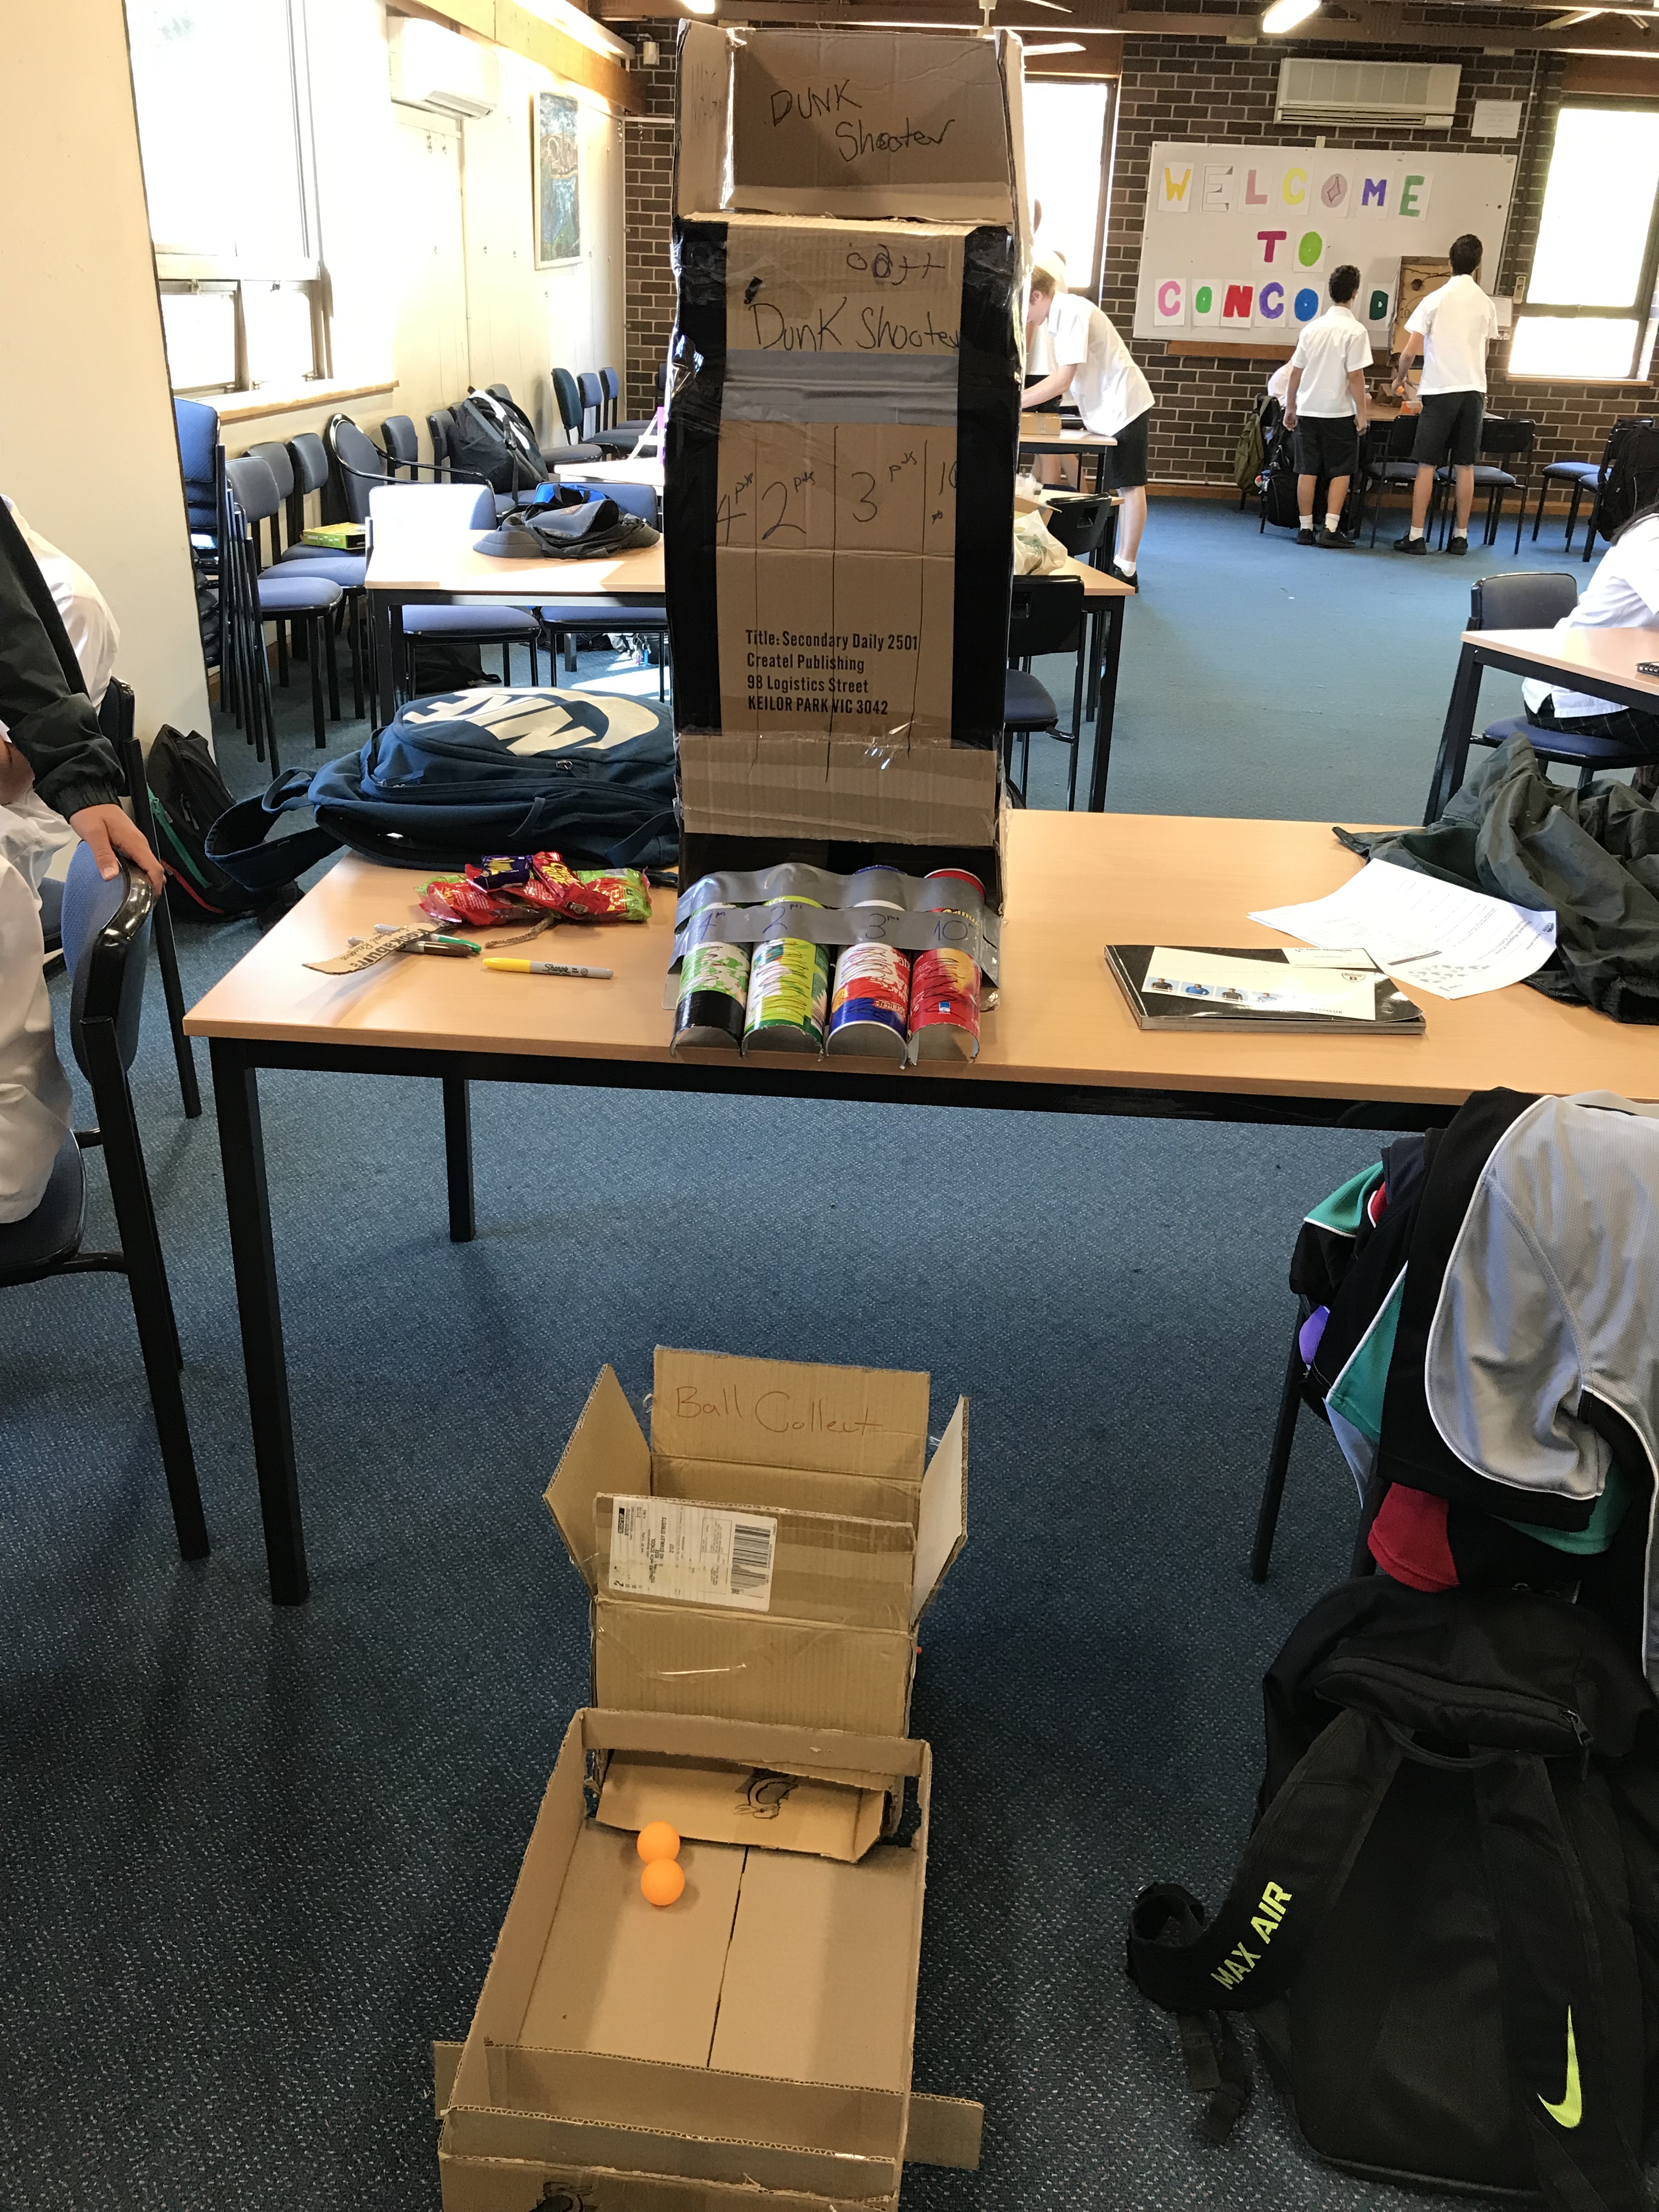
The photos below show the cardboard games the students made.

cardboard skeeball
cardboard darts
high score board made of cardboard and masking tape
cardboard pinball
cardboard skeeball
cardboard dunk shooter

So what worked well?

  • The project unpacking template that was inspired by Bianca Hewes. I found this template worked well in enabling students to engage with the project outline, identify their strengths and ask any clarifying questions. Students shared their completed templates with their team members so they can work out their group strengths and negotiate tasks based on their strengths.
  • The overall project allowed lots of differentiation and student voice. Students chose which cardboard game to create. Some students chose mechanically complex games like pinball while other students chose simpler games like skeeball. I had to guide some groups in adjusting their games throughout the project when they were not able to carry through their initial ideas. Eg. the group who wanted to make a cardboard claw machine had to adjust their game quite a few times after each prototype.
  • The ongoing prototyping and feedback as part of the design process. The project allowed students to provide feedback to each other and help each to solve problems.
  • The project presentation – We ended up presenting the project to a Year 7 group of students. While the original plan was to run the games room for the whole school, some of the cardboard games were not going to be able withstand over 1000 students playing them so we decided on one Year 7 class as this was our first project.

What would I change next time?

  • Strengthen the use of a consistent feedback protocol. For this cardboard project, I used the What Worked Well/Even Better If feedback protocol. Students gave their feedback verbally. Next time, I would have students write down their feedback so that each group can further reflect on it.
  • Strengthen the digital portfolio. I originally planned for each student to individually create a digital portfolio to record ongoing evaluations of their prototypes and how their were working as a team. This did not happen in this round of the project. We still did feedback, reflections and evaluations but it was more disjointed (done via verbal feedback and Google Doc templates) than I would’ve liked. Next time I want to test the use of a digital portfolio. I’m thinking of using SeeSaw.
  • The project presentation – Next time, I’d like to bring in an arcade games expert or someone who runs carnival games. Next time, I’d also have each student group provide a short presentation on their game and the design process they used to make each prototype before having students play the games.

Overall I am really, really proud of the effort, prototypes and end products from the Year 8s. The project gave me an opportunity to test some processes in a new elective that I can tweak for their upcoming projects, which will include pixel art, interactive posters and propeller cars.

3 things I’ve learnt from supporting teachers


This year one of my roles is to support teachers in using technology to further enhance teaching and learning for their students. I feel very privileged to have such a position because it is one of the best professional learning experiences I have; I learn so much from the teachers I support.

So here’s a summary of what I have learnt:

1. It’s not about me; it’s about them and their students

Those who know me knows that I like to try new things, especially with technology. I like to take risks with designing learning new experiences. I often go into the classroom with “this can go really well or it will blow up in my face” (Don’t worry. The usual result is option A). This doesn’t mean that other teachers have the same attitude and that’s OK. Some teachers like small steps and others like giant leaps. I have learnt that the best way to support a teacher to shift their practice is to find out what they and their students’ needs are. It’s not about how I would teach the class.

2. I do. We do. You Do.

The “I do. We do. You Do” strategy is one that many teachers use to teach students reading comprehension and writing. It’s otherwise known as “Deconstruction. Group Construction. Independent Construction”. When teachers teach students how to write or read for understanding, they would first model the process, then students do the process as a group then students do the process independently. Basically the aim is to make the teacher redundant. This is what I’ve been doing with the teachers and classes I’ve been supporting. My aim is to make my role redundant. For example, in Year 8 French, students and their teacher have been using Google Apps to enable a more efficient feedback model. My role was to teach students how to use Google Apps, teach the teacher how to use comments, editing modes and revision history to give students feedback and show students how to act on this feedback in Google Apps. Towards the last few weeks of the term, I wasn’t needed in the room. The kids knew what to do. The teacher knew what to do. In fact, the student starting using Google Apps for feedback with her other classes, without me helping her at all. The kids are now using Google Apps in their other subjects without their teachers directing them to and are showing their teachers how to use the technology. So I have made my role redundant.

3. From little things big things grow

In the beginning, I was supporting the classes with “little things” like resetting students’ computer and internet access passwords, helping them connect their devices to the school wifi, showing students how to access Google Apps, things that I considered “little” as they were basic technical steps. However, I’ve realised these “little things” are absolutely essential for many teachers and students. It enabled the teachers and students to get over hurdles that switch off a lot of them from trying new ways of teaching and learning with technology.

So I have one more term in this role of supporting teachers. I have loved every minute of it so far. While teachers have thanked me for teaching them, it is them who are teaching me new things.

A story in 2 minutes – a multimedia activity for all subjects

My principal shared this video with me today. It’s called Our Story in 2 Minutes. The video summarises the Earth’s history from the Big Bang till now in two minutes.

This inspired me to come up with some similar story-in-2-minutes activities where students can create a video using images only to represent the development of an event. It doesn’t even have to be two minutes. It can be one minute, three minutes, however long you and your students like. A video of images can be made to sequence the events in the evolution of life on Earth, the development of our current understanding of the universe, development of the cell theory, development of our understanding of genetics … the list goes on and on and it can be used in subjects other than science.

What I like about this activity is that it’s simple and yet allows students to create and engage in deep learning that extends from a subject area and even be part of a cross-KLA activity. It’s simple for both students and teachers as it involves searching and selecting images that represents certain ideas and events and then inserting the images into a video-editing program such as Windows Movie Maker or even PowerPoint. Technology tools that don’t require a high level of technical expertise from either teachers or students and are available to most students. The activity is also simple in the sense that it does not have to take long, which can be a good activity to suggest to teachers who are concerned about being pressed for time.

To create stories in 2 minutes also allow students the opportunity to learn about digital citizenship. Can students use any images pulled from the web? Do they have to search for creative commons images? How do they acknowledge the source of images? This activity is not only about the content of a subject area.

Finally creating stories in 2 minutes can be adapted into project-based learning or provide an opportunity to create a product that can be shared with a public audience beyond the classroom. Creating a story in 2 minutes require students to first understand the content, select and justify appropriate images that best represent the content and sequence them in a logical order. It allows students to apply higher order thinking skills.

I teach in Sydney, Australia so my school year is starting in about a week’s time. I will be definitely using the story-in-2-minutes concept this year.

What will you use it for?


Leading learning design with SOLO

A photo of resources for designing learning for new syllabus

I led my science faculty in using structured observed learning outcomes (SOLO) to design learning for the new NSW science syllabus over the past two days. Like all other NSW schools, we are spending this year preparing for the implementation of new syllabuses for the Australian Curriculum. As a faculty we felt that this was a great opportunity to evaluate the effectiveness of our current teaching and learning practices. We are using the new syllabus as a driver of change in teaching and learning.

We decided to use SOLO as the framework to design learning for the new syllabus. Why did we choose SOLO? One of the main reasons is that the Essential Secondary Science Assessment (ESSA) uses SOLO to assess students’ understanding. ESSA is a state-wide science assessment that is completed by all Year 8 students from NSW government schools. An analysis of the trend data shows we needed to work on moving students from being able to recall scientific information to making relationships with this information and then applying this information to real world situations. Another reason why we chose to use SOLO is because it makes learning visible to students and teachers when it is accompanied by learning intentions and success criteria. Learning intentions and success criteria help students focus on the purpose of learning activities rather than just merely completing work. They also help enhance students’ self regulation.

So the two days played out like this:

(1)    Getting everyone on the same page

We started the two days by analysing where our students currently are and where we want to move our students in their learning and achievements. Why SOLO was explored. We used a KWHLAQ table to do this.

 (2)    Drawing out main concepts from the syllabus

We decided to program a unit on human health and diseases first. We familiarised ourselves with the relevant sections of the syllabus and brainstormed all the concepts, ideas and facts that students needed to understand. Individually we wrote each concept, idea and fact onto post-it notes and stuck them on the whiteboard. As a team we sorted the post-it notes into logical categories.

 (3)    Classifying into SOLO categories

We then classified each concept, idea and fact into SOLO categories. We decided to have 3 SOLO categories:

  • Level 1 – unistructural and multistructural
  • Level 2 – relational
  • Level 3 – extended abstract

IMG_4162

 (4)    Assigning SOLO verbs

We assigned SOLO verbs for each concept, idea and fact.

Level 1
Uni/multistructural
Level 2
Relational
Level 3
Extended abstract
Describe
Identify
Name
List
Follow a simple procedure
Compare and contrast
Explain causes
Sequence
Analyse
Relate
Form an analogy
Apply
Criticise
Evaluate
Predict
Hypothesise
Reflect
Generate
Formulate
CreateJustify

 (5)    Creating learning intentions and success criteria

We created learning intentions and success criteria based on the verbs for each category.

 (6)    Teaching and learning activities

We split up into three teams to design teaching and learning activities that will allow students to meet the success criteria.

We also designed an assessment task gives students an authentic context to learn this unit.

What next?

We are still in the progress of completing the unit and I will share it once it is completed. Meanwhile some of our next steps will also include

  • using SOLO for feedback and feedforward
  • working with our school’s PDHPE faculty to see whether we can make this into a cross-curricular unit and assessment

It will be great to get some feedback on how we are going so far in using SOLO to design learning.